Scaling Up and Scaling Out in Windows Azure Web Sites
Posted on
6 min read
When you are starting on a new web project, or even just beginning to develop web sites and applications in general, you might want to start small. But you probably won’t stay that way. You might not want to expend resources on a new web farm when you are entering the proof-of-concept phase, but when things get going, you also wouldn’t launch a major marketing campaign on a server under your desk. Developing and deploying in the cloud on Windows Azure Web Sites is no different.
In this blog post, I’ll take you through the ways that you can develop, test, and go live, all while staying within budgeted time and costs.
Standard, Free, and Shared modes in Windows Azure Web Sites
One of the most important considerations when deploying your web site is choosing the right pricing tier for your site. Once you exit the development and test cycle, this will be your corporate web presence site, or an important new digital marketing campaign. or line-of-business app. So you want to make sure that your site is as available and responsive as your business needs demand, while staying comfortably within budget.
Your choice depends on a number of factors like:
- How many individual sites are you planning to host? For example, a digital marketing campaign might include a social-media page for each service you are using, and a different landing page for each target segment.
- How popular do you expect the sites to be? When should traffic levels change? You estimate might be based on numbers of employees for a line-of-business application, or the number of Twitter followers and Facebook Likes for a campaign site. You may also expect differences in traffic due to seasonaility, demand-generation activities like social media activities and ads.
- How much resources (CPU, memory, and bandwidth) will the sites consume?
One of the best things about Windows Azure Web Sites is that you do not need to be able to answer this questions at the time that you launch your web apps and web site into production. Using the scale options provided in the Management Portal you can scale your site on the fly according to user demand and your business goals.
Site Modes in Windows Azure Web Sites
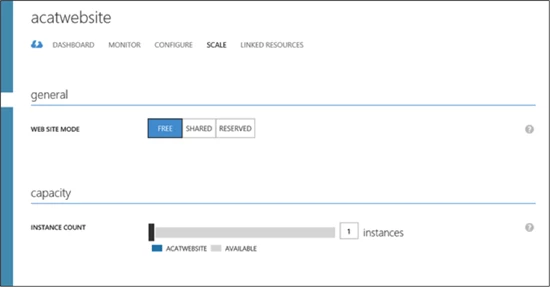
Windows Azure Web Sites (WAWS) offers 3 modes: Standard, Free, and Shared.
Each one of these modes – Standard, Shared, and Free — offers different set of quotas that control how many resources your site can consume and provides different scaling capabilities. These quotas are summarized in the chart below.

Standard mode & Service Level Agreement (SLA)
Standard mode runs on dedicated instances, making it different from the other ways to buy Windows Azure Web Sites. It also comes with no limits on the CPU usage, and the largest amount of included storage of the 3 modes. See the table above for details.
Standard also has some important capabilities worth highlighting:
- No data egress bandwidth limit – The first 5 GB of data served on the site is included, additional bandwidth is priced according to the “pay-as-you-go” rate.
- Custom DNS Names – Free mode does not allow custom DNS. Standard allows CNAME and A Records.
Standard mode carries an enterprise-grade SLA (Service Level Agreement) of 99.9% monthly, even for sites with just one instance. Windows Azure Web Sites can provide this SLA on a single instance site because of our design, which includes on the fly site provisioning functionality. Provisioning happens behind the scenes without the need to change your site, and happens transparently to any site visitor. By doing this we eliminate availability concerns as part of the scale equation.
Shared and Free modes
Simply put, Shared and Free modes do not offer the scaling flexibility of Standard, and they have some important limits.
Free mode runs on shared Compute resources with other sites in Free or Shared mode, and has an upper limit capping the amount of CPU time that that site (and the other Free sites under the subscription) can use per quota interval. Once that limit is reached, the site – and the other Free sites under the subscription – will stop serving up content/data until the next quota interval. Free mode also has a cap on the amount of data the site can serve to clients, also called “data egress”.
Shared mode, just as the name states, also uses shared Compute resources, and also has a CPU limit – albeit a higher one than Free, as noted in the table above. Shared mode also allows 5 GB data egress with “pay-as-you go” rates beyond that.
So, while neither Free nor Shared is likely to be the best choice for your production environment due to the limits above, they are useful. Free is fine for limited scenarios like trying and learning Windows Azure Web Sites, such as learning how to setup a publish config, connect to Visual Studio, or deploy with TFS, Git, or other deployment tools. Shared has additional capabilities vs. Free that make it great for development and testing out your site under limited, controlled load. For more serious production environments, Standard has way more to offer.
Scale operations, your code, and user sessions/experience
Scale operation have no impact on existing user sessions, beyond improving the user experience when the operation scales the site up, or scales the site out.
Additionally, each scale operation happens quickly – typically within seconds – and does not require changes to your site’s code, nor a redeployment of your site.
Next we’ll discuss what it means to “scale up” and to “scale out.”
Windows Azure Web Sites Scaling Dynamics
Windows Azure Web sites offers multiple ways to scale your website using the Management Portal. These operations are also available if you are managing your site via Microsoft Visual Studio 2012, as detailed in our service documentation.
Scale Up
A scale up operation is the Azure Web Sites cloud equivalent of moving your non-cloud web site to a bigger physical server. So, scale up operations are useful to consider when your site is hitting a quota, signaling that you are outgrowing your existing mode or options. In addition, scaling up can be done on virtually any site without worrying about the implications of multi-instances data consistency.
Two examples of scale up operations in Windows Azure Web Sites are:
- Changing the site mode: If you choose Standard mode, for example, your web site will have no quotas imposed on the CPU usage, and data egress will only be limited by the cost of data egress over the included 5 GB/month.
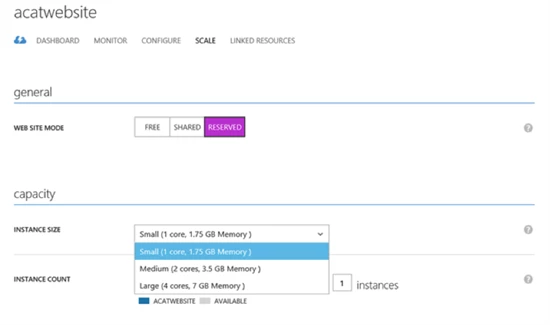
- Instance Size in Standard mode : In Standard mode, Windows Azure Web Sites allows a choice of different instance sizes, Small, Medium, and Large. This is also analogous to moving to a bigger physical server with increasing numbers of cores and amounts of memory:
- Small: 1 core, 1.75 GB memory
- Medium: 2 cores, 3.5 GB memory
- Large: 4 cores, 7 GB memory
Scale Out
A scale out operation is the equivalent of creating multiple copies of your web site and adding a load balancer to distribute the demand between them. When you scale out a web site in Windows Azure Web Sites there is no need to configure load balancing separately since this is already provided by the platform.
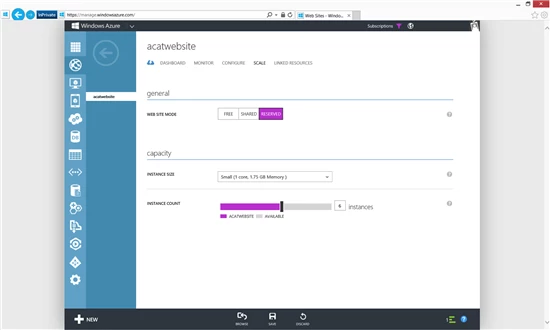
To scale out your site in Windows Azure Web Sites you would use the Instance Count slider to change the instance count between 1 and 6 in Shared mode and 1 and 10 in reserved mode. This will generate multiple running copies of your website and handle the load balancing configurations necessary to distribute incoming requests across all instances.
To benefit from scale OUT operations your site must be multi-instance safe. Writing a multi-instance safe site is beyond the scope of this posting, but please refer to MSDN resources for .NET languages, such as https://msdn.microsoft.com/en-us/library/3e8s7xdd.aspx
Scale up and scale out operations can be combined for a website to provide hybrid scaling. The same contentions about multi-instance sites would apply to this scenario.
Autoscaling and Scaling in Windows Azure PowerShell
In this blog post, I discussed the concepts involved in scaling up and scaling out in Windows Azure Web Sites, focusing on doing these tasks manually via the Management Portal; similar manual settings are also available in Visual Studio.
We have also added Autoscaling to Windows Azure Web Sites, allowing unattended changes to the scale up/scale out settings on your web site in response to demand.
In addition, the Windows Azure PowerShell allows some scaling operations as well as versatile control of your site and subscription.
Final Thoughts
Windows Azure Web Sites allows you to develop, deploy, and test a web site or web app at low, or even no cost, and seamlessly scale that site all the way up to a more production-ready configuration, and then to scale further in a cost-effective way.
I focused in this blog post on scaling up and scaling out in your web site, but, keep in mind that your site is potentially only a portion of a more complex application that uses other components such as databases, data feeds, storage, or 3rd Party Web API’s. Each one of this components will have its own scale operations and should be taken into consideration when evaluating your scaling options.
Scaling your web sites will have cost implications, of course. And an easy way to help estimate your costs and the impact a given scale operation will have on your wallet, is to use the Azure Pricing Calculator.