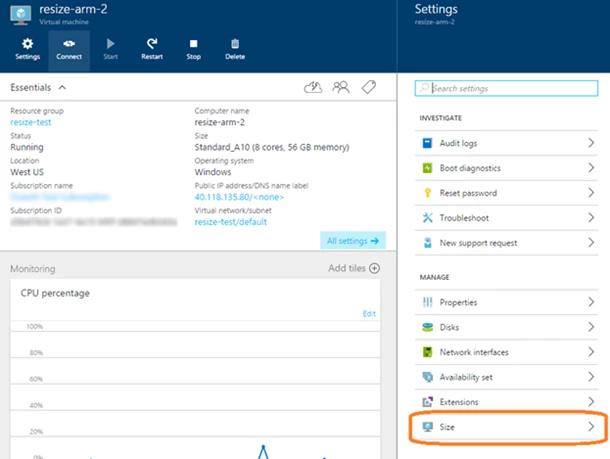
One of the great benefits of Azure VMs is the ability to change the size of your VM based on the needs for CPU, Network or disk performance. In this blog post I will outline the process of changing the size of a virtual machine using either Azure Classic Compute VMs or the newer Azure Resource Manager VMs.
When considering the ability to resize virtual machines there are three key concepts that will impact how simple it is to change the size of your VM.
- The region in which your VM is deployed. Different VM sizes require different physical hardware. In some instances, an Azure region may not contain the hardware required to support the desired VM size. All Azure regions support the VM sizes Standard_A0 – A7 and Basic_A0 – A4. You can then find which other VM sizes are supported in each region under the Services tab of the Azure Regions web page.
- The physical hardware currently hosting your VM. If the physical hardware currently running your virtual machine also supports your desired new size, then it is very easy to change the VM size through a simple size change operation which results in a VM reboot.
- The deployment model used for the VM. The two deployment models are Classic and Resource Manager. The Resource Manager model is the newer model, and it supports some ease of use functionality not available in the classic deployment model.
Move region to resize
If the VM size you desire to use is not available in your current region, then your options are to either wait for the size to become available in the region or to move the VM, and possibly other services, to a new region. This process is outside the scope of this post.
The basic steps involved in moving a VM from one region to another is described in the following blog post: Migrate Azure Virtual Machines between Storage Accounts.
Resize to size available in current hardware cluster
When a VM is running it is deployed to a physical server. The physical servers in Azure regions are grouped together in clusters of common physical hardware. A running VM can easily be resized to any VM size supported by the current cluster of hardware supporting the VM. You can determine which VM sizes are supported by the current physical hardware hosting your VM through any of the following methods.
Resize in Azure portal

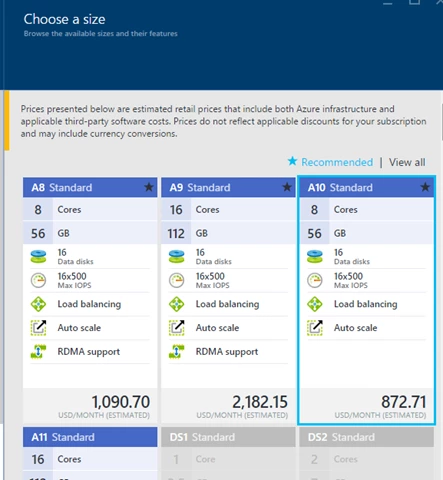
When selecting the resize action you will see the available VM sizes which the VM can be resized. In this example, the VM is using the size Standard_A10 and it can be resized to either Standard_A8, Standard_A9, Standard_A10 or Standard_A11. Other VM sizes are not available because the hardware cluster currently used for this VM does not support these other sizes.

Virtual machine size families
The VM sizes available on the physical hardware may vary. For example, some hardware clusters will support both Standard_A1 and Standard_D1 without support for Standard_D1_v2 while other hardware clusters will support all three. You can be confident that the VM sizes in the following groups are always supported in the hardware cluster if any size in the group is supported. These are sometimes referred to as VM size families.
The following VM size families currently exist within Azure:
| VM Size Family | Sizes |
|---|---|
| Entry Level |
Basic_A0 – Basic_A4 and Standard_A0 – Standard_A4 |
| High Memory Entry Level | Standard_A5 – Standard_A7 |
| High Performance Computing | Standard_A8 – Standard_A11 |
| General Purpose Production |
Standard_D1 – Standard_D14 and Standard_DS1 – Standard_DS14 |
| General Purpose Production v2 | Standard_D1_v2 – Standard_D14v2 |
| High Memory and Dense Local Storage |
Standard_G1 – Standard_G5 and Standard_GS1 – Standard_GS5 |
Resize to size not available in current hardware cluster
If the desired new VM size is supported on the current hardware cluster hosting the VM, then the resize operation is a simple reboot operation. However, if the current hardware hosting your VM does not support the requested new VM size then the operation of resizing the VM is a bit more difficult. Resizing a VM which requires the VM to be moved to different hardware clusters is different depending on which deployment model was used to deploy the VM.
Additionally, the same hardware cluster must be used to host all VMs in a cloud service (for classic deployment model) or all VMs in an availability set (for Azure Resource Manager deployment model). This means in some cases multiple VMs must be resized together. If the Resource Manager (ARM) deployment model was used then the VM(s) can be resized if the VM, and any other VMs in the same availability set, are in a stopped (deallocated) state. If a VM was deployed using the Classic (ASM) deployment model, then the cloud service deployment must be removed and redeployed to change the VMs to a size in another size family.
Resize Resource Manager (ARM) virtual machine to size not available in current hardware cluster
If your VM(s) are deployed using the Resource Manager (ARM) deployment model and you need to change to a size which requires different hardware then you can resize VMs by first stopping your VM, selecting a new VM size and then restarting the VM. If the VM you wish to resize is part of an availability set, then you must stop all VMs in the availability set before changing the size of any VM in the availability set. The reason all VMs in the availability set must be stopped before performing the resize operation to a size that requires different hardware is that all running VMs in the availability set must be using the same physical hardware cluster. Therefore, if a change of physical hardware cluster is required to change the VM size then all VMs must be first stopped and then restarted one-by-one to a different physical hardware clusters.
The move to a new physical hardware clusters may also require changing the size of other VMs in the availability set as the previous VM size may not be supported on the new physical hardware clusters. If all VMs are in the same VM Size family, then you can be assured they will all be supported on the physical hardware cluster which is used to host the VMs of the availability set.
Resize classic (ASM) virtual machine to size not available in current hardware cluster
Resizing a VM deployed using Classic (ASM) deployment model to a size that requires different hardware is more difficult if the new size is not supported by the hardware cluster where the VM is currently deployed. Unlike VMs deployed through the Azure Resource Manager deployment model it is not possible to resize the VM while the VM is in a stopped state. So for VMs using the classic deployment model the VMs must be deleted and then recreated using the same OS and data disks. To simplify this process, we have provided a PowerShell script to aid in the delete and redeployment process.
The script will perform the following actions:
- Evaluate the current deployment to ensure the requested resize operation cannot be done through a simple resize using the existing hardware cluster where they VM is deployed
- Ensure VMs using Premium Storage are getting resized to another VM size which also supports Premium Storage
- Warn if any IP addresses will be changed as part of the delete and redeployment operation
- Ensure no features not supported by the script are in use: With the initial release, the script does not support VMs with multiple NICs, deployments with reverse FQDN configured or deployments with custom DNS configuration configured
- Store all current configuration into an output file which can be used to rebuild the VM if anything were to fail during the redeployment process
- Delete the existing deployment after saving all VM configuration.
- Redeploy the VMs using the newly selected VM size.
