Azure SQL Database, Databases, How to, Hybrid + Multicloud
Handling data encoding issues while loading data to SQL Data Warehouse
Posted on
6 min read
This blog is intended to provide insight on some of the data encoding issues that you may encounter while using Polybase to load data to SQL Data Warehouse. This article also provides some options that you can use to overcome such issues and load the data successfully.
Problem
In most cases, you will be migrating data from an external system to SQL Data Warehouse or working with data that has been exported in flat file format. If the data is formatted using either the UTF-8 or UTF-16 encoding standard, you can use Polybase to load the data. However, the format of your data is dependent on the encoding options supported by the source system. Some systems do not provide support for UTF-8 or UTF-16 encoding. If the data you are working with is formatted in an alternate format, such as ISO-8859-1, then being able to convert the data to UTF-8/UTF-16 format can save valuable time and effort.
The flow of data from a source system to Azure Blob Storage and then on to Azure SQL Data Warehouse (DW) is shown in the following graphic:

Azure Blob Storage is a convenient place to store data for use by Azure services like SQL DW. PolyBase makes it easy to access the data by using T-SQL, for example creating external tables for the data on Azure Blob Storage and loading the data into internal tables of SQL Data Warehouse using a simple SELECT query.
If the volume of the data being loaded is small, then it may be easier to export the data from the source system again, this time using UTF-8/UTF-16 encoding. For larger volumes of data, however, re-export, data compression, and data load to Azure Blob Storage can take weeks. To avoid this delay, you need to be able to convert the encoding on the data files within the Azure environment without accessing the source system again.
Solution
The sections below provides details on options you have for converting source file encoding to UTF-8/UTF-16.
Important: PolyBase supports UTF16-LE. It shouldn’t matter for customers in the Windows ecosystem, but a customer may specify UTF16-BE and have their load fail.
Option 1: Notepad++
You can use the Notepad++ tool to change the encoding of a file on a local computer. Simply download the data file to a local computer, open the file in Notepad++, and then convert the file encoding to UTF-8/UTF-16.
1. To view the encoding of a source file, click the Encoding menu, as shown in the following graphic:

The source file in the example above is encoded in ANSI.
2. To convert file encoding to UTF-8, on the Encoding menu, select Convert to UTF-8.
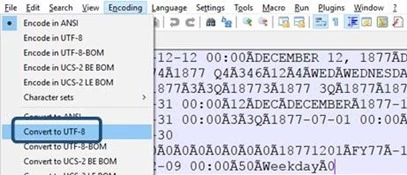
3. Save the file, use the Encoding menu to view the encoding, and confirm that the file is now encoded using UTF-8.
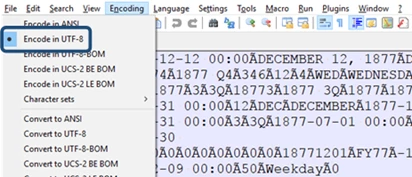
After the file is saved in UTF-8 encoding, you can use Polybase to upload it to Azure Blob Storage and load it into SQL Data Warehouse.
While this is a viable approach, there are some drawbacks, which are listed below:
- Download time
- Available space on local system
- Upload time
- Works only with small files because of memory and space constraints
Option 2: Azure VM
To overcome some of the drawbacks associated with using Notepad++, you can use an Azure VM to convert data file encoding. With this method, the entire process occurs within the Azure environment, thereby eliminating delays associated with transferring data between Azure and the local system. This process is shown in the following graphic:
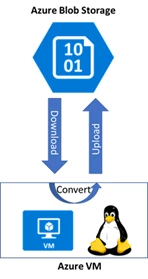
This approach has the following high-level steps:
- Setup an Azure VM (Windows or Linux)
- Download data file from Azure Blob Storage to local storage on Azure VM
- Extract data file (if applicable)
- Convert data file encoding using a utility (custom/built-in)
- Upload the converted data file from local storage on Azure VM to Azure Blob Storage
Note that this approach has its own drawbacks:
- Download time
- Available space on local system
- Upload time
Option 3: Azure File Storage
To overcome the limitations associated with download and upload time when using Azure VMs, you can use Azure File Storage, which offers cloud-based SMB file shares that you can use to quickly migrate legacy applications that rely on file shares to Azure without costly rewrites. With Azure File Storage, applications running in Azure virtual machines or cloud services can mount a file share in the cloud, just as a desktop application mounts a typical SMB share. Any number of application components can then mount and access the File Storage share simultaneously, as shown in the following graphic:
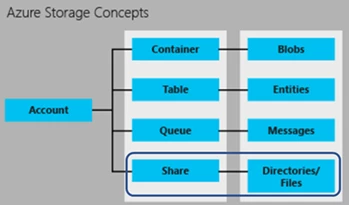
Note: Learn more about Azure Storage.
When using Azure File Storage, be aware of the capacity limits identified in the following table:

Note: A full listing of Azure Storage Scalability and Performance Targets is now available.
With this approach, you can have all the data files on Azure File Storage and have an Azure VM that can mount Azure File Storage. After having the mount, the Azure VM can directly read and write files from/to Azure File Storage without having to download to or upload from local storage on Azure VM.
This approach includes the following high-level steps:
- Setup an Azure VM (Windows or Linux)
- Mount Azure File Storage on Azure VM (see procedure below)
- Extract data file (if applicable)
- Convert data file encoding using a utility (custom/built-in)
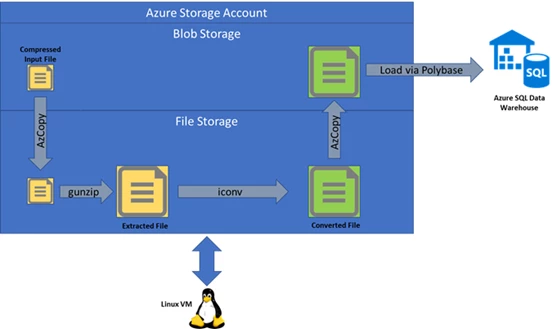
The diagram below shows the complete flow of data compression, transfer, extraction, transformation, and load via PolyBase into SQL DW:
Mounting Azure File Storage to VM
The process of mounting Azure File Storage to VM, Ubuntu Linux VM in this case, involves three high-level steps:
- Installing the required libraries/packages.
- sudo apt-get install cifs-utils
- Creating the mount point location on Azure VM to which the Azure File Storage will be mapped.
- sudo mkdir /mnt/mountpoint
- Mounting Azure File Storage location to Azure VM mount point.
- sudo mount -t cifs //myaccountname.file.core.windows.net/mysharename /mnt/mountpoint -o vers=3.0,user=myaccountname,password=StorageAccountKeyEndingIn==,dir_mode=0777,file_mode=0777,serverino
Note: Get full details on mounting Azure File Storage from a Linux VM.
Automating data encoding conversion
This section provides some details on a project that leveraged this approach to convert the encoding of a data file:
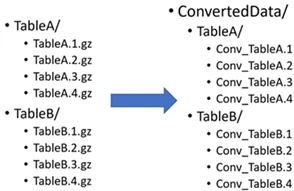
- 131 tables data exported from Netezza system
- 4 data files per source table organized under the folder name representing the source table
- All data files encoded in ANSI format (ISO-8859-1)
- All data files compressed using GZ compression
- Total compressed data files size was 750GB
- Total uncompressed converted data files size was 7.6TB
The data files were organized on Azure File Storage in the following structure:
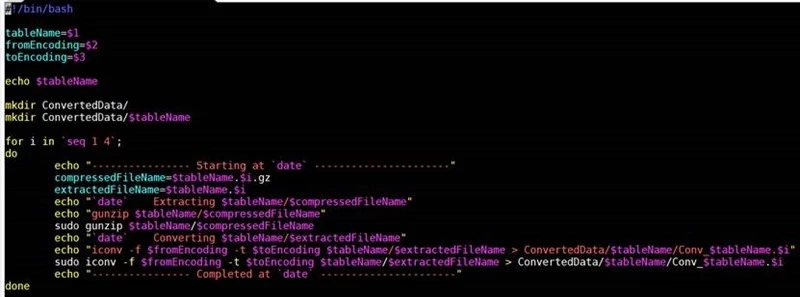
A snapshot of the bash script on Ubuntu VM that was used to convert the encoding on the data files automatically is shown in the following graphic:

This script performed the following:
- Accepted the table name as an argument
- Looped through each of the 4 data files for the given table
- For each data file
- Extracted the compressed GZ file using gunzip command
- Converted the encoding of each file using iconv command where the source file encoding is specified as ISO-8859-1 and the target file encoding is specified as UTF-8
- Wrote the converted file to a folder with the table name under ConvertedData
The script was further enhanced to loop through a list of table names and repeat the above process, rather than accepting the table name as an argument.
Convert from any encoding to any other encoding
The script can be modified to accept the from and to encoding as arguments instead of hardcoding them in the script. A full list of encodings supported by iconv command can be retrieved by running the command iconv -l on the computer you will be using to convert the data encoding. Be sure to check for any typos in the encoding format specified before running the command. A snapshot of the generic script and an example on how to invoke it is shown in the following graphic:
![]()
The above command converts the data files from UTF-8 encoding to ISO_8859-1 encoding format.
Recognition
The Data Migration Team would like to thank primary contributors Rakesh Davanum, Andy Isley, Joe Yong, Casey Karst, and Mukesh Kumar, for their efforts in preparing this blog posting. The details provided has been harvested as part of a customer engagement sponsored by the CSE DM Jumpstart Program.