
Archives
Securing your Windows Azure Web Sites (WAWS) with HTTPS and SSL
With the rapid increase in identity theft and various forms of cybercrime, security your website with Secure Socket Layer, or SSL for short has become more important and more common. If you are hosting your web site on Windows Azure Web Sites (WAWS), you might be looking into setting it to use HTTPS, and in this guide, we will see how to do so.
The first step for this seems to be getting a digital certificate…right? Well, not necessarily. The first step is actually deciding whether you want to have your own custom domain, or to run your site using Azure’s default domain of Azurewebsites.net. The reason for this being the 1st step is that Windows Azure Web Sites actually comes pre-configured to run on SSL, and if you don’t want your own domain, then you can use SSL immediately. All you have to do is simply browse to it! In your browser, change the prefix from HTTP:// to HTTPS:// and voila! Your site will respond and you will have a secure connection to it. However, we do not recommend using this to secure sensitive content or applications, because the wildcard certificate used is generic for all Azure Web Sites.
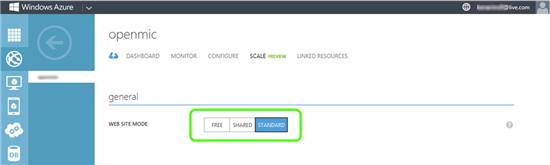
If you do want to use your own domain with SSL, setting up takes several additional steps. Before taking any action, it’s important to keep in mind that SSL with custom domains is only supported for sites on the Standard tier. If your site is current in the Free or Shared tier, you’ll have to switch to Standard, and that will incur additional costs. Please refer to our pricing guide or Azure Calculator to examine the expected costs.
Once you have chosen your domain and set your site to use it, the next step is getting a digital certificate to match your domain. When buying a certificate, you have 3 choices:
- Buying a simple certificate to match your website URL. This is the cheapest option, which could be had for as little as $8 per year at stores such as https://www.thesslshop.com
- Buying a SAN (Subject Alternative Name) certificate. These are certificates that match more than one URL under the same domain, and are an economic solution for companies with several websites. Instead of buying multiple certificates, each for a single URL, you buy one certificate that covers several, and pay less than you would have paid for the multiple certificates.
- Buying a Wildcard certificate. This is a certificate that matches any subdomain under your domain, and even though it’s the most expensive type, it’s the most financially sound option for companies who have many sites. For example, if your company has 30 websites, paying $79 for a wildcard certificate is much cheaper than paying $240 for 30 single certificates.
To actually buy a certificate, you will need to choose a provider, and go through a certain process to generate the certificate in the form of a PFX file. We have outlined this process in this article.
Once you have your certificate, enabling SSL is quite simple. Here are the steps:
Stage 1: Switch your site to Standard.
Before making the switch, you might consider removing spending limits you might have configured. While this is not a requirement, running a commercial site with spending limits is usually not done, because once your limit is reached, your site will be taken offline until the next billing cycle. The steps for switching your site to Standard are:
- Log into the Azure management portal
- Click on your web site
- Switch to the Scale tab
- Under General, click on the Standard button to switch the site to Standard.
- Click Save
Stage 2 – configure SSL
To configure SSL, you will upload your certificate and bind it to your site. The steps are:
- Log into the Azure management portal
- Click on your web site
- Switch to the Configure tab
- In the Certificate section, click Upload a certificate

- Upload your certificate PFX file and specify the password for it (you would have created one when exporting the certificate to PFX)
- Under SSL Binding, Select your custom domain from the dropdown. If you haven’t configured a custom domain yet, click here to read about doing so:

- Select the relevant certificate from the drop down (right now, you have one, but in the future, you might have more
- The 3rd drop down allows you to enable or disable SNI. Normally, you would prefer to use SNI, but if you expect your site to be visited by very old browsers (Windows XP or older), select IP Based SSL. If you examine SSL pricing, you will also see that using SNI is also financially attractive.
- Click Save
With any luck, you’re done, and your site will now respond to request sent to HTTPS.
Problems?
The most common issue you might run into is inability to upload your certificate to Azure. In a previous blog post we discussed how to obtain a certificate, and this is a good time to remind you that it has to be an exported PFX certificate, and not the file you got from your certificate provider (even if it’s a PFX file as well). The reason for this is that to assign the certificate to a website, Azure needs to have the private key that’s associated with the certificate. The certificate generation process starts off on your own computer, when it creates the private key, and that is then matched by your certificate provider. The file that the provider gives you back needs to be imported to the same computer that originally issued the request, and that makes a “complete” certificate. If you tried to upload the file given by the provider, it would not give Azure the private key, and that makes the certificate invalid.
Another variation of this is exporting the certificate to a PFX incorrectly. The export must include the private key (and that’s why you need to give a password as part of that process) and if you forgot to check that box when doing the import, it won’t work.
Another common question when using a certificate is related to browsers showing some kind of security warning when your users try to browse to the site. This happens when the browser doesn’t like the certificate, and different browsers are designed to react differently. Some would just show a warning, while others might completely block the site. The most common cause for an error is a mismatch in the URL. A certificate is issued for a specific URL, and if the actual URL is not a perfect match…that’s a potential security risk. A single misspelling could ruin your day, so that’s important to keep track of.
One more common issue for a security warning in the browser is an untrusted certificate. Certificates are typically issued and sold by commercial providers, and all modern operating systems come pre-configured with the root certificates of all major commercial providers. However, if you issued the certificate from a private certificate authority (such as a CA server owned by some private organization or your own company), it will not be trusted and would lead to errors. Using a private certificate is not supported by Azure Web Sites, so if you do want to use SSL without purchasing a certificate, you could use a self-signed one instead.
As we said above, all major commercial providers are supported by default, but occasionally, you might run into a provider that uses intermediate certificates in his trust chain. Some certificate providers have split up their certification path to 2 pieces, so instead of a root CA issuing your cert, it’s issued by a lower-level “intermediate” server, which is trusted by the providers root. In such a case, the certificate might cause the client browser to issue a warning, and this means that the publisher’s intermediate certificate will need to be uploaded with your certificate. When you export your certificate into a PFX, the entire chain should be included in it, and this option is enabled by default:

If, however, you unchecked it, or did the export in some other way that doesn’t include the certificate path, this could lead to problems with some providers. If unsure, we recommend performing the export again and making sure this option is selected.
IP and Domain Restrictions for Windows Azure Web Sites
Configuring an Azure Web Sites (WAWS) for IP and Domain Restrictions has been one of our most requested asks, and it is now finally available. IP and Domain restrictions provide an additional security option that can also be used in combination with the recently enabled dynamic IP address restriction (DIPR) feature.
Developers can use IP and Domain Restrictions to control the set of IP addresses, and address ranges, that are either allowed or denied access to their websites. With Windows Azure Web Sites developers can enable/disable the feature, as well as customize its behavior, using web.config files located in their website.
There is an overview of the IP and Domain Restrictions feature from IIS available on the IIS.Net website. A full description of individual configuration elements and attributes is available on TechNet.
The example configuration snippet below shows an ipSecurity configuration that only allows access to addresses originating from the range specified by the combination of the ipAddress and subnetMask attributes. Setting allowUnlisted to false means that only those individual addresses, or address ranges, explicitly specified by a developer will be allowed to make HTTP requests to the website. Setting the allowed attribute to true in the child add element indicates that the address and subnet together define an address range that is allowed to access the website.

If a request is made to a website from an address outside of the allowed IP address range, then an HTTP 404 not found error is returned as defined in the denyAction attribute.
One final note, just like the companion DIPR feature, Windows Azure Web Sites ensures that the client IP addresses “seen” by the IP and Domain Restrictions module are the actual IP addresses of Internet clients making HTTP requests.
Obtaining a Certificate for use with Windows Azure Web Sites (WAWS)
With the increase in cybercrime in recent years, securing your website with SSL is becoming a highly sought-after feature, and Windows Azure Web Sites provides support for it. To use it, you need to upload your certificate to Azure, and assign it to your site. Getting a certificate can be challenging, because the process involves several steps. In this guide we will describe the following ways to obtain a certificate:
- Using DigiCert’s certificate utility
- Using CertReq
- Using IIS
Background
The process of generating a certificate is comprised of two parts. First, the user creates a Certificate Signing Request, which is a textual file containing the details of the request. The user gives this file to his certificate provider of choice, and in return, gets a Certificate Response file, which he then installs on his server to complete the process and have a full certificate. To use this with your Windows Azure Web Sites, there’s a 3rd part where you export the certificate to a PFX file, which you can upload to your Azure account.
Most server products have some built in mechanism to generate the CSR files and process the Certificate Response file. In IIS, for example, this is a button on Actions pane:

If you are a seasoned IIS administrator and have a server at your disposal, this is all pretty simple and straight forward. If not, this guide offers two other ways to do this.
| Note: In all the following procedures, all 3 parts must be performed on the same computer. The reason for this is that the CSR request generates a private encryption/decryption key that is unique to this computer. If you try to complete the process on another computer, the Certificate Response would have no key to match, and will fail. |
Create a CSR using DigiCert’s Certificate Utility
DigiCert’s Certificate Utility is a 3rd party tool that was designed to make the process of generating a CSR easier by providing a simple graphic user interface for the process. This is by far the easiest way to do this, but the DigiCert Certificate Utility is not a Microsoft tool, and it is not supported by Microsoft. You can download the tool here. This tool can be used with any certificate provider. The steps are:
- Run the utility and click Create CSR on the top-right corner:

- Type in the URL for your website, and the other details.
- Select the key length. Note that Microsoft recommends a key length of 2048 bit
- Click Generate and receive the CSR code:

- Use the resulting CSR code to purchase your certificate. Most providers will ask you to paste the text into their web page, while others may require you to save it to a file and upload it to their website. In return, they will provide you with a file carrying the .CER extension. Save this file on the computer you performed the CSR request on.
- To complete the process, click Import on the top-right corner of the DigiCert utility, and navigate to the .CER file you received from your certificate provider. ***
- Once this has completed, you will see the new cert in the tool. Click on it, and click Export Certificate on the bottom of the certificate list screen:

- Select to export the private key, and to export to a PFX file, which you can use with Azure Web Sites. Set a password for the export, which you will use later when uploading it to Azure:

*** Some certificate providers might provide the certificate in a format that is not compatible with DigiCert’s utility. If the import does not succeed, you can use the utility described next to complete the process – follow step 5 in the next section to do this.
Create a CSR using the command-line tool CertReq
CertReq is a tool that is built into any modern version of the Windows operating system. It is designed to take a simple text file with some parameters, and produce a CSR file that you can send to your certificate provider. Once the provider has returned a CER file, you can use CertReq to complete the request. At that point, you can use the Windows Certificate Management console to export the certificate into the PFX format that Windows Azure Web Sites uses. Here are the steps for this:
- Create an input file for CertReq. This is a simple text file that contains some details about your certificate. The most important one is the Subject Name, which would need to match the URL of the site you intend to use the certificate for. The following sample is a standard request, but if you like, you can read the documentation of CertReq and adjust the parameters to match your needs.
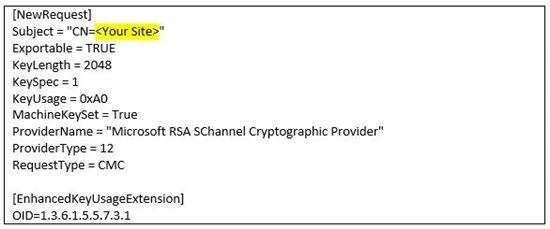
Adjust the highlighted portion to your site’s address. For example, if your site is going to be https://www.contoso.com, then the line would be:
Subject = “CN=www.contoso.com”
You can also adjust other properties of the request, but this is an advanced task. Visit this page for details about other options you can configure for CertReq.
- Save the file on your hard drive as a text file, and then open a CMD window and navigate to where you saved the file.
- Type the command CertReq –new MyRequest.txt MyRequest.csr, where MyRequest.txt is the name of the file you saved in the previous step, and MyRequest.csr is a target file name that will be created:

- Use the resulting MyRequest.csr file to purchase your certificate. Most providers will ask you to upload the file to their servers. Some providers might ask you to paste the content of the file into their web page (you can open the file in Notepad). In return, the provider will give you a file carrying the .CER extension. Copy this file to the computer you performed the CSR request on.
- In a CMD window, navigate to where you stored the .CER file, and type CertReq –accept –user MyCertificate.cer.

- Open your certificate management console by pressing the Windows+R key combination and typing certmgr.msc and then Enter

- In the certificate manager, navigate to Personal/Certificates. Your new certificate should be there:

- Right-click on the certificate and choose All Tasks/Export
- In the wizard, select YES to export the private key, and on the next page, Personal Information Exchange – PKCS #12:

- On the next page, enable the password option, and type in a password of your choice. You will use it later when uploading the certificate. On the next page, type in a target path and name for the exported file:

- That’s it – the new PFX file can be uploaded to your account in Azure and used with your websites.
Create a CSR using IIS
If you have an IIS Server at your disposal, you can use it to generate the certificate. If you don’t, you can easily install it on any computer running Windows (Server or Client). The steps are:
- Install IIS on the computer you wish to do this on.
- Open the IIS management console
- Click on your computer name on the left, then on Server Certificate in the middle, and then on Create Certificate Request on the right action pane:

- In the wizard, fill in the target URL for the site (without the HTTPS:// prefix) and the other details. Note that Microsoft recommends a key length of 2048 bit:

- Complete the wizard and use the resulting CSR file to purchase your certificate. Most providers will ask you to upload the file to their servers. Some providers might ask you to paste the content of the file into their web page (you can open the file in Notepad). In return, the provider will give you a file carrying the .CER extension. Copy this file to the computer you performed the CSR request on.
- In the IIS console, click Complete Certificate Request in the action pane.

- Follow steps 6 through 11 in the previous section to export the certificate to a PFX file, which you can use with Azure Web Sites.
Next steps
Now that you have a certificate in the form of a PFX file, you can upload it to your Azure account and use it with web sites and other services. Visit this article for further information about this process. In some situations, your certificate needs might be different. For example, if you want to use a SAN certificate, or a self-signed certificate, the process for getting those are different. You can read about those here.
Removing standard server headers on Windows Azure Web Sites
Part of the HTTP communication process that occurs between web servers and browsers are the HTTP headers that are included in the request and response. For example, the following are the headers recorded from a typical response to a web request on a typical site:
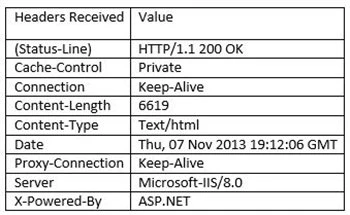
HTTP Headers are a critical part of the communication process between clients and servers. They allow the server to send information that is related to the request, but not part of the content itself. For example, the Content-Length header tells the browser how long the content that it’s about to receive is, and Cache-Control header tells the browser whether it can cache the response or not.
There are two specific headers of particular interest, because they inform the client about the type of Web server that is servicing the request and its properties. While all Web Servers emit headers of this type, many people prefer that this information is not sent out by the servers, because they prefer to maintain a certain anonymity. Our customers asked us to allow these headers to be disabled on Azure Web Sites, and so with the recent release of Windows Azure Web Sites, we have enabled this to be done.
How do I get rid of them?
The removal of these headers is facilitated with the Request Filtering module, which is part of IIS. To remove a header, you need to have a web.config file stored on your site, with the following content:
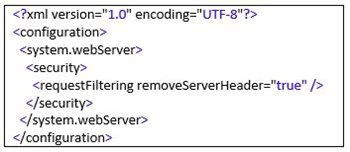
The above would remove the Server header. Other headers that many want to eliminate are the X-Powered-By and X-AspNet-Version headers. To remove these two, your web.config needs to contain the following segments. For X-Powered-By, the following would fall within the <system.webserver> set:

And for X-AspNet-Version, the following should be within <system.web>:

So, if you were to want to have them all removed, your Web.config will look like this:
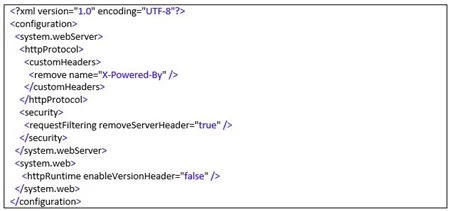
Naturally, if your site already had an existing web.config file, you would need to adjust it to contain either or both of the elements described above.
A Records, CNAME and Using DNS with Windows Azure Web Sites (WAWS)
When setting up a website, an important part of the game is having the site run on your own domain name. As you probably know, hosting your site on Windows Azure Web Sites allows this for both Shared and Standard tiers, but configuring DNS can be a bit tricky for those who aren’t seasoned network engineers, especially if your domain registrar is not very cooperative (and let’s face it…for $10 a year, you can’t really expect them to drop everything and drive over to your house, right?). Today, we’ll explore some of the key terms and mechanisms that you’ll run across when configuring DNS for your website, and see how to get it all to run smoothly. We’ll talk about things like:
- DNS zones
- DNS Servers
- DNS Entries
- CNAME records
- A-Records
- The best kind of Pizza to make time fly when waiting for DNS to update.
DNS Basics
Domain Name Resolution, or DNS for short, is a mechanism that resolves names to IP address, giving us the ability to browse to websites by entering their name, rather than trying to remember the IP address. When a website is setup, it’s assigned a numerical IP address like 65.55.58.201 or 2607:f8b0:400a:0803:0000:0000:0000:1006, but this (especially the longer number) are not especially practical as they are difficult to remember and type. DNS is a world-wide service that’s provided by several thousand servers, which spring to action when you type in an address in your browser to provide the IP of the website you want to visit. This process is called DNS Resolution.
Normally, this process is done by your browser in the background, without you being aware of it, but if you want, you can run it manually and see for yourself. To do so, open a CMD window from your start menu, and type the PING command, followed by the name of a website. If the site exists, you will see its IP address, like this:

(Note that the four replies you see aren’t necessarily returned by every site. Some block the reply as a security mechanism, but the IP that’s shown in the square brackets would always be shown for any existing website)
When you setup a website on Windows Azure Web Sites (the process can be different with different website hosting providers, but we’ll put a pin in that for now), it’s automatically given an IP address by Azure, and you’re asked to choose a name for it under the Azurewebsites.net domain:

When the wizard is completed, DNS gets “told” that the name you selected should resolve to this site’s IP, and this match gets stored in a special database called a DNS ZONE. Every domain in the world has a Zone, and the entry for your site gets stored in the Azurewebsites.net zone, which Microsoft manages.
Using the default name under the Azure zone is usually good enough for testing and development, but as you move your site into production you’ll likely want your own domain. You would start this process by buying a domain name from one of the many global DNS providers. For example, GoDaddy is one of the better known providers in North America…both for their great prices and for their awesome commercials starring Danica Patrick, Bar Refaeli and…Jessie Heiman.
When you buy a domain from a domain provider, they will create the DNS Zone for you on their servers, and since a DNS needs to resolve the domain to an IP, they will ask if you already have a website with an IP. If not, you would typically have the option of “parking” the domain, which points the domain at an IP address of some server that has nothing on it, or some generic landing page (the domain provider typically has a special server that’s designated to service the parked domains it hosts). If you already have a site, your domain provider will point the DNS Zone to its IP (which you need to provide as part of this process). The process of pointing a domain at an IP by a provider is called “Creating a DNS record”, and when this is done, the record is known as an A-Record or Host Record.
Site Dynamics
When you create your website on Azure Web Sites, your site is assigned an IP address. You can identify that IP by running the PING command against your selected hostname, per the example provided earlier in this article. If you want, you can then buy a domain, and have an A-Record created in it that points to this IP, but you’ll also have to tell Azure about your new domain. This is where things get complicated, because of the complex way websites are stored in the cloud.
The thing that’s so great about the cloud, compared to traditional web hosting is that your site is not stored on a one specific server. The cloud is a dynamic environment and therefore your IP might change and so dealing with DNS is somewhat different. In other words, even though your site has an IP and you can easily find it…you shouldn’t have your domain point to that IP. To be clear…you CAN hard code your DNS entry to point at that IP, but the IP might change, and If that happens, the Domain will point at an IP that is no longer really assigned to your server. In such a situation, when people try to visit your site, they will not be able to get to it. No fun at all! That’s where CNAME comes into the picture.
CNAME record
In a situation such as this, where a site’s IP might change at any moment, we have a somewhat different mechanism in DNS, known as Canonical Name, or CNAME for short. When a domain provider creates the DNS Zone for a customer that just bought a domain, they would usually create an A-Record, as we mentioned earlier, but they also have the option of creating a CNAME record instead. A CNAME record tells the DNS service that when the site’s Domain doesn’t point to an IP, but rather at ANOTHER URL. This is like someone coming into the grocery store to get a hypo-allergenic rubber ducky, and the clerk saying “Gee, I dunno, but ask Donny at the bar across the street…he’d know”.
Because the IP of your site in Azure can change, using a CNAME is ideal, because it adds a middleman to the DNS Resolution process that’s as dynamic as the IP. What we do is tell DNS that when someone types in your custom domain, to resolve it to your azurewebsites.net URL instead of an IP. Then, Azure’s servers resolve your azurewebsites.net URL to the IP. Here is the process, side-by-side:
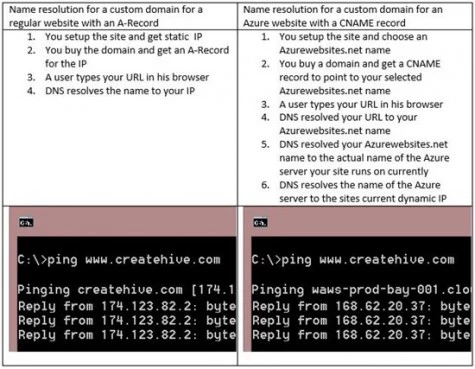
Even though the name resolution process with the cloud has more steps, it has no impact on you or your website visitors, because the process happens in the background, and instantly. The only real difference is in the way you need to have DNS configured for your domain when you purchase it.
The main challenge with setup is due to the fact that many domain providers are still coming to grips with the huge amount of people moving to use the cloud. The larger providers have already moved to create wizards or clever editing tools to allow you to make the necessary configuration changes.
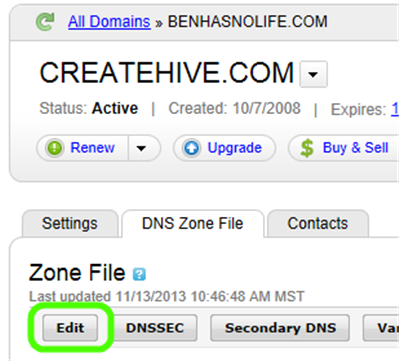
If your provider already has a self-service interface, things could be really simple. For example, GoDaddy, which we mentioned earlier, has a domain editor that’s quite easy to use. To add a CNAME for your domain, your steps would be:
- Login to your account
- Go to your domain’s page
- Switch to the DNS Zone File tab

- Click Edit:
- The Zone Editor will open in a new tab. Under the CNAME block, click Quick Add:
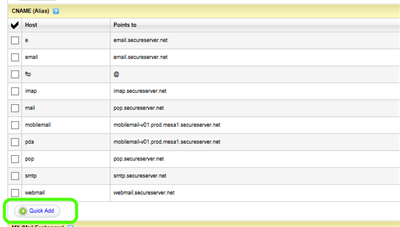
- Fill in the alias www and the name of your Azurewebsites.net URL:
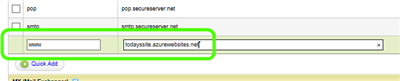
- Click Save Zone File on the right-hand top of the screen
- 1. You’re done! It would typically take the DNS about an hour to get updated, and once it does, if you use the PING command to ping your custom domain, you should be able to see it resolve to the name and IP of one of Azure’s servers.
More to explore
Usually, when people want to browse to a site, they type its URL, like www.createhive.com. However, you might have occasionally seen sites that don’t start with the WWW prefix. In fact, for most sites, you can reach the site by simply typing the domain like “createhive.com”, and still get to it. To be able to service requests like this, your domain has to have a special DNS record pointing to the “root” of the site (as in, its name without any prefix). Unfortunately, it’s not possible to have a CNAME record like that, and for this, special action must be taken. This is discussed in this article, under Configure an A record for the domain name. We will discuss this some more in a future blog post. Stay tuned!
Summary
The process described above is something you would do rarely, because most people don’t buy domains or move their sites every day. We recommend saving this guide for future reference. As we mentioned, your domain provider might have a different mechanism or procedure for setting up CNAME records, so it would be a good idea to explore it and get to know it well.
Disabling ARR’s Instance Affinity in Windows Azure Web Sites
Setting up multiple instances of a website in Windows Azure Websites is a terrific way to scale out your website, and Azure makes great use of the Application Request Routing IIS Extension to distribute your connecting users between your active instances. ARR cleverly keeps track of connecting users by giving them a special cookie (known as an affinity cookie), which allows it to know, upon subsequent requests, to which server instance they were talking to. This way, we can be sure that once a client establishes a session with a specific server instance, it will keep talking to the same server as long as his session is active. This is of particular importance for session-sensitive application (a.k.a. stateless applications), because the session-specific data won’t move from one server to another on its own. Applications can be designed to do this (typically by storing that data in some kind of shared storage like SQL), but most are not and so normally, we want to keep every user attached to his designated server. If the user moves to another server, a new session is started, and whatever session data the application was using is gone (for example, the content of a shopping cart). Here’s a brief description of this process:
- Client connects to an Azure Web Sites website
- ARR runs on the front-end Azure server and receives the request
- ARR decides to which of the available instances the request should go
- ARR forwards the request to the selected server, crafts and attaches an ARRAffinity cookie to the request
- The response comes back to the client, holding the ARRAffinity cookie.
- When the client receives the request, it stores the cookie for later use (browsers are designed to do this for cookies they receive from servers)
- When the client submits a subsequent request, it includes the cookie in it
- When ARR receives the request, it sees the cookie, and decodes it.
- The decoded cookie holds the name of the instance that was used earlier, and so ARR forwards the request to the same instance, rather than choosing one from the pool
- The same thing (steps 7-9) repeat upon every subsequent request for the same site, until the user closes the browser, at which point the cookie is cleared

However, there are situations where keeping affinity is not desired. For example, some users don’t close their browser, and remain connected for extended periods of time. When this happens, the affinity cookie remains in the browser, and this keeps the user attached to his server for a period that could last hours, days or even more (in theory, indefinitely!). Keeping your computer on and browser open is not unusual, and many people (especially on their work-place computers) do it all the time. In the real world, this leads to the distribution of users per instance falling out of balance (that’s a little like how the line behind some registers in the supermarket can get hogged by a single customer, leading to others waiting in line more than they normally should).
Depending on your applications and what they do, you may care more or less about users being tied to to their servers. In case this is of little or no importance and you’d rather disable this affinity and opt for better load balancing, we have introduced the ability for you to control it.
Because the affinity is controlled by an affinity cookie, all you have to do to disable affinity is make sure that Azure doesn’t give the cookies out. If it doesn’t, subsequent requests by the user will be treated as “new”, and instead of trying to route them to “their” server, ARR will use its normal load-balancing behavior to route the request to the best server.
This is how the affinity cookie looks:

Disabling the affinity can be done in two ways:
- In your application
- In a site configuration
To control this behavior in an application, you need to write code to send out a special HTTP header, which will tell the Application Request Router to remove the affinity cookie. This header is Arr-Disable-Session-Affinity, and if you set it to true, ARR will strip out the cookie. For example, you could add a line similar to this to your applications’ code:
headers.Add(“Arr-Disable-Session-Affinity”, “True”);
* This example is for C#, but this could just as easily be done in any other language or platform.
Setting this in the application’s code would be suitable for situations you DO want affinity to be kept for the most part, and only reset on specific application pages. If, however, you prefer to have it completely disabled, you could have ARR remove the cookie always by having IIS itself inject that header directly. This is done with a customHeaders configuration section in web.config. Simply add the following into your web.config, and upload it to the root of the site:
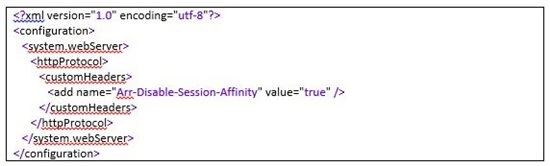
Keep in mind, though, that the configuration in web.config is sensitive, and a badly formatted file can stop the site from working properly. If you haven’t had a chance to work with web.config files before, read this getting-started guide.
Troubleshooting
If you intend on implementing this, you might wonder how to confirm its working and troubleshoot it. The ARR Affinity cookie is normally included with the 1st response from any Azure Web Sites web site, and subsequently included with any request sent from the client and response received from the server. To see it in action, you could use any of multiple HTTP troubleshooting and diagnostic tools. Here is a list of some of the more popular options:
- Fiddler
- HTTPWatc
- Network Monitor
- WireShark
- Firebug
You can find info about several other tools here. The 1st one on the list, Fiddler, is one of the most popular, because it can interact with any browser, and is available for free. Once Fiddler is installed, it will record any URL you browse to, and you can then click on the Inspector tab for either the request or response to see the details. For example, below you can see the HTTP Headers tab, which show the affinity cookie sent by the server using the Set-Cookie header:

If you add the Arr-Disable-Session-Affinity header to disable the affinity cookie, ARR will not set the cookie, but it will also remove the Arr-Disable-Session-Affinity header itself, so if your process is working correctly, you will see neither. If you see both the cookie AND the header, this means that something is wrong with the way you set the header. Possibly an error in the text of the header name or its value. If you see the cookie and not the header, this probably means your changes to Web.config are invalid, or your header-injection code is not working, and you could try to confirm it by adding another, unrelated header. Generally speaking, it’s easier to set the headers with web.config than with code, so in case of doubt, you should start by simplifying it to reduce the surface area of your investigation.
In closing, we should mention that disabling the affinity is not something that should be taken lightly. For static content, it would rarely be an issue, but if you’re running applications, and they are not designed for dealing with users jumping from one server to another, it might not end well. For scenarios where the affinity has led to imbalance, this new ability will come as great news.
Introduction to WebSockets on Windows Azure Web Sites
Azure Web Sites has recently added support for the WebSocket protocol. Both .NET developers and node.js developers can now enable and use WebSockets in their applications.
There is a new option on a web site’s Configuration tab to enable WebSockets support for an application.

Once WebSockets has been enabled for a website, ASP.NET (v4.5 and above) and node.js developers can use libraries and APIs from their respective frameworks to work with WebSockets.
ASP.NET SignalR Chat Example
SignalR is an open source .NET library for building real-time web apps that require live HTTP connections for transferring data. There is an excellent site with introductory articles and details on the SignalR library.
Since SignalR natively supports WebSockets as a protocol, SignalR is a great choice for running connected web apps on Windows Azure Web Sites. As an example, you can run this sample chat application on Windows Azure Web Sites.
The screen shot below shows the structure of the SignalR chat sample:

After creating a web application in Windows Azure Web Sites, enabling WebSockets for the application, and uploading the SignalR chat sample, you can run your very own mini-chat room on Windows Azure Web Sites!
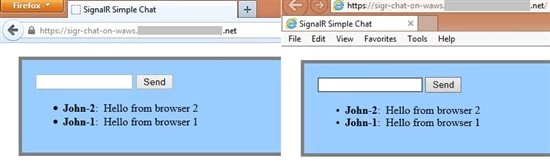
The raw HTTP trace (shown below) from Fiddler shows how the WebSockets protocol upgrade request that is sent by the client-side portion of SignalR negotiates a WebSockets connection with the web server:
Request snippet: GET https://sigr-chat-on-waws.xxxx.net/signalr/connect?transport=webSockets snip HTTP/1.1 Origin: https://sigr-chat-on-waws.xxxx.net Sec-WebSocket-Key: hv2icF/iR1gvF3h+WKBZIw== Connection: Upgrade Upgrade: Websocket Sec-WebSocket-Version: 13 … Response snippet: HTTP/1.1 101 Switching Protocols Upgrade: Websocket Server: Microsoft-IIS/8.0 X-Content-Type-Options: nosniff X-Powered-By: ASP.NET Sec-WebSocket-Accept: Zb4I6w0esmTDHM2nSpndA+noIvc= Connection: Upgrade …
To learn more about building real-time web applications with SignalR, there is an extensive tutorial available on the SignalR overview website.
ASP.NET Echo Example
ASP.NET has supported WebSockets since .NET Framework v4.5. Developers will usually want to use higher level libraries like SignalR to abstract away the low-level details of managing WebSockets connections. However for the adventurous developer, this section shows a brief example of using the low-level WebSockets support in ASP.NET.
The ASP.NET Echo example project consists of a server-side .ashx handler that listens and responds on a WebSocket, and a simple HTML page that establishes the WebSocket connection and sends text down to the server.
The .ashx handler listens for WebSockets connection requests:
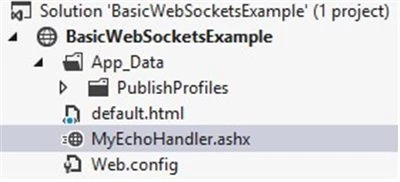
The .ashx handler listens for WebSockets connection requests:
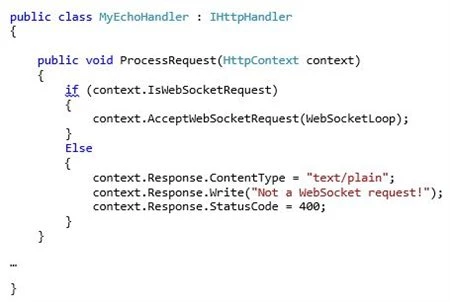
Once a WebSocket connection is established, the handler echoes text back to the browser:

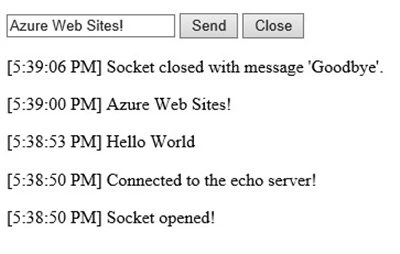
The corresponding HTML page establishes a WebSocket connection when the page loads. Whenever a browser user sends text down the WebSocket connection, ASP.NET will echo it back.

The screenshot below shows a browser session with text being echo’d and then the WebSockets connection being closed.
Node.js Basic Chat Example
Node.js developers are familiar with using the socket.io library to author web pages with long-running HTTP connections. Socket.io supports WebSockets (among other options) as a network protocol, and can be configured to use WebSockets as a transport when it is available.
A Node.js application should include the socket.io module and then configure the socket in code:

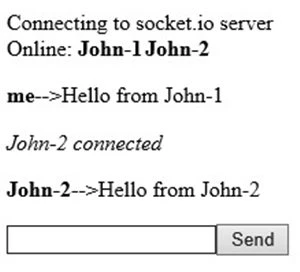
The sample code shown below listens for clients to connect with a nickname (e.g. chat handle), and broadcasts chat messages to all clients that are currently connected.

The following small tweak is needed in web.config for node.js applications using WebSockets:

This web.config entry turns off the IIS WebSockets support module (iiswsock.dll) since it isn’t needed by node.js. Nodej.js on IIS includes its own low-level implementation of WebSockets, which is why the IIS support module needs to be explicitly turned off.
Remember though that the WebSockets feature still needs to be enabled for your website using the Configuration portal tab in the UI shown earlier in this post!
After two clients have connected and traded messages using the sample node.js application, this is what the HTML output looks like:
The raw HTTP trace (shown below) from Fiddler shows the WebSockets protocol upgrade request that is sent by the client-side portion of socket.io to negotiate a WebSockets connection with the web server:
Request snippet: GET https://abc123.azurewebsites.net/socket.io/1/websocket/11757107011524818642 HTTP/1.1 Origin: https://abc123.azurewebsites.net Sec-WebSocket-Key: rncnx5pFjLGDxytcDkRgZg== Connection: Upgrade Upgrade: Websocket Sec-WebSocket-Version: 13 … Response snippet: HTTP/1.1 101 Switching Protocols Upgrade: Websocket Server: Microsoft-IIS/8.0 X-Powered-By: ASP.NET Sec-WebSocket-Accept: jIxAr5XJsk8rxjUZkadPWL9ztWE= Connection: Upgrade …
WebSockets Connection Limits
Currently Azure Web Sites has implemented throttles on the number of concurrent WebSockets connections supported per running website instance. The number of supported WebSockets connections per website instance for each scale mode is shown below:
- Free: (5) concurrent connections per website instance
- Shared: (35) concurrent connections per website instance
- Basic: (350) concurrent connections per website instance
- Standard: no limit
If your application attempts to open more WebSocket connections than the allowable limit, Windows Azure Web Sites will return a 503 HTTP error status code.
Note: the terminology “website instance” means the following – if your website is scaled to run on (2) instances, that counts as (2) running website instances.
You Might Need to use SSL for WebSockets!
There is one quirk developers should keep in mind when working with WebSockets. Because the WebSockets protocol relies on certain less used HTTP headers, especially the Upgrade header, it is not uncommon for intermediate network devices such as web proxies to strip these headers out. The end result is usually a frustrated developer wondering why their WebSockets application either doesn’t work, or doesn’t select WebSockets and instead falls back to less efficient alternatives.
The trick to working around this problem is to establish the WebSockets connection over SSL. The two steps to accomplish this are:
- Use the wss:// protocol identifier for your WebSockets endpoints. For example instead of connecting to ws://mytestapp.azurewebsites.net (WebSockets over HTTP), instead connect to wss://mytestapp.azurewebsites.net (WebSockets over HTTPS).
- (optional) Run the containing page over SSL as well. This isn’t always required, but depending on what client-side frameworks you use, the “SSL-ness” of the WebSockets connection might be derived from the SSL setting in effect for the containing HTML page.
Windows Azure Web Sites supports SSL even on free sites by using a default SSL certificate for *.azurewebsites.net. As a result you don’t need to configure your own SSL certificate to use the workaround. For WebSockets endpoints under azurewebsites.net you can just switch to using SSL and the *.azurewebsites.net wildcard SSL certificate will automatically be used.
You also have the ability to register custom domains for your website, and then configure either SNI or IP-based SSL certificates for your site. More details on configuring custom domains and SSL certificates with Windows Azure Web Sites is available on the Windows Azure documentation website.
Windows Azure Web Sites: How Application Strings and Connection Strings Work
Windows Azure Web Sites has a handy capability whereby developers can store key-value string pairs in Azure as part of the configuration information associated with a website. At runtime, Windows Azure Web Sites automatically retrieves these values for you and makes them available to code running in your website. Developers can store plain vanilla key-value pairs as well as key-value pairs that will be used as connection strings.
Since the key-value pairs are stored behind the scenes in the Windows Azure Web Sites configuration store, the key-value pairs don’t need to be stored in the file content of your web application. From a security perspective that is a nice side benefit since sensitive information such as Sql connection strings with passwords never show up as cleartext in a web.config or php.ini file.
You can enter key-value pairs from “Configure” tab for your website in the Azure portal. The screenshot below shows the two places on this tab where you can enter keys and associated values:
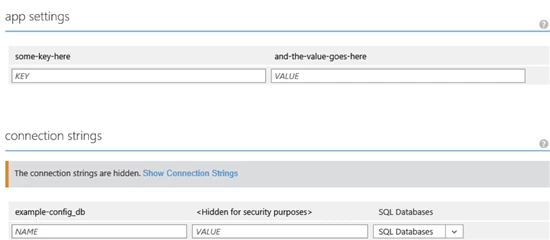
You can enter key-value pairs as either “app settings” or “connection strings”. The only difference is that a connection string includes a little extra metadata telling Windows Azure Web Sites that the string value is a database connection string. That can be useful for downstream code running in a website to special case some behavior for connection strings.
Retrieving Key-Value Pairs as Environment Variables
Once a developer has entered key-value pairs for their website, the data can be retrieved at runtime by code running inside of a website.
The most generic way that Windows Azure Web Sites provides these values to a running website is through environment variables. For example, using the data shown in the earlier screenshot, the following is a code snippet from ASP.NET that dumps out the data using environment variables:

Here is what the example page output looks from the previous code snippet:

[Note: The interesting parts of the Sql connection string are intentionally blanked out in this post with asterisks. However, at runtime rest assured you will retrieve the full connection string including server name, database name, user name, and password.]
Since the key-value pairs for both “app settings” and “connection strings” are stored in environment variables, developers can easily retrieve these values from any of the web application frameworks supported in Windows Azure Web Sites. For example, the following is a code snippet showing how to retrieve the same settings using php:

From the previous examples you will have noticed a naming pattern for referencing the individual keys. For “app settings” the name of the corresponding environment variable is prepended with “APPSETTING_”.
For “connection strings”, there is a naming convention used to prepend the environment variable depending on the type of database you selected in the databases dropdown. The sample code is using “SQLAZURECONNSTR_” since the connection string that was configured had “Sql Databases” selected in the dropdown.
The full list of database connection string types and the prepended string used for naming environment variables is shown below:
If you select “Sql Databases”, the prepended string is “SQLAZURECONNSTR_”
If you select “SQL Server” the prepended string is “SQLCONNSTR_”
If you select “MySQL” the prepended string is “MYSQLCONNSTR_”
If you select “Custom” the prepended string is “CUSTOMCONNSTR_”
Retrieving Key-Value Pairs in ASP.NET
So far we have shown how the key-value pairs entered in the portal flow through to a web application via environment variables. For ASP.NET web applications, there is some extra runtime magic that is available as well when using the .NET 4.5 framework (note: this magic is not available if you choose .NET 3.5 since it relies on functionality that only exists in .NET 4.5). If looking at the names of the different key-value types seems familiar to a .NET developer that is intentional. “App settings” neatly map to the .NET Framework’s appSettings configuration. Similarly “connection strings” correspond to the .NET Framework’s connectionStrings collection.
Here is another ASP.NET code snippet showing how an app setting can be referenced using System.Configuration types:

Notice how the value entered into the portal earlier just automatically appears as part of the AppSettings collection. If the application setting(s) happen to already exist in your web.config file, Windows Azure Web Sites will automatically override them at runtime using the values associated with your website.
Connection strings work in a similar fashion, with a small additional requirement. Remember from earlier that there is a connection string called “example-config_db” that has been associated with the website. If the website’s web.config file references the same connection string in the <connectionStrings /> configuration section, then Windows Azure Web Sites will automatically update the connection string at runtime using the value shown in the portal.
However, if Windows Azure Web Sites cannot find a connection string with a matching name from the web.config, then the connection string entered in the portal will only be available as an environment variable (as shown earlier).
As an example, assume a web.config entry like the following:

A website can reference this connection string in an environment-agnostic fashion with the following code snippet:

When this code runs on a developer’s local machine, the value returned will be the one from the web.config file. However when this code runs in Windows Azure Web Sites, the value returned will instead be overridden with the value entered in the portal:
This is a really useful feature since it neatly solves the age-old developer problem of ensuring the correct connection string information is used by an application regardless of where the application is deployed.
Configuring Key-Value Pairs from the Command-line
As an alternative to maintaining app settings and connection strings in the portal, developers can also use either the PowerShell cmdlets or the cross-platform command line tools to retrieve and modify both types of key-value pairs.
For example, the following PowerShell commands define a hashtable of multiple app settings, and then stores them in Azure using the Set-AzureWebsite cmdlet, associating them with a website called “example-config”.

Running the following code snippet in ASP.NET shows that the value for the original app setting (“some-key-here”) has been updated, and a second key-value pair (“some-other-key”) has also been added.

Sample HTML output showing the changes taking effect:
some-other-key <–> a-different-value
some-key-here <–> changed-this-value
Updating connection strings works in a similar fashion, though the syntax is slightly different since internally the PowerShell cmdlets handle connection strings as a List<T> of ConnStringInfo objects (Microsoft.WindowsAzure.Management.Utilities.Websites.Services.WebEntities.ConnStringInfo to be precise).
The following PowerShell commands show how to define a new connection string, add it to the list of connection strings associated with the website, and then store all of the connection strings back in Azure.
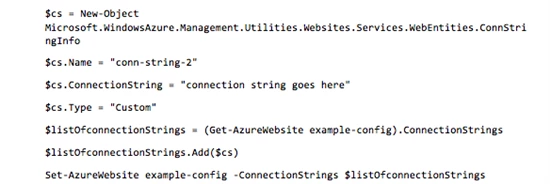
Note that for the property $cs.Type, you can use any of the following strings to define the type: “Custom”, “SQLAzure”, “SQLServer”, and “MySql”.
Running the following code snippet in ASP.NET lists out all of the connection strings for the website.

Remember though that for Windows Azure Web Sites to override a connection string and materialize it in the .NET Framework’s connection string configuration collection, the connection string must already be defined in the web.config. For this example website, the web.config has been updated as shown below:
Now when the ASP.NET page is run, it shows that both connection string values have been over-ridden using the values stored via PowerShell (sensitive parts of the first connection string are intentionally blanked out with asterisks):

Summary
You have seen in this post how to easily associate simple key-value pairs of configuration data with your website, and retrieve them at runtime as environment variables. With this functionality web developers can safely and securely store configuration data without having this data show up as clear-text in a website configuration file. And if you happen to be using ASP.NET, there is a little extra configuration “magic” that also automatically materializes the values as values in the .NET AppSettings and ConnectionStrings configuration collections.
Enjoy!
Scaling Up and Scaling Out in Windows Azure Web Sites
When you are starting on a new web project, or even just beginning to develop web sites and applications in general, you might want to start small. But you probably won’t stay that way. You might not want to expend resources on a new web farm when you are entering the proof-of-concept phase, but when things get going, you also wouldn’t launch a major marketing campaign on a server under your desk. Developing and deploying in the cloud on Windows Azure Web Sites is no different.
In this blog post, I’ll take you through the ways that you can develop, test, and go live, all while staying within budgeted time and costs.
Standard, Free, and Shared modes in Windows Azure Web Sites
One of the most important considerations when deploying your web site is choosing the right pricing tier for your site. Once you exit the development and test cycle, this will be your corporate web presence site, or an important new digital marketing campaign. or line-of-business app. So you want to make sure that your site is as available and responsive as your business needs demand, while staying comfortably within budget.
Your choice depends on a number of factors like:
- How many individual sites are you planning to host? For example, a digital marketing campaign might include a social-media page for each service you are using, and a different landing page for each target segment.
- How popular do you expect the sites to be? When should traffic levels change? You estimate might be based on numbers of employees for a line-of-business application, or the number of Twitter followers and Facebook Likes for a campaign site. You may also expect differences in traffic due to seasonaility, demand-generation activities like social media activities and ads.
- How much resources (CPU, memory, and bandwidth) will the sites consume?
One of the best things about Windows Azure Web Sites is that you do not need to be able to answer this questions at the time that you launch your web apps and web site into production. Using the scale options provided in the Management Portal you can scale your site on the fly according to user demand and your business goals.
Site Modes in Windows Azure Web Sites
Windows Azure Web Sites (WAWS) offers 3 modes: Standard, Free, and Shared.
Each one of these modes – Standard, Shared, and Free — offers different set of quotas that control how many resources your site can consume and provides different scaling capabilities. These quotas are summarized in the chart below.

Standard mode & Service Level Agreement (SLA)
Standard mode runs on dedicated instances, making it different from the other ways to buy Windows Azure Web Sites. It also comes with no limits on the CPU usage, and the largest amount of included storage of the 3 modes. See the table above for details.
Standard also has some important capabilities worth highlighting:
- No data egress bandwidth limit – The first 5 GB of data served on the site is included, additional bandwidth is priced according to the “pay-as-you-go” rate.
- Custom DNS Names – Free mode does not allow custom DNS. Standard allows CNAME and A Records.
Standard mode carries an enterprise-grade SLA (Service Level Agreement) of 99.9% monthly, even for sites with just one instance. Windows Azure Web Sites can provide this SLA on a single instance site because of our design, which includes on the fly site provisioning functionality. Provisioning happens behind the scenes without the need to change your site, and happens transparently to any site visitor. By doing this we eliminate availability concerns as part of the scale equation.
Shared and Free modes
Simply put, Shared and Free modes do not offer the scaling flexibility of Standard, and they have some important limits.
Free mode runs on shared Compute resources with other sites in Free or Shared mode, and has an upper limit capping the amount of CPU time that that site (and the other Free sites under the subscription) can use per quota interval. Once that limit is reached, the site – and the other Free sites under the subscription – will stop serving up content/data until the next quota interval. Free mode also has a cap on the amount of data the site can serve to clients, also called “data egress”.
Shared mode, just as the name states, also uses shared Compute resources, and also has a CPU limit – albeit a higher one than Free, as noted in the table above. Shared mode also allows 5 GB data egress with “pay-as-you go” rates beyond that.
So, while neither Free nor Shared is likely to be the best choice for your production environment due to the limits above, they are useful. Free is fine for limited scenarios like trying and learning Windows Azure Web Sites, such as learning how to setup a publish config, connect to Visual Studio, or deploy with TFS, Git, or other deployment tools. Shared has additional capabilities vs. Free that make it great for development and testing out your site under limited, controlled load. For more serious production environments, Standard has way more to offer.
Scale operations, your code, and user sessions/experience
Scale operation have no impact on existing user sessions, beyond improving the user experience when the operation scales the site up, or scales the site out.
Additionally, each scale operation happens quickly – typically within seconds – and does not require changes to your site’s code, nor a redeployment of your site.
Next we’ll discuss what it means to “scale up” and to “scale out.”
Windows Azure Web Sites Scaling Dynamics
Windows Azure Web sites offers multiple ways to scale your website using the Management Portal. These operations are also available if you are managing your site via Microsoft Visual Studio 2012, as detailed in our service documentation.
Scale Up
A scale up operation is the Azure Web Sites cloud equivalent of moving your non-cloud web site to a bigger physical server. So, scale up operations are useful to consider when your site is hitting a quota, signaling that you are outgrowing your existing mode or options. In addition, scaling up can be done on virtually any site without worrying about the implications of multi-instances data consistency.
Two examples of scale up operations in Windows Azure Web Sites are:
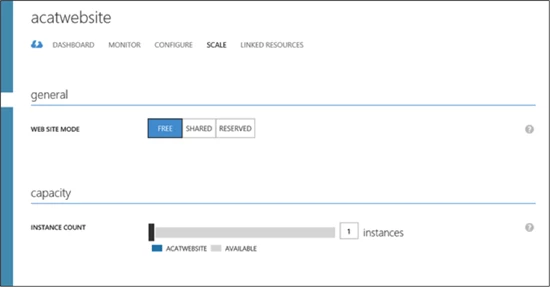
- Changing the site mode: If you choose Standard mode, for example, your web site will have no quotas imposed on the CPU usage, and data egress will only be limited by the cost of data egress over the included 5 GB/month.
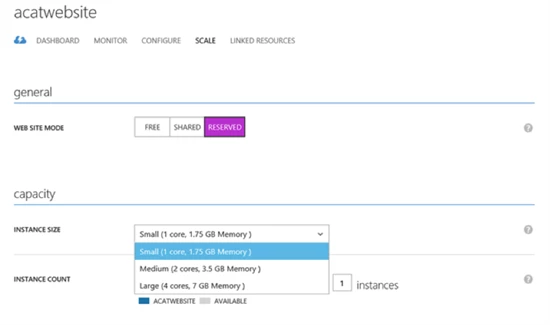
- Instance Size in Standard mode : In Standard mode, Windows Azure Web Sites allows a choice of different instance sizes, Small, Medium, and Large. This is also analogous to moving to a bigger physical server with increasing numbers of cores and amounts of memory:
- Small: 1 core, 1.75 GB memory
- Medium: 2 cores, 3.5 GB memory
- Large: 4 cores, 7 GB memory
Scale Out
A scale out operation is the equivalent of creating multiple copies of your web site and adding a load balancer to distribute the demand between them. When you scale out a web site in Windows Azure Web Sites there is no need to configure load balancing separately since this is already provided by the platform.
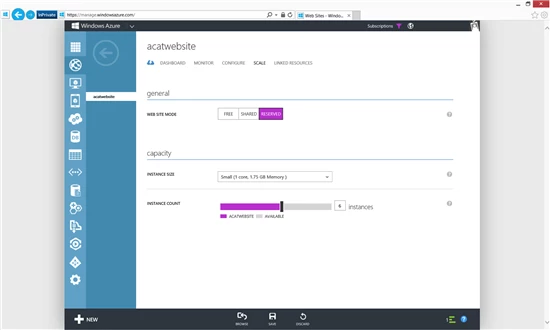
To scale out your site in Windows Azure Web Sites you would use the Instance Count slider to change the instance count between 1 and 6 in Shared mode and 1 and 10 in reserved mode. This will generate multiple running copies of your website and handle the load balancing configurations necessary to distribute incoming requests across all instances.
To benefit from scale OUT operations your site must be multi-instance safe. Writing a multi-instance safe site is beyond the scope of this posting, but please refer to MSDN resources for .NET languages, such as https://msdn.microsoft.com/en-us/library/3e8s7xdd.aspx
Scale up and scale out operations can be combined for a website to provide hybrid scaling. The same contentions about multi-instance sites would apply to this scenario.
Autoscaling and Scaling in Windows Azure PowerShell
In this blog post, I discussed the concepts involved in scaling up and scaling out in Windows Azure Web Sites, focusing on doing these tasks manually via the Management Portal; similar manual settings are also available in Visual Studio.
We have also added Autoscaling to Windows Azure Web Sites, allowing unattended changes to the scale up/scale out settings on your web site in response to demand.
In addition, the Windows Azure PowerShell allows some scaling operations as well as versatile control of your site and subscription.
Final Thoughts
Windows Azure Web Sites allows you to develop, deploy, and test a web site or web app at low, or even no cost, and seamlessly scale that site all the way up to a more production-ready configuration, and then to scale further in a cost-effective way.
I focused in this blog post on scaling up and scaling out in your web site, but, keep in mind that your site is potentially only a portion of a more complex application that uses other components such as databases, data feeds, storage, or 3rd Party Web API’s. Each one of this components will have its own scale operations and should be taken into consideration when evaluating your scaling options.
Scaling your web sites will have cost implications, of course. And an easy way to help estimate your costs and the impact a given scale operation will have on your wallet, is to use the Azure Pricing Calculator.
Alerting and Notifications Support for Windows Azure Applications
Editor’s Note: This post comes from the Windows Azure Monitoring Team.
Today we are excited to announce the ability to configure threshold based alerts on monitoring metrics within the Azure. This feature will be available for compute services (cloud services, VM, websites and mobiles services). Alert provide you the ability to get notified of active or impending issues within your application. With this feature you will be able to create alert rules on monitoring metrics. An alert is created when the condition defined in the rule is violated. When you create an alert rule, you can select options to send an email notification to the service administrator and co-administrators email addresses, and one additional administrator email address.
You can define alert rules for:
- Virtual machine monitoring metrics that are collected from the host operating system (CPU percentage, network in/out, disk read bytes/sec and disk write bytes/sec) and on metrics from monitoring web endpoint urls (response time and uptime) that you have configured.
- Cloud service monitoring metrics that are collected from the host operating system (same as VM), monitoring metrics from the guest VM (from performance counters within the VM) and on and on metrics from monitoring web endpoint urls (response time and uptime) that you have configured.
- For Web Sites and Mobile Service alerting rules can be configured and on metrics from monitoring web endpoint urls (response time and uptime) that you have configured.
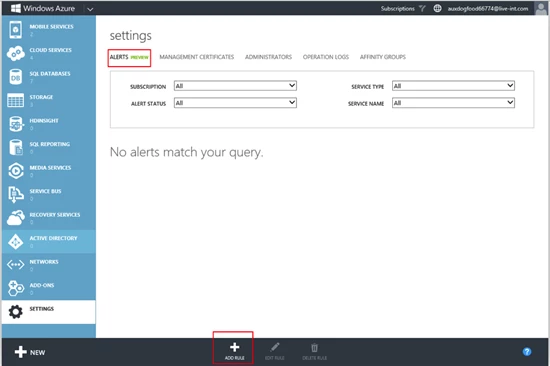
Creating Alert Rules
Adding an alert rule for a monitoring metric requires you navigate to Setting -> Alerts tab in the Portal. Click on the Add Rule button to create an alert rule.
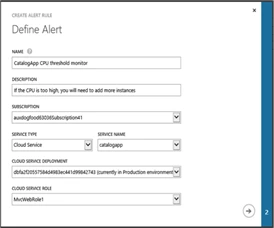
Give the Alert rule a name and optionally add a description. Pick the service on which you want to define the alert rule on, the next step in the alert creation wizard will filter the monitoring metrics based on the service that is selected.
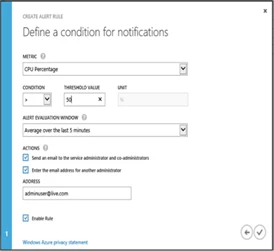
Each alert is calculated based on the values over the alert evaluation window. In the above example we have created a rule for a CPU based alert with a threshold of 50% over an evaluation windows of 5 minutes. This rule creates a monitor on the backend that evaluates the CPU percentage over a period of 5 minutes. Initially the alert is in “Not Activated” state, if the condition is violated the alert will transition to an “Active” state and when the alert condition is resolved the alert rules gets back to “Non Activated” state.
Each data point for CPU percentage is an average value over the last five minute period. In the backend the alerting engine evaluates each data point and triggers a state change event when a condition is violated or resolved.
An active alert for the condition defined in the rule above is shown here
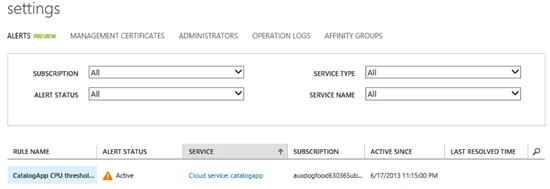
To get more details on the alert rule you can click on the rule name to navigate to the alert details page.
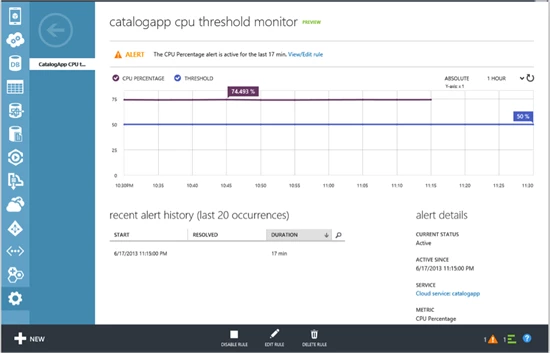
Here you can get a history of the recent times this alert was activated, this will help you determine if rule is getting activated often and the action you need to take so that the alert condition is not violated. You could also choose to edit the alert rule to change the condition. Also an alert rule can be disabled, this will stop processing of this rule on the backend.
Alert Notifications
When an alert is activated, if you had opted to receive an email notification an email is sent from email address Windows Azure Alerts (alerts-noreply@mail.windowsazure.com) to service or co-administrator email addresses and/or one additional administrator email address as defined in the alert rule. To receive alert emails you may need to add this email address to your email whitelist. Email notifications are sent on state transitions i.e. when an alert is activated or when an alert is resolved, note if an alert is active for an extended period of time an email is not sent in between, since only threshold violated and resolution are considered state changes.
Alerts and Monitoring Metrics
For each subscription, you can create up to 10 alert rules. For all compute services, you can create alert rules on web endpoint availability monitoring metrics. If you have enabled availability monitoring for urls, then you can select uptime or response time as measured from a geo-distributed location to be alerted on. For example, for a web site you may want to get alerted when the response time for the web site is greater than 1 second when measured from a location in Europe over a period of 15 minutes. This rule can be simply defined by creating an alert rule and picking the web site, selecting the response time metric, specifying the condition and an evaluation window of 15 minutes. Note the web site has to be already configured for web endpoint monitoring, this can be configured in the web site configure page after the web site is scaled up to standard mode.
For Virtual Machines and Cloud Services alert rules can be configured on metrics that are emitted from host operating system. In addition, for cloud services you can configure monitoring metrics on metrics derived from performance counters that are collected from the guest role instance. Alerting for cloud services is defined on metrics that are aggregated to the role level (values of metrics for each role instance metrics aggregated up to role level). To alert on metrics based on performance counters “Verbose monitoring” has to be enabled for the cloud service deployment. More details can be found in the how to monitor a cloud services.
Summary
With this update you can easily create alerting rules based on monitoring metrics and be notified about active or impending issues that require your attention within your application. During preview, each subscription is limited to 10 alert rules. If you encounter this limit, you will need to delete one or more alert rules within that subscription before you create a new rule.
Virtual Network adds new capabilities for cross-premises connectivity
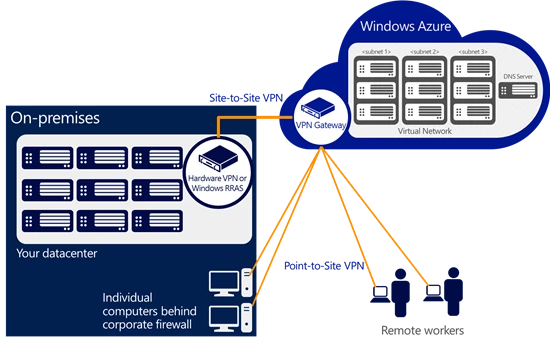
Last week we announced the general availability of Windows Azure Infrastructure Services and Virtual Network. Virtual Network is a service that allows you to create a private, isolated network in Windows Azure and treat it as an extension of your datacenter. You can assign private IP addresses to virtual machines inside a virtual network, specify DNS, and connect it to your on-premises infrastructure using a Cisco or Juniper hardware VPN device in a ‘site-to-site’ manner.
Today, we’re excited to announce that we’re expanding the capabilities of Virtual Network and stepping beyond cross-premises connectivity using hardware VPN devices.
First, we’re enhancing the existing ‘Site-to-Site VPN’ connectivity so you can use Windows Server 2012 RRAS (Routing and Remote Access) as an on-premises VPN server. This gives you the flexibility of using a software based VPN solution to connect your on-premises network to Windows Azure. Of course, if you prefer the more traditional route, you can still connect a virtual network to your hardware based VPN and we will continue to expand the list of supported VPN devices.
Second, we’ve added a new capability called Point-to-Site VPN which allows you to setup VPN connections between individual computers and a virtual network in Azure. We built this capability based on customer requests and learnings from a preview feature called Windows Azure Connect. Point-to-Site VPN greatly simplifies setting up secure connections between Azure and client machines, whether from your office environment or from remote locations.
Here is an illustration:
Using Point-to-Site VPN enables some new and exciting ways to connect to Windows Azure that are not possible from other cloud providers. Here are a few examples:
- You can securely connect to your Windows Azure environment from any location. You can connect your laptop to a Windows Azure test and development environment and continue to code away while sipping coffee at an airport café!
- Small businesses or departments within an enterprise who don’t have existing VPN devices and/or network expertise to manage VPN devices can rely on the Point-to-Site VPN feature to securely connect to workloads running in Windows Azure virtual machines.
- You can quickly set up secure connections to Windows Azure even if your computers are behind a corporate proxy or firewall.
- Independent Software Vendors (ISVs) wanting to provide secure access to their cloud apps can leverage the Point-to-Site VPN feature to offer a seamless application experience.
Windows Azure Virtual Network continues to deliver the power of ‘AND’ by providing you the ability to integrate your on-premises environment with Windows Azure. If you want to learn more about Windows Azure Virtual Network, its capabilities and scenarios, you can find more information here. Also, check out Scott Guthrie’s blog for a deeper dive on the new features.
Check out our Free Trial and try it for yourself.
Best practices for using push notifications, SMS and email in your mobile app
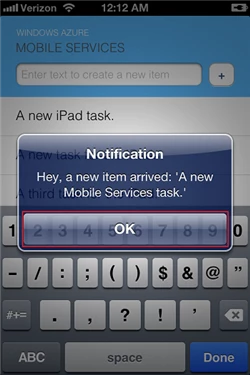
After we delivered iOS client libraries for Mobile Services in October, many of you asked when support for iOS push notifications would follow. As Scott Guthrie announced Wednesday, Mobile Services now supports sending iOS push notifications! We’ve also improved our iOS Client API by adding an even easier login method; configuring user authentication now only takes a single line of Objective-C code.
With this update, Mobile Services now fully supports Windows Store, Windows Phone 8, and iOS apps.
Since we now support three means of communicating with your customers—push notifications, SMS via Twilio, and email via SendGrid—across three platforms, this post will first cover the basics of iOS push and then turn to general guidelines on when and why to use each.

The Basics of Configuring iOS Push Notifications
Scott’s blog has all the details you need to get started with push, but to summarize the two big takeaways:
- Mobile Services makes it incredibly easy to send a push notification.
- Mobile Services gives you the tools you need to handle feedback for expired devices and channels right in the portal. Periodically pruning your database of invalid tokens allows you to save money by not sending notifications to uninstalled apps.
Josh Twist, another member of the Mobile Services team, demos these new additions in the following video:
There are also two fantastic tutorials available in the mobile dev center. The first provides a walkthrough of the basics of configuring your iOS app for push and sending push notifications. The second details how to use a table to store APNS tokens that can then be used to send push notifications to an app’s users.
You can also review our reference docs for complete details on how to use the APNS object to send your push notifications.
When to use Push vs Email vs SMS
Just as important as understanding how to use these push notifications, is understanding when to use a push notification versus an SMS versus an email. The easy answer is that it depends on the app.
I’m going to share, however, some general guidelines we’ve adopted as best practices as well as share some examples that illustrate exceptions to the rule. I’d love to hear some of your own best practices in the comments, as well as discuss when it makes sense to depart from these or your own general guidelines.
Push Notifications: the Canonical Default
Push notifications were created specifically with smartphones and apps in mind. They are the most powerful and effective channel for engaging your customers.

Be careful, though, because with great power comes great responsibility. Most users will give you some leeway at the outset and allow push notifications. They will withdraw that consent just as quickly, however.
The most common danger zones?
- Apps with a social component that send alert notifications every time a user’s Facebook friend signs up, without limiting notifications to only those friends that the user actually invited or with whom they engage regularly.
- News apps that add to the badge count every time there’s a new story published in a category, even if you are not following the specific topic.
- Selling any type of notification to a third party is obviously a fast way have your user disable push notifications.
Toast notification best practices:
- Keep it brief and simple. Know that you’re working with a very small space and try to avoid ellipses. Make sure the content of a toast notification is valuable in and of itself.
The exception here is when the content of the notification before the ellipses is compelling enough for your user to open and interact in the app. If the content of the toast is a truly irresistible teaser, then by all means use the ellipses. Facebook posts are a great example of this exception.

- Use this with a clear call to a very specific action or non-action. Even with something as simple as a to-do app, “You have a new task ‘Buy a gallon of milk’” sounds infinitely better than “A new item ‘Buy a gallon of milk’ has been added”
Badge count best practices:
- The action required to engage with and reset the badge count should take three or fewer gestures (taps, swipes, etc.).

- Limit the number of things a badge notification can mean. Take a turn based game with a chat component. If the badge count increases with both game updates and a new message arriving to the in-game chat, your customer doesn’t have a clear understanding of the ask.
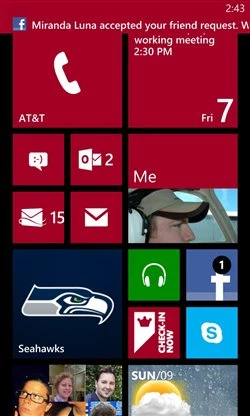
- The badge count should never hit double digits. Once it does, the customer is definitely ignoring the app and likely to disable push notifications right away, if not uninstall outright.
The Mail app is definitely the exception here. It’s not uncommon for users to not only tolerate a badge count of more than ten, but a badge count of more than one hundred. This is likely due to the fact that users have had decades to get comfortable and familiar with high unread mail counts. Unless your app has a similarly long history, it’s probably best to avoid letting the badge count run too high.


SMS: Must Read Messages
friends at Twilio have an army of Doers that have proved just how versatile a simple SMS can be. Let’s narrow our discussion, however, to SMS only a means of customer communication. SMS should be reserved for must-read items. Since it can’t be turned off, the risk of uninstall is much higher too. Be sure that it’s worth it.
When to use Email: the Basics and the Important Stuff
Just like with SMS, there are tons of fantastic and non-standard use cases for Email in the modern app. Developers are using SendGrid to do that everyday. When limiting the discussion again to just a means of customer communication, however, one scenario shines through. Use email for the content you want your users to be able to go back and find days, weeks, or months later.
Does that include confirmation on successful authentication? Absolutely. Does that include a shot of the their highest scoring final board in a Scrabble type game? Absolutely. Does that include requests to invite friends to the app? Maybe not.
Uber does a great job with this. Instead of sending a toast notification that you have a new receipt, Uber emails a receipt and ride summary to their customer. This makes sense since it’s content that customers will likely revisit.

If you would like to get started with Mobile Services and are new to Windows Azure, sign up for the Windows Azure 90-day Free Trial and receive 10 free Mobile Services running on shared instances.
Visit the Windows Azure Mobile Development Center to learn more about building apps using Mobile Services.
If you have feedback (or just want to show off your app), shoot an email to the Windows Azure Mobile Services team at mobileservices@microsoft.com.
As always, if you have questions, please ask them in our forum. If there’s a feature you’d like to see, please visit our Mobile Services uservoice page and let us know.
You can also find me on Twitter @kirillg_msft