In today’s digital world, security of data in transit is one of the fundamental requirements for running any service on the internet. For most customers, this means hosting their service on a Secure Socket Layer (SSL) endpoint that guarantees that the data is not tampered between a client (e.g. web browser) and a server (e.g. an App Service). App Service platform supports SSL bindings for custom hostnames. In order to create these bindings, customers need to upload a PFX certificate first. One of the most requested feature by our customer, is the ability to purchase and manage certificates in Azure.
Purchasing certificate from a trusted CA is a daunting task since it requires knowledge of cryptography. Even technically savvy customers when purchasing a certificate from a regular CA, find it difficult to follow the recommendations to generate a cryptographically strong and compliant certificate. An insecure certificate is as good as no certificate.
We are pleased to introduce App Service Certificate (ASC) which allows App Service customers to create, manage and consume certificates seamlessly in Azure cloud. We are partnering with GoDaddy for this offering. This post provides an in depth overview of ASC. If you are looking for a quick guide then check out the Azure documentation page and Ruslan’s blog post on ASC.
Creating App Service Certificate
One of the primary goals of ASC is to make it really easy for App Service customers to create certificate by doing all crypto operations on their behalf. Currently, we only support single domain and wild card domain validated (DV) RSA certificates with one year validity.
Let’s go through the end to end scenario. For this demo, I own a standard Web App named appservicecertificatedemo that has appservicecertificatedemo.com and www.appservicecertificatedemo.com hostnames assigned to it. I would like to purchase an ASC for this Web App so that I can create SSL bindings for these custom hostnames.
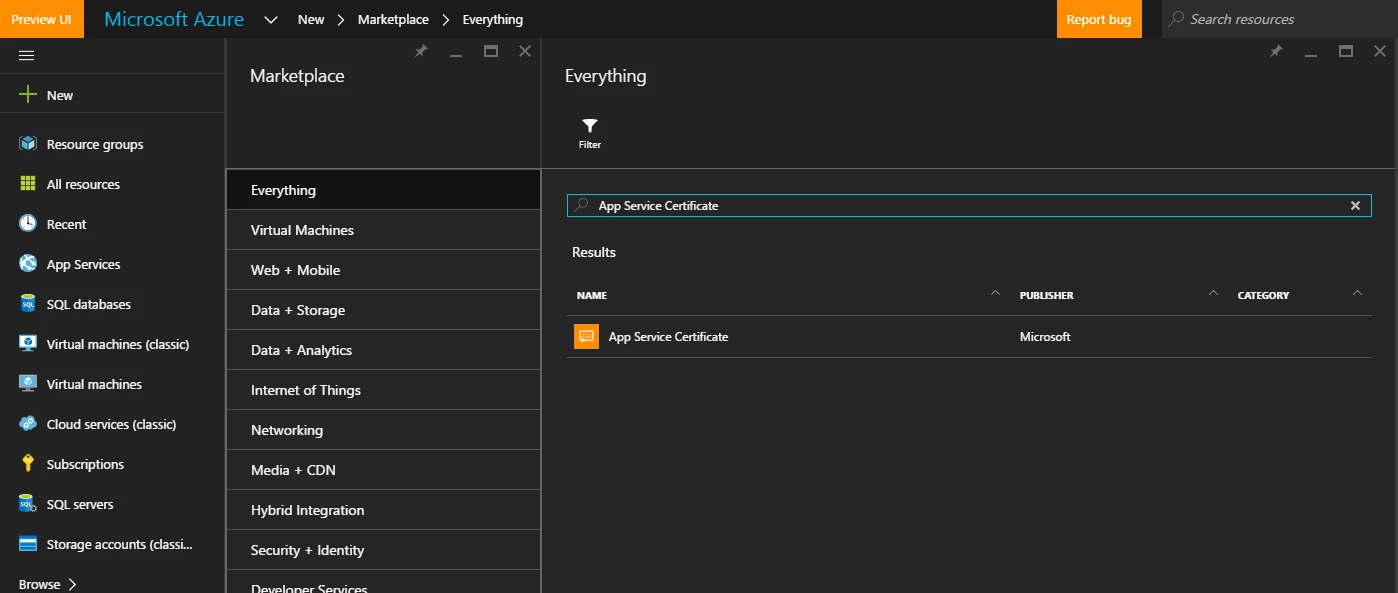
In order to create an ASC, go to Azure portal. Click New on the left side and search for App Service Certificate. Choose App Service Certificate from the result page and click Create.
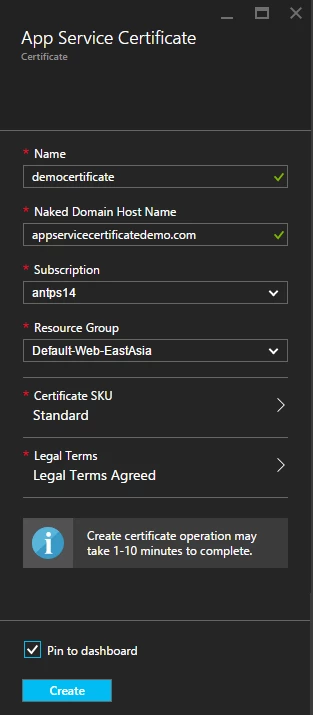
Enter a user friendly name and a domain name you want to secure. Choose a subscription and a new/existing resource group. Click Certificate SKU to see the list of currently supported ASC SKUs.
S1 Standard
If you want to create SSL bindings for root and www subdomain then choose this option. Example: This type of ASC for appservicecertificatedemo.com can be used for protecting appservicecertificatedemo.com and www.appservicecertificatedemo.com.
If you want to create this type of ASC then the hostname should be the root domain.
W1 Wildcard
If you want to create SSL binding for root and any first level subdomain then choose this option. Unlike S1 Standard which can only be used for two hostnames, this certificate can potentially be used for unlimited hostnames. Example: If you buy this type of ASC for appservicecertificatedemo.com then it can be used for protecting appservicecertificatedemo.com, api.appservicecertificatedemo.com, support.appservicecertificatedemo.com and so on. Note that this ASC can only be used for first level subdomains. In the example described above, the ASC cannot be used for protecting subdomain2.subdomain1.appservicecertificatedemo.com.
If you want to create this type of ASC then the hostname should be in *.domainname format.
For this demo, I am choosing S1 Standard as we only want to create SSL binding for the root and www subdomain. Click Legal Terms to open terms and conditions blade. Go through them and click OK to accept. Select Pin to Dashboard and click Create to submit the certificate create request.
When ASC Resource Provider (RP) receives a create request, it generates a pair of RSA keys using the recommended security configurations. It then constructs a Certificate Signing Request (CSR) based on the key-pair and the domain name included in the request and submits it to the CA for signing. You, as an App Service customer, will never have to worry about these crypto operations. The RP takes care of it transparently.
It takes about 5-10 minutes for this initial deployment request to complete. Once finished, Azure portal would open the ASC resource. At this stage, we have kicked off a certificate purchase workflow. The certificate is in Pending Issuance state currently which means we successfully submitted a certificate purchase request but the certificate itself hasn’t been issued yet. We need to go through a few additional steps in order to get a certificate that can be used for creating SSL bindings.
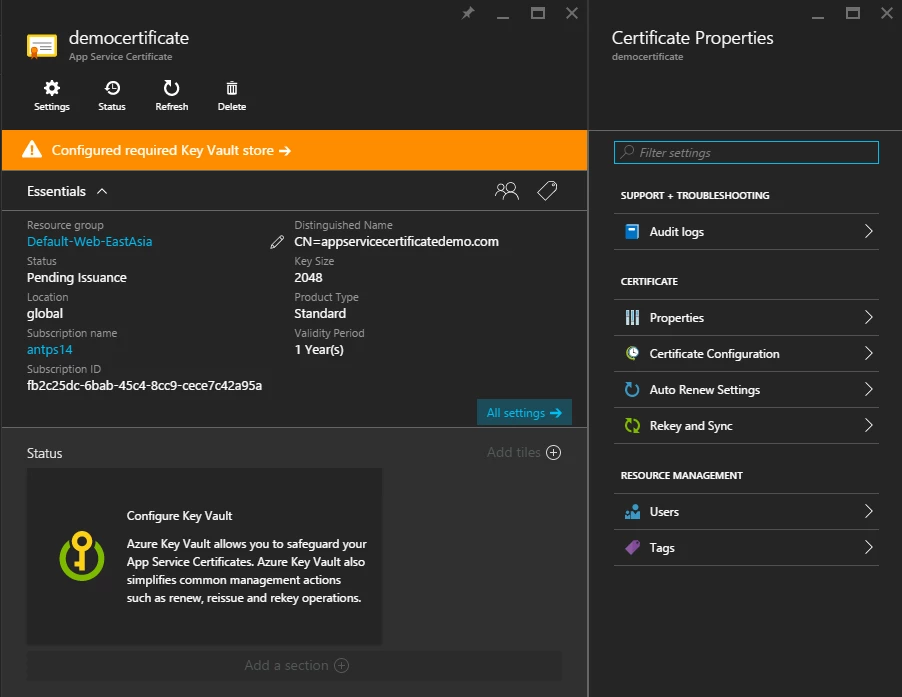
The status Infobox underneath Essential Properties says that we need to configure Key Vault for this certificate. This Infobox would always tell you the current status of ASC and any action you may need to take to go back to ready state. If you click here, the portal will open the ‘Certificate Status’ blade. This blade contains the list of actions you need to take in order to move to ready state. It will also describe where you are currently in the ASC purchase workflow and what the remaining steps are.
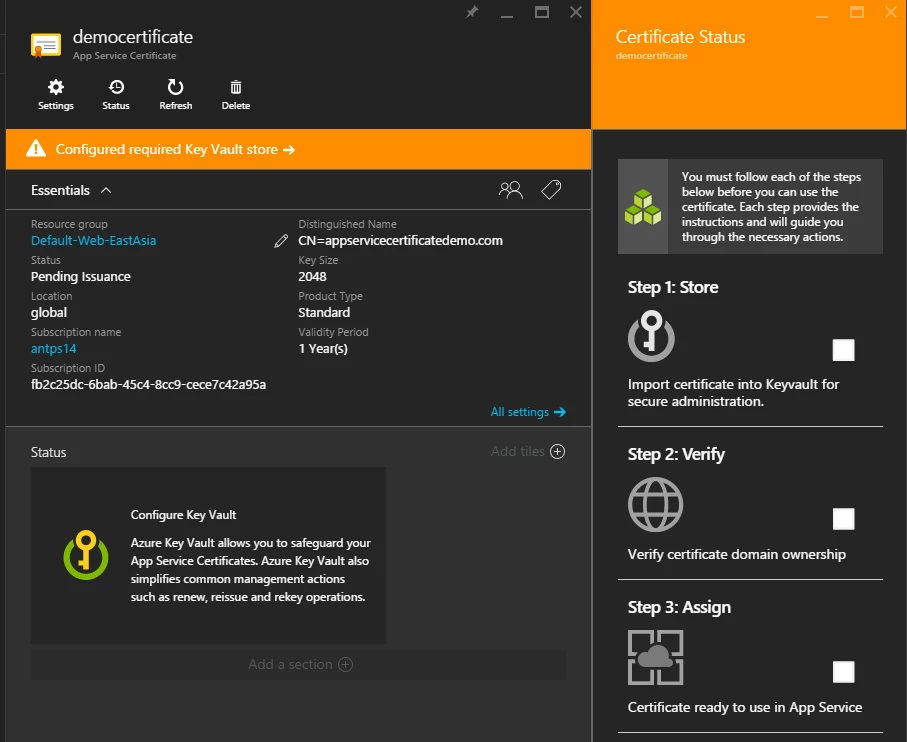
There are three steps that need to be completed.
Step 1: Store
ASC leverages Azure Key Vault Secret for storing PFX certificate in a secure manner. ASC and other App Service Apps follow a producer-consumer model using Key Vault Secret. Once a certificate is ready, ASC RP writes it into the user provided Key Vault Secret which can then be consumed by other Apps. Click here to see the list of Key Vaults in the subscription.
You can choose any Key Vault from the list. You can also create a new Key Vault if required. When creating a new Key Vault, choose a location to satisfy data sovereignty requirements if any. When portal creates a new Key Vault for storing ASC, it locks down its access policies to make sure that only the required Azure services have access to it. For this demo, I am creating a new Key Vault called democertificate in West US location.
Key Vault is a separate Azure resource and has its own billing model. Click here to read more about Key Vault.

Once this step is complete, you will see a green checkmark next to Step 1.
Step 2: Verify
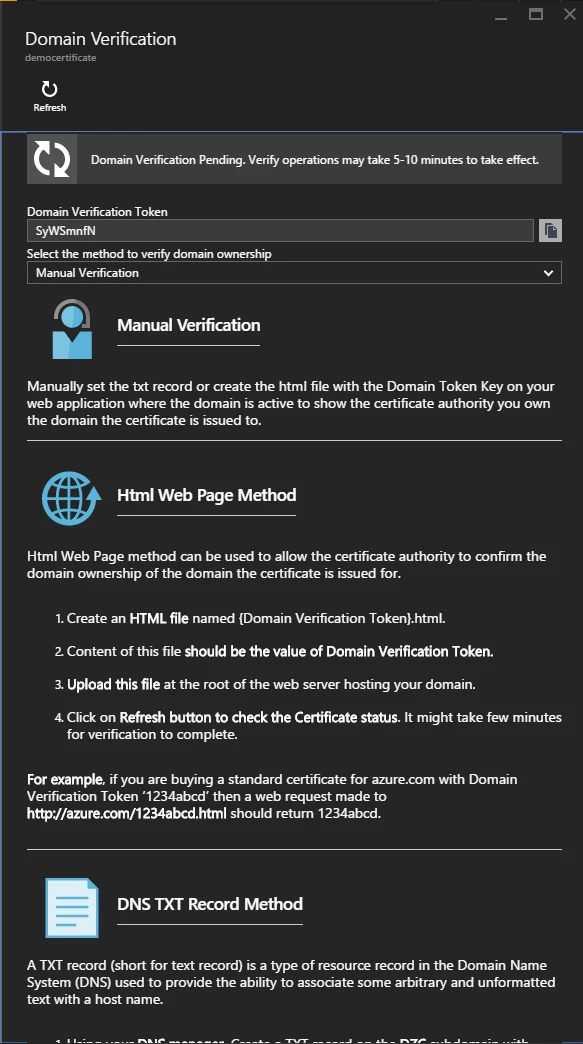
In order to acquire an ASC, you need to verify that you own the domain included in the request. Click on this button to open the Domain Verification window. At the top, you would see a Domain Verification Token which is a randomly generated identifier that helps in the verification process. Before I go into the different options we provide here, first let me explain how one usually validates domain ownership. There three ways to do so:
- HTML file: Host an HTML file at the root of the webserver hosting the domain
- DNS TXT record: Create a TXT record for the root domain.
- Email: Click on the verification link included in the mail sent to the Email addresses associated with the domain.
With this in mind, let’s go over the four options we present in the dropdown in increasing order of convenience:
Manual verification
This option contains step by step instructions to perform validation using methods A and B manually. You should choose this option only if none of the other options are applicable in your case.
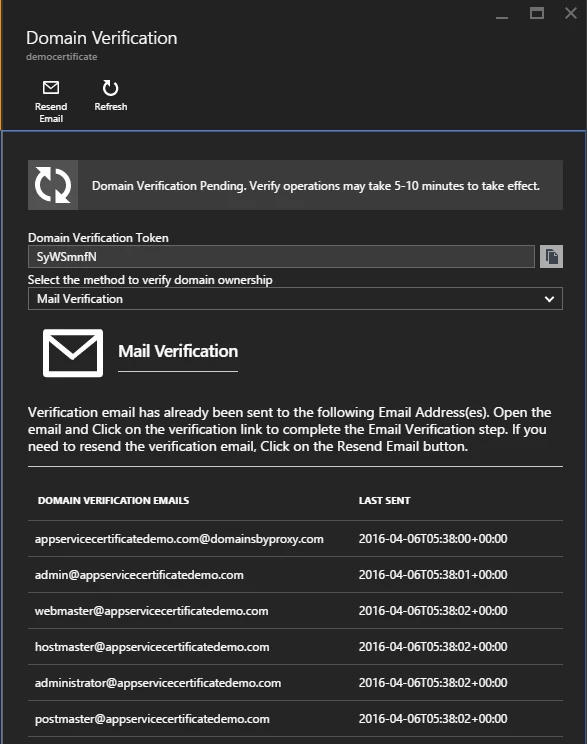
Mail verification
This option helps to validate ownership using the email method. When you purchase a domain from any registrar, you provide a set of contact email addresses. ICANN publishes these email addresses in its database which is publicly accessible to everyone on the internet.
When ASC RP receive a create request, it sends a verification mail to these email addresses. You can see the list of email addresses that have received verification mail in this blade along with the time when these mails were sent. If you want to resend the verification email then click on the ‘Resend Email’ button at the top.
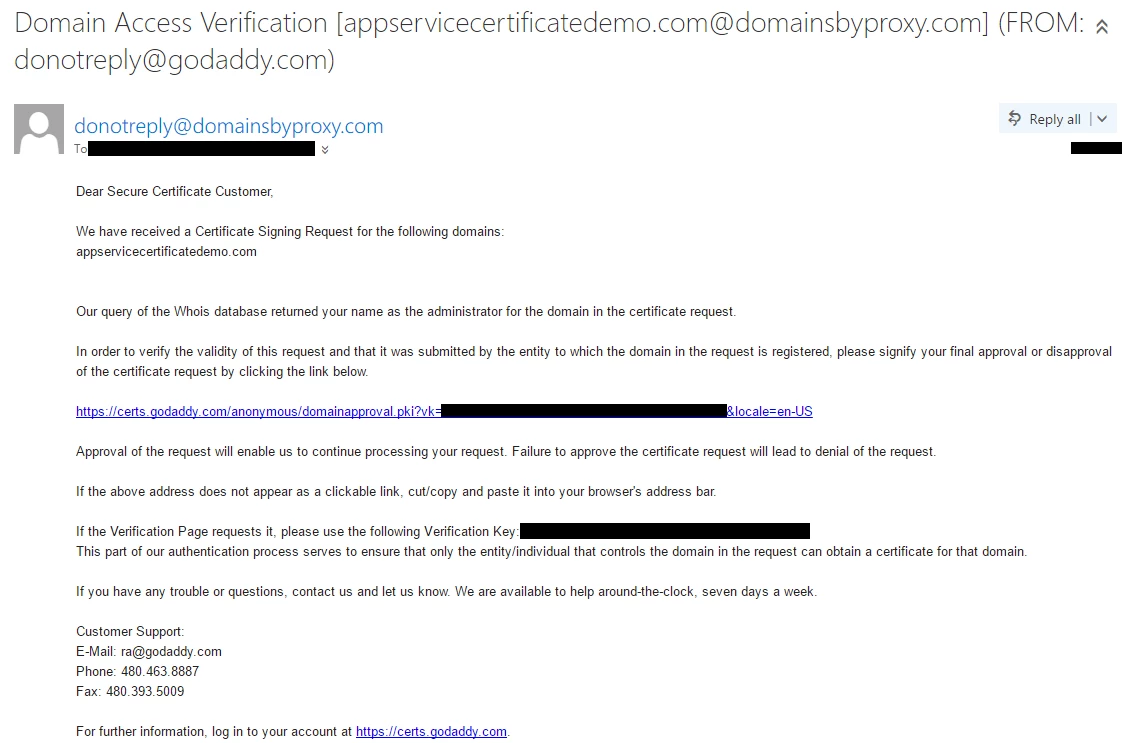
The next two options are the recommended verification methods as you don’t have to leave Azure portal for verification.
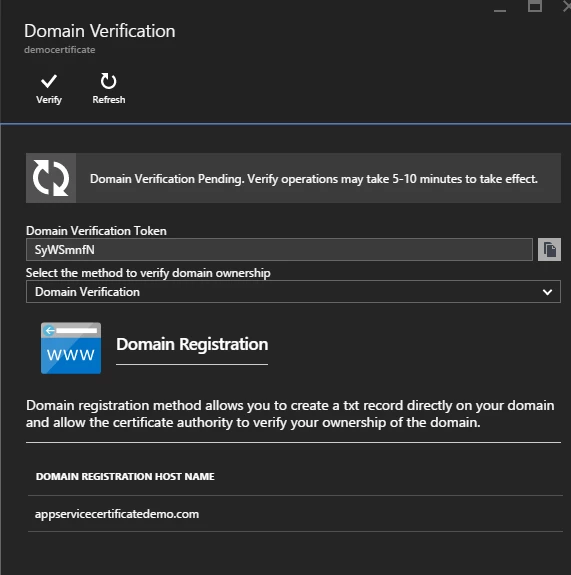
Domain verification
You can purchase domains for App Service Apps in Azure as described here. If you have purchased the domain through Azure then this feature can setup the necessary DNS record for you with just one click. When you select this option in the drop down, you would see your domain listed here if it was purchased through Azure. Click Verify at the top if you want to use the domain object for verification.
App Service verification
You can use this option if the domain is assigned to one or more App Service Apps as a custom hostname. You may see more than one App here if it’s a geo distributed App. Click the Verify button if you want to use this option. This would emulate the verification method A where your App would respond to the verification http request as expected. This option is available for Standard ASC only. For this demo, I am choosing this verification method.
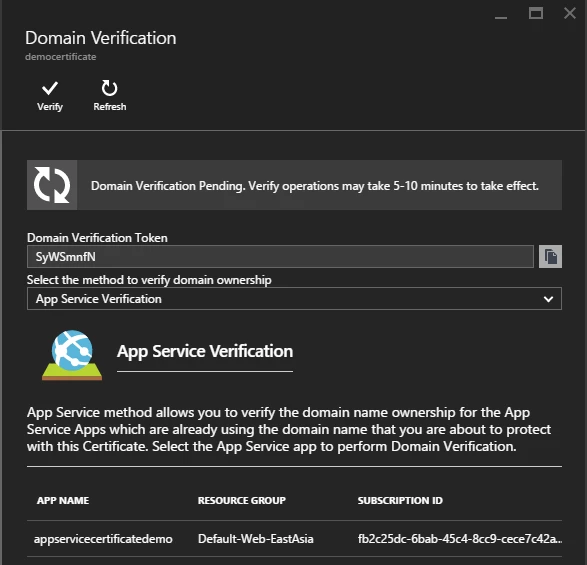
No matter which verification option you choose, click on Refresh button at the top to refresh certificate status. Once domain verification is successful, you would see a Green checkmark next to this step.
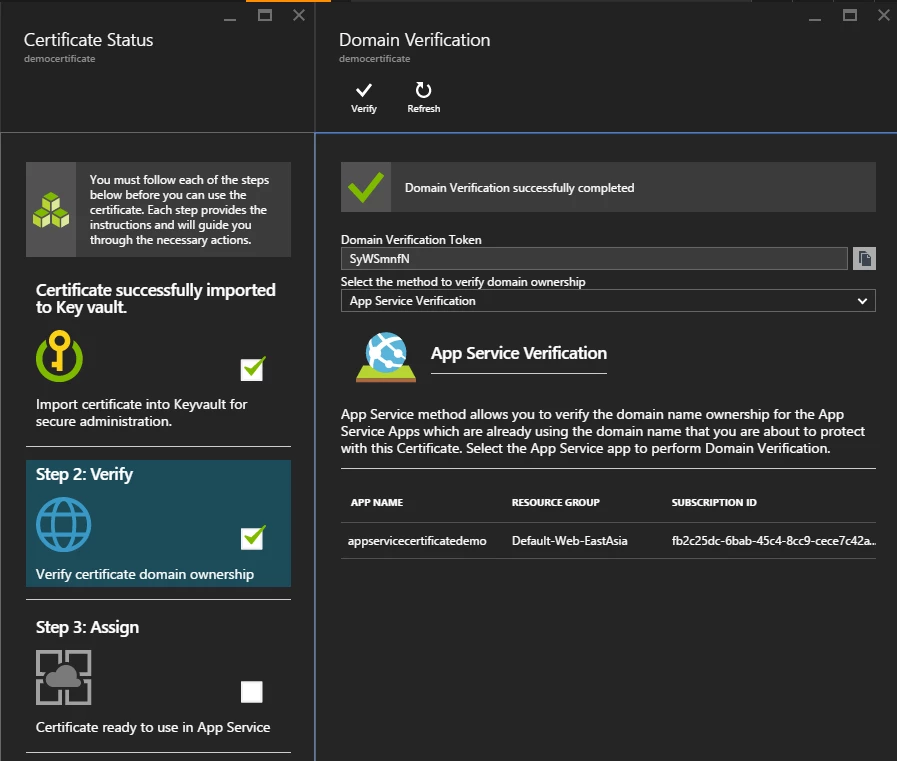
Step 3: Assign
It takes a while for the CA to issue a certificate once domain ownership is verified. At this point, you don’t have to take any action on your side. Click the Refresh button in the resource blade to update the screen. This step would complete shortly on its own once the CA issues the certificate.
The ASC is in ‘Issued’ state now. We successfully created an ASC at this point.
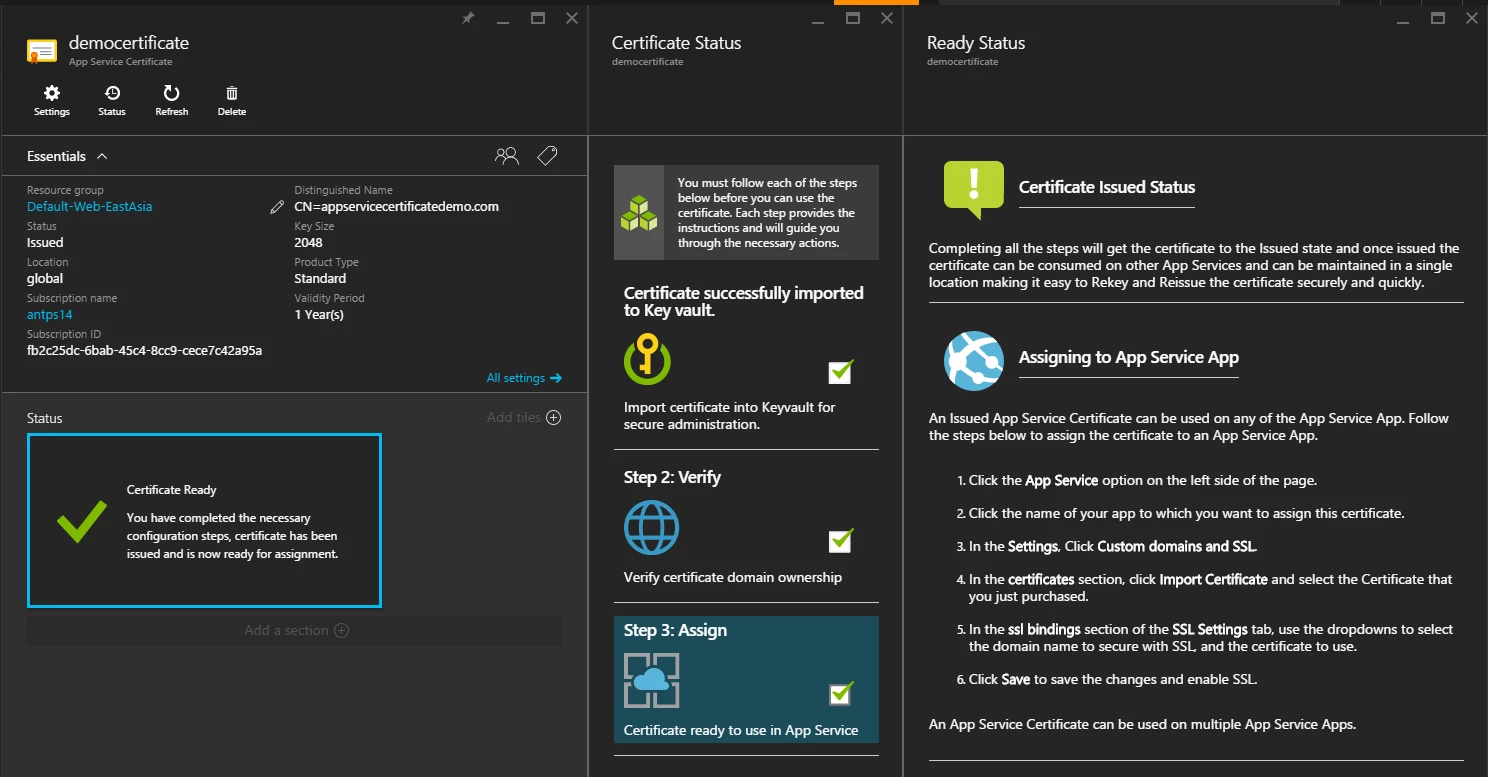
If you don’t complete the purchase workflow after submitting an initial create request then the certificate will remain in Pending Issuance state for the next seven days. After this period, it will move to Denied state. There is no way to recover from Denied state, you should delete this ASC resource and submit a new request if you want to complete the purchase workflow. ASC RP generates the billing event only when a certificate moves to Issued state so you won’t be charged for ASC that gets denied this way.
Assigning App Service Certificate to an App Service App
In order to assign the ASC we just created, go to the Custom Domains and SSL blade and click Import Certificate at the top. This will open up a new blade that lists all ASCs that are in issued state. Choose the ASC you just created. This will upload the certificate into your Web App.
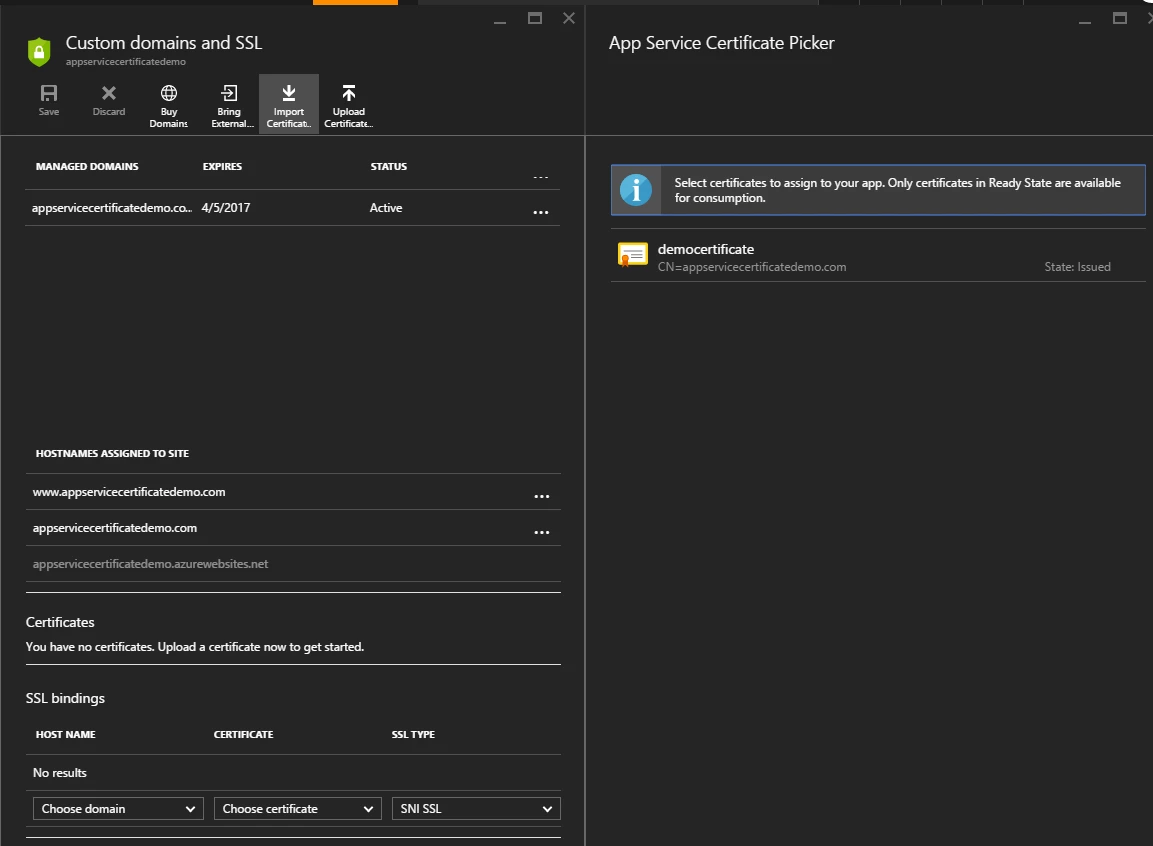
In SSL Bindings section, choose the custom hostnames one by one, choose the certificate in Certificate column and hit the Save button on top.
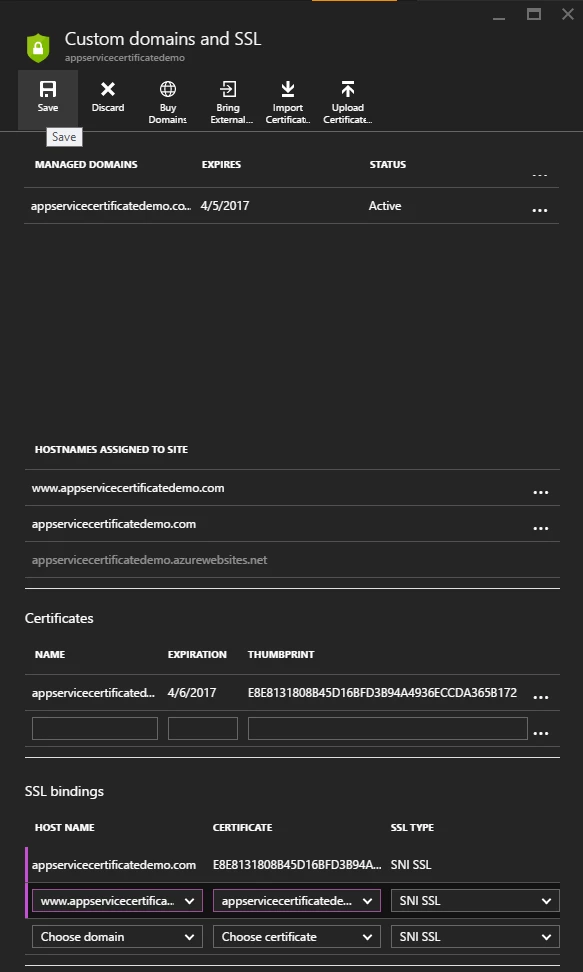
Hurray! We just created an ASC and assigned it to a Web App successfully. If you go to https://www.appservicecertificatedemo.com, you will see that now it’s protected with our newly created ASC.
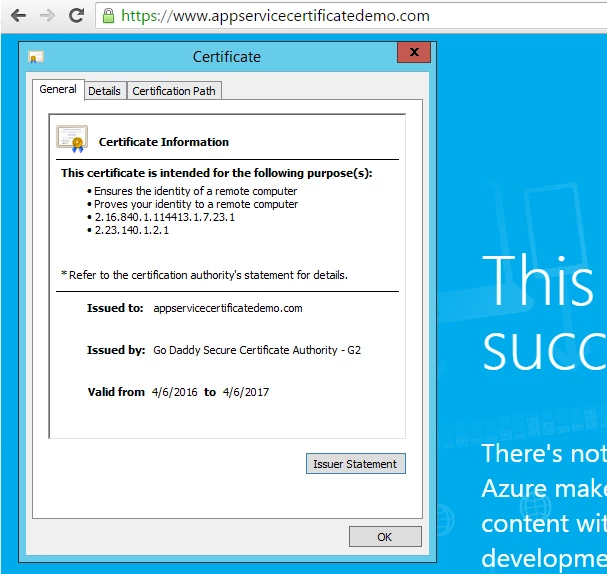
You can use an ASC with as many App Service Apps you want.
Managing App Service Certificate
ReKey and Sync
In order to stay compliant, many web companies need to rotate their certificates periodically. Also if a customer believes that his certificate has been compromised then he should rotate the certificate as soon as possible to minimize likelihood of the stolen certificate being used for malicious purposes. Traditionally, this requires obtaining a new certificate from the CA which is as complicated as buying a new one. Once a new certificate is created, you need to update all App Service Apps one by one manually. With ASC, we support one click ReKey. ASC allows you to ReKey a certificate unlimited number of times during its lifetime for free.
Let’s click on the Rekey and Sync option. This blade displays the current sync state. You can see the thumbprint of ASC along with the thumbprints of all App Service linked certificates. When these certificates are in sync, all thumbprints will match and when they are out of sync, one or more linked certificate thumbprints will be different from the ASC thumbprint.
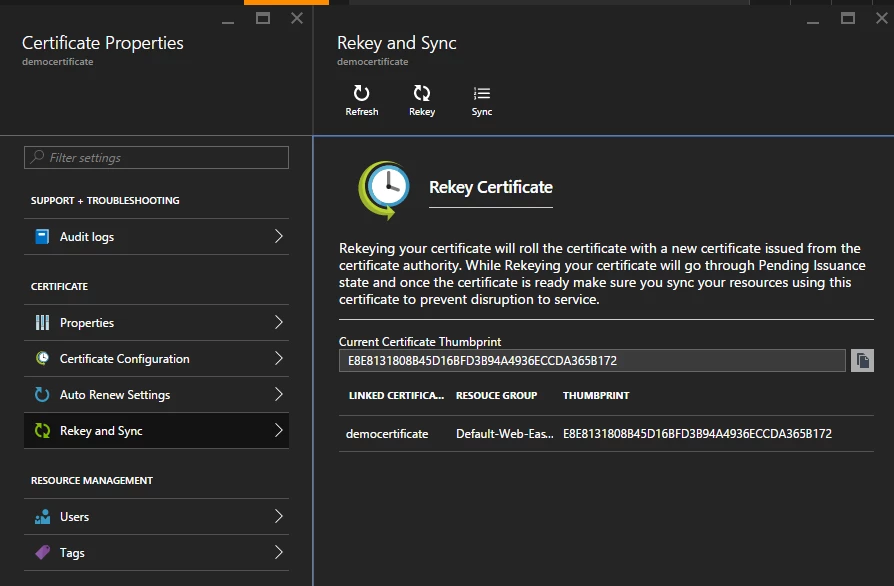
In order to rotate the certificate, click ReKey at the top. The ASC status will move to Rekey Certificate.
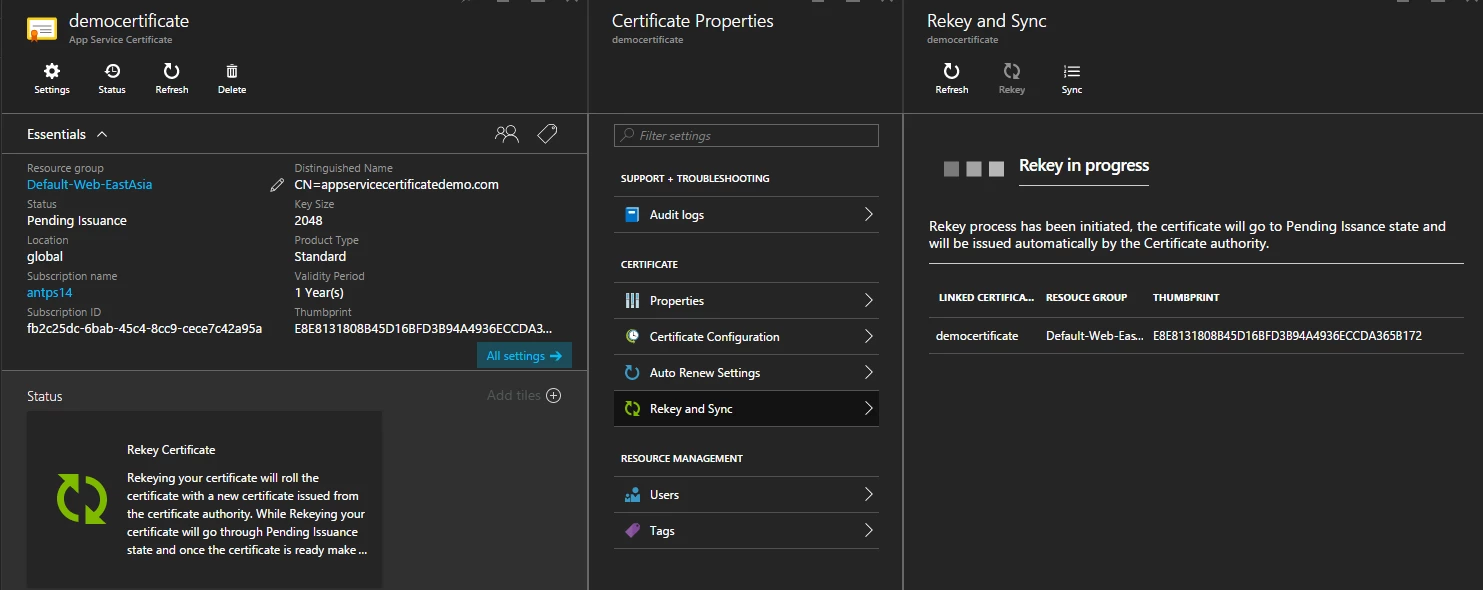
When the RP receives a ReKey request, it generates a new pair of RSA keys and CSR which it then submits to the CA. You don’t need to validate domain ownership this time as you have already done it when creating ASC. ReKey operation usually takes about 5-10 minutes to complete. You don’t need to take any action after clicking on ReKey to get the new certificate. Click Refresh at the top to find out the current status of ReKey request.
Once ReKey request is complete, ASC status would move back to ready state.
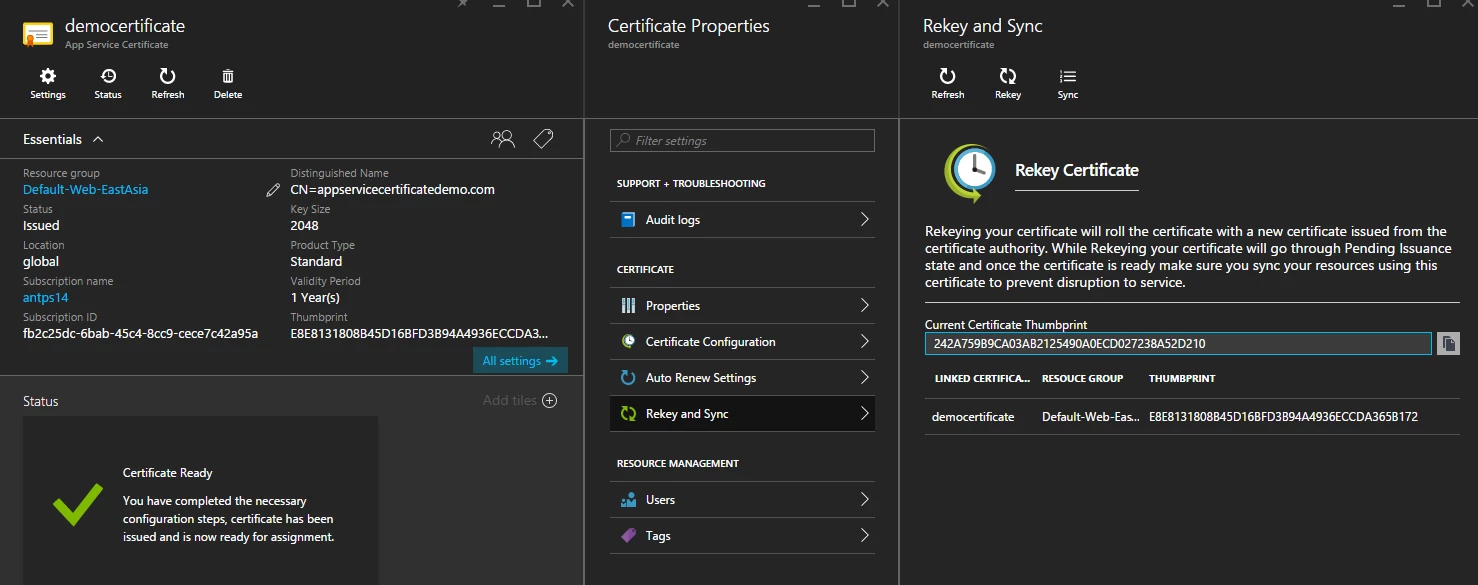
Now, the linked certificate is out of sync as it doesn’t match with the new thumbprint. The endpoint https://www.appservicecertificatedemo.com is still serving the old certificate.
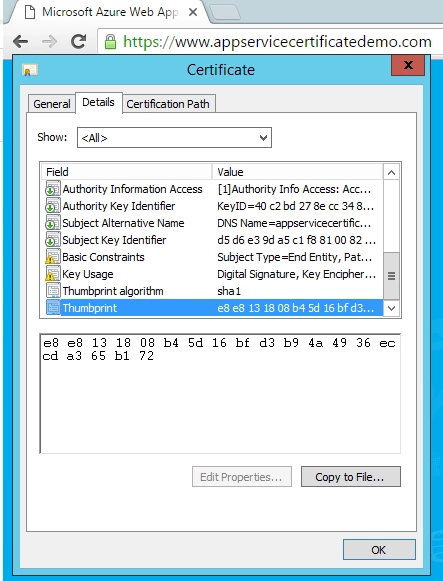
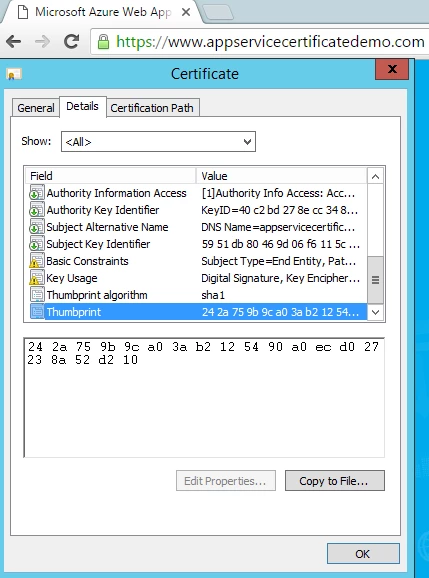
Click Sync to update the Web App with the new certificate. The endpoint https://www.appservicecertificatedemo.com will start serving the new certificate once sync operation is finished.
What happens if you don’t click on Sync once a ReKey operation is finished? Would the linked certificates stay in out of sync state forever? The answer is no. ASC RP has a periodic job that syncs linked certificates with the corresponding ASC every few hours. So even if you don’t click on Sync, this job would eventually migrate your Apps to the new certificate in a few hours.
Certificate renewal
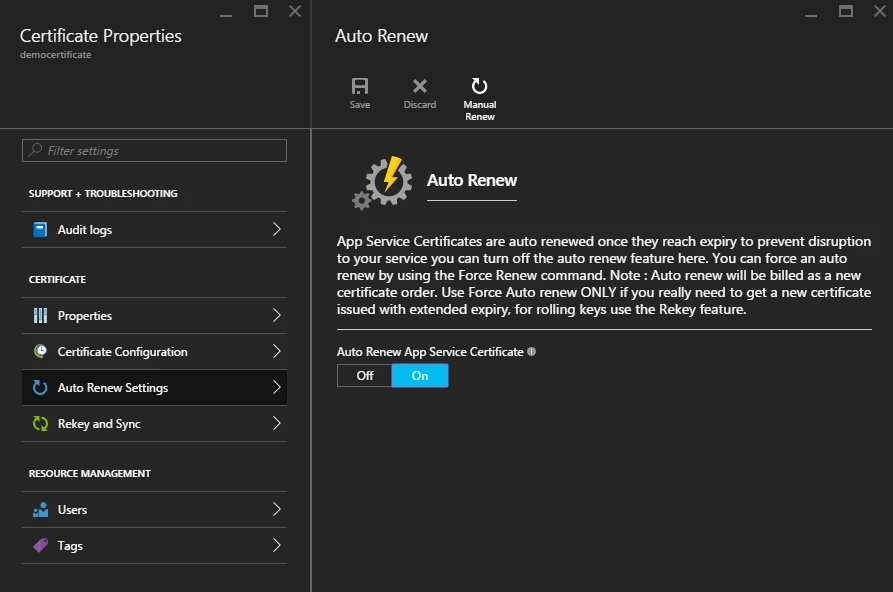
ASC is valid for one year. If Auto Renew is on for an ASC then it will be renewed automatically before it expires and just like ReKey operation, the linked App Service Apps will be moved to the new certificate. You can change this setting by clicking on ‘Auto Renew Settings’ which is on by default. You can also manually renew a certificate by clicking on Manual Renew irrespective of the current Auto Renew setting if the certificate expiration is within 90 days.
Looking forward
We are very excited about this offering. This is our v1 release, we will add new features in the coming months as we learn more from you. Your feedback will be greatly appreciated.
