Best practices, Compute, Virtual Machines
Virtual Machines Best Practices: Single VMs, Temporary Storage and Uploaded Disks
Posted on
5 min read
Hello Everyone, I am Drew McDaniel from the Microsoft Azure team working on the Virtual Machines feature and have been working on it since the beginning. In this blog post, I will share some best practice guidelines to help you get the most out of your Azure Virtual Machines. These guidelines come straight out of customer feedback and cover some of the most common problems they have encountered.
Avoid Configuring Single VMs in an Availability Set
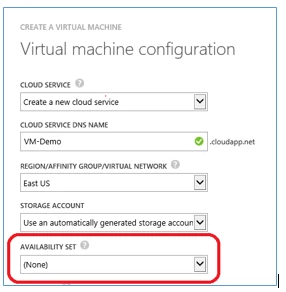
When a virtual machine is deployed in Azure it can be configured to be either part of anavailability set or to have the availability set configured to ‘None’. The ‘None’ option can be slightly misleading because everyone would like their VM to be highly available, right? However, I only recommend selecting an availability set when 2 or more virtual machines are deployed to provide the same functionality. If the VM you are deploying is not part of a set of VMs (i.e., 2 or more) that provide the same functionality, such as multiple web servers under a common load balancer or two SQL Servers that are replicating data. If the VM you are deploying is not part of a set of VMs that provide the same functionality, then you should select ‘None’.  You may ask yourself, “Why is it bad to deploy single VMs in an availability set?” Simply put, if you deploy a single VM instance within an availability set, you will receive no advanced warning or notification of platform maintenance. In this configuration, your single VM instance can and will be rebooted with no advanced warning when platform maintenance occurs. If you deploy your single VM instance and set the availability set option to ‘None’, you will receive notification prior to your VM being rebooted for platform maintenance operations and help ensure that your single VM instance is not rebooted without you understanding when and why. Behind the scenes, when VMs are deployed to an availability set the Azure platform ensures that only a subset of the VMs in the availability set are taken down for platform maintenance at any one time. So when you have multiple VMs in the availability set you will always have at least a portion of those VMs running. When a single VM instance is not part of an availability set you are informing the Azure platform that this machine is not part of a high availability set, and therefore we have special processes in place to inform you via email before the VM is rebooted for platform maintenance operations. At any time, if you have only a single virtual machine within an availability set then Azure will provide a warning on your virtual machine dashboard that this is not the best practice configuration. This configuration is outside existing service level agreement (SLA) guarantees. NOTE: Moving a Virtual Machine into an availability set or out of an availability set will result in that Virtual Machine rebooting to move.
  Learn more about virtual machine service level agreement (SLA) guarantees, here.
Temporary Storage
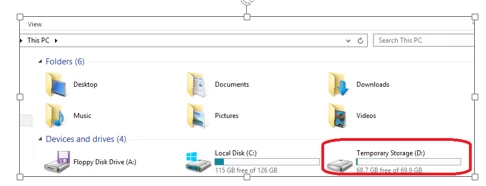
One of the primary reasons customers use Microsoft Azure Virtual Machines is the fact that Virtual Machines support persistent disks. By persistent it means that data written to these persistent disks will be available through reboots, start/stop, or other lifecycle events. However virtual machines also contain one temporary disk on each VM. The data on these temporary disks may not remain through standard VM lifecycle events. This is because the data for the temporary disks is stored on the host operating system running the hypervisor software while the data for persistent disks is stored in Microsoft Azure Storage. The temporary disk is very useful for data which, you guessed it, is temporary in nature. A great example of this type of data for Windows is the pagefile. In fact, when a new Windows VM is provisioned from an image in Azure we configure the pagefile to be located on this temporary disk. Customers should not use the temporary disk for data that should be persistent. A common misconfiguration that we have seen is customers placing a SQL database file on the temporary drive or placing the database files for a Windows Active Directory Domain Controller on this drive. For most Windows VMs the volume on the temporary disk will have the drive letter of D:. It will also have the drive label of “Temporary Storage”. This can be seen in the screenshot below from an Azure virtual machine.  To ensure that you are not incorrectly using the temporary disk, we recommend that you take an action that will cause the temporary disk to be reset as part of your testing procedures. The simplest method to cause the temporary disk to be reset is to change the size of the virtual machine. You should first configure the virtual machine as required, change the VM size and then return to the VM to ensure that everything is functioning as expected.
OS Disk Uploads
One of the great benefits of Microsoft Azure is that you can easily upload VHD format files to be used with Azure virtual machines. When the uploaded VHD file contains a Windows operating system that VHD can be in one of two categories: (1) sysprep was run on the guest operating system before uploading to generalize the OS or (2) sysprep has not been run in the guest operating system. In case (2) the guest operating system is registered as a disk with an operating system. When this disk is used to create a VM, it is deployed without the benefit of a provisioning agent to optimize it for use in Microsoft Azure. Therefore the following best practices should be taken after starting the VM in Azure: 1. Move pagefile to temporary disk – As described above the temporary disk is normally drive D:. It is recommended that you move the pagefile to the temporary disk. This will eliminate storage transaction charges associated with the pagefile and it will free bandwidth to Microsoft Azure storage for data that must be stored on a persistent disk. 2. Configure activation server– This step is valid for uploaded disks which are either a retail edition of Windows or a volume license edition of windows. The steps cannot be used to activate an evaluation version of Windows. To configure the virtual machine to activate using the Microsoft Azure provided activation server execute the following steps from an administrative command prompt: a. If the VM is running a retail version of Windows use the following steps to configure the VM to become a volumelicense edition of Windows: i. Find the appropriate KMS Client Setup key (Generic Volume License Key) for your Windows Edition from the following page: KMS Client Setup Keys ii. Install client setup key by typing: slmgr /ipk
-
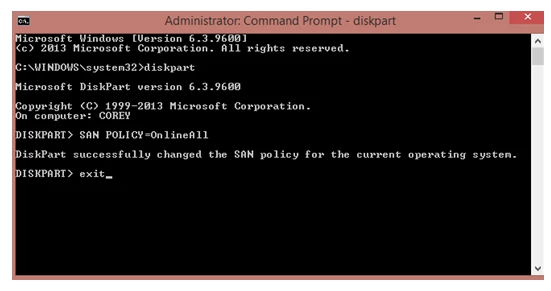
- Diskpart
- SAN POLICY=OnlineAll
- Exit
