BCP and SQL Azure
Posted on
3 min read
[This article was contributed by the SQL Azure team.]
BCP is a great way to locally backup your SQL Azure data, and by modifying your BCP based backup files you can import data into SQL Azure as well. In this blog post, we will learn:
- How to export data out of tables in SQL Azure server into a data file by using BCP and
- How to use the BCP utility to import new rows from a data file into SQL Azure tables.
What is BCP?
The bcp utility is a command line utility that ships with Microsoft SQL Server. It bulk copies data between SQL Azure (or SQL Server) and a data file in a user-specified format. The bcp utility that ships with SQL Server 2008 R2 is fully supported by SQL Azure.
You can use BCP to backup and restore your data on SQL Azure
You can import large numbers of new rows into SQL Azure tables or export data out of tables into data files by using bcp.
The bcp utility is not a migration tool. It does not extract or create any schema or format information from/in a data file or your table. This means, if you use bcp to back up your data, make sure to create a schema or format file somewhere else to record the schema of the table you are backing up. bcp data files do not include any schema or format information, so if a table or view is dropped and you do not have a format file, you may be unable to import the data. The bcp utility has several command line arguments. For more information on the arguments, see SQL Server Books Online documentation. For more information on how to use bcp with views, see Bulk Exporting Data from or Bulk Importing Data to a View.
Exporting Data out of SQL Azure
Imagine you are a developer or a database administrator. You have a huge set of data in SQL Azure that your boss wants you to backup.
To export data out of your SQL Azure database, you can run the following statement at the Windows command prompt:
bcp AdventureWorksLTAZ2008R2.SalesLT.Customer out C:UsersuserDocumentsGetDataFromSQLAzure.txt -c -U username@servername -S tcp:servername.database.windows.net -P password
This will produce the following output in the command line window:
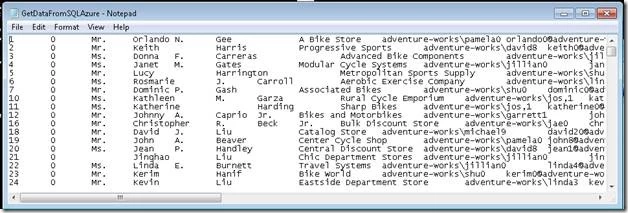
The following screenshot shows the first 24 rows in the GetDataFromSQLAzure.txt file:
Note: The examples provided in this blog post use the AdventureWorkLTAZ2008R2 database. You can download it from SQL Server Database Samples.
Importing Data to SQL Azure
Similarly, you might have existing data in your local database and want to move it to the cloud. You need a very simple way to do this.
To import data into your SQL Azure database, create a data file which has the same schema format as the destination table in your SQL Azure database.
For example, rename the GetDataFromSQLAzure.txt file as MoveDataToSQLAzure.txt and remove all the existing entries and add 5 new entries as shown below.
Then, run the following statement at the Windows command prompt:
bcp AdventureWorksLTAZ2008R2.SalesLT.Customer in C:UsersuserDocumentsMoveDataToSQLAzure.txt -c -U username@servername -S tcp:servername.database.windows.net -P password
This will produce the following output in the command line window:
The bcp utility provides several command line arguments. For a list of all the arguments, see SQL Server Books Online documentation.
Here, let’s describe the ones that are used in those examples.
- database_name.schema.table_name: The database_name specifies the database in which the specified table or view resides. If not specified, this is the default database for the user. table_name is the name of the destination table when importing data into SQL Azure server (in), and the source table when exporting data from SQL Azure server (out).
- in: copies from a file into the database table or view.
- out: copies from the database table or view to a file. If you specify an existing file, the file is overwritten.
- -c: Performs the operation using a character data type.
- -U: Specifies the login ID used to connect to SQL Azure server. You must append the SQL Azure server name to the login name in the connection string by using the <login>@<servername> notation.
- -S: Specifies the SQL Azure server to which to connect. The fully qualified name of the SQL Azure server is servername.database.windows.net.
- -i: Specifies the input file.
- queryout: Starting with SQL Server 2008 R2, SQL Azure supports the queryout argument as well. When you use the queryout argument, make sure to append –d database_name argument. Otherwise, the bcp utility cannot locate the database to connect to.
This blog post demonstrated how to use bcp with SQL Azure in a very simple way. If you have millions of rows in your table in your local database — it is still fast and easy to use.
Do you have questions, concerns, comments? Post them below and we will try to address them.
![clip_image002[1] clip_image002[1]](https://azure.microsoft.com/en-us/blog/wp-content/uploads/2010/05/5611.clip_5F00_image0021_5F00_thumb_5F00_37C01547.webp)


![clip_image002[3] clip_image002[3]](https://azure.microsoft.com/en-us/blog/wp-content/uploads/2010/05/5756.clip_5F00_image0023_5F00_thumb_5F00_1EB41F35.webp)