Back in September, we announced Azure CLI 2.0 Preview. Today, we’re announcing the general availability of the vm, acs, storage and network commands in Azure CLI 2.0. These commands provide a rich interface for a large array of use cases, from disk and extension management to container cluster creation.
Today’s announcement means that customers can now use these commands in production, with full support by Microsoft both through our Azure support channels or GitHub. We don’t expect breaking changes for these commands in new releases of Azure CLI 2.0.
This new version of Azure CLI should feel much more native to developers who are familiar with command line experiences in the bash enviornment for Linux and macOS with simple commands that have smart defaults for most common operations and that support tab completion and pipe-able outputs for interacting with other text-parsing tools like grep, cut, jq and the popular JMESpath query syntax​. It’s easy to install on the platform of your choice and learn.
During the preview period, we’ve received valuable feedback from early adopters and have added new features based on that input. The number of Azure services supported in Azure CLI 2.0 has grown and we now have command modules for sql, documentdb, redis, and many other services on Azure. We also have new features to make working with Azure CLI 2.0 more productive. For example, we’ve added the “–wait” and “–no-wait” capabilities that enable users to respond to external conditions or continue the script without waiting for a response.
We’re also very excited about some new features in Azure CLI 2.0, particularly the combination of Bash and CLI commands, and support for new platform features like Azure Managed Disks.
Here’s how to get started using Azure CLI 2.0.
Installing the Azure CLI
The CLI runs on Mac, Linux, and of course, Windows. Get started now by installing the CLI on whatever platform you use. Also, review our documentation and samples for full details on getting started with the CLI, and how to access to services provided via Azure using the CLI in scripts.
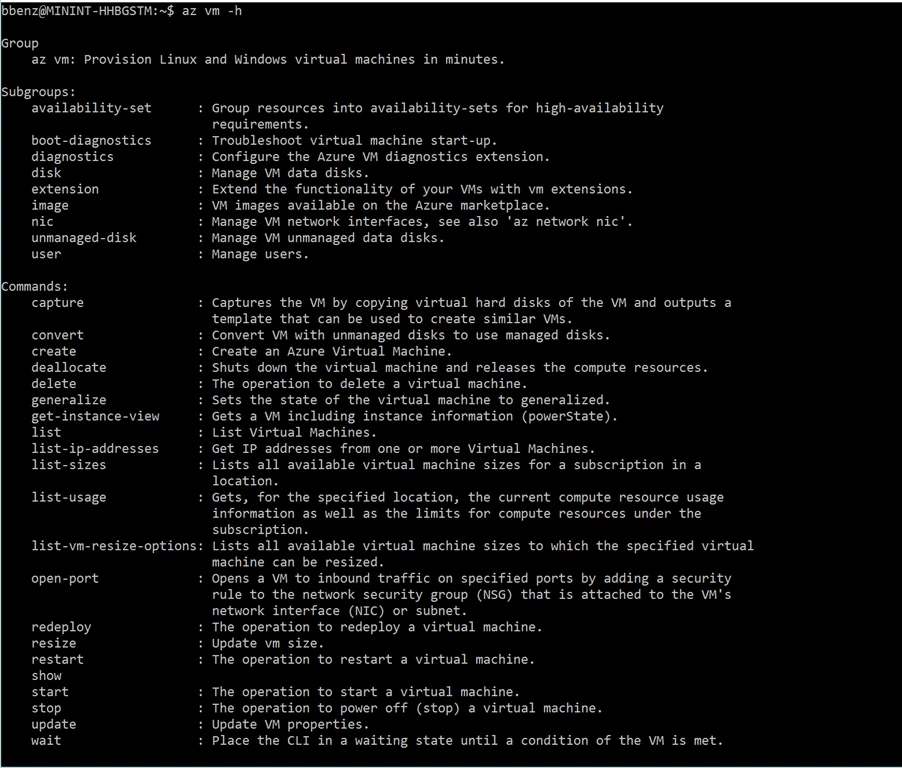
Here’s an example of the features included with the “vm command”:
Working with the Azure CLI
Accessing Azure and starting one or more VMs is easy. Here are two lines of code that will create a resource group (a way to group and Manage Azure resources) and a Linux VM using Azure’s latest Ubuntu VM Image in the westus2 region of Azure.
az group create -n MyResourceGroup -l westus2
az vm create -g MyResourceGroup -n MyLinuxVM --image ubuntults
Using the public IP address for the VM (which you get in the output of the vm create command or can look up separately using “az vm list-ip-addresses” command), connect directly to your VM from the command line:
ssh
For Windows VMs on Azure, you can connect using remote desktop (“mstsc ” from Windows desktops).
The “create vm” command is a long running operation, and it may take some time for the VM to be created, deployed, and be available for use on Azure. In most automation scripting cases, waiting for this command to complete before running the next command may be fine, as the result of this command may be used in next command. However, in other cases, you may want to continue using other commands while a previous one is still running and waiting for the results from the server. Azure CLI 2.0 now supports a new “–no-wait” option for such scenarios.
az vm create -n MyLinuxVM2 -g MyResourceGroup --image UbuntuLTS --no-wait
As with Resource Groups and a Virtual Machines, you can use the Azure CLI 2.0 to create other resource types in Azure using the “az create” naming pattern.
For example, you can create managed resources on Azure like WebApps within Azure AppServices:
# Create an Azure AppService that we can use to host multiple web apps
az appservice plan create -n MyAppServicePlan -g MyResourceGroup

# Create two web apps within the appservice (note: name param must be a unique DNS entry)
az appservice web create -n MyWebApp43432 -g MyResourceGroup --plan MyAppServicePlan
az appservice web create -n MyWEbApp43433 -g MyResourceGroup --plan MyAppServicePlan
Read the CLI 2.0 reference docs to learn more about the create command options for various Azure resource types. The Azure CLI 2.0 lets you list your Azure resources and provides different output formats.
--output Description
json json string. json is the default. Best for integrating with query tools etc
jsonc colorized json string.
table table with column headings. Only shows a curated list of common properties for the selected resource type in human readable form.
tsv tab-separated values with no headers. optimized for piping to other tex-processing commands and tools like grep, awk, etc.
You can use the “–query” option with the list command to find specific resources, and to customize the properties that you want to see in the output. Here are a few examples:
# list all VMs in a given Resource Group
az vm list -g MyResourceGroup --output table

# list all VMs in a Resource Group whose name contains the string ‘My’
az vm list --query “[?contains(resourceGroup,’My’)]” --output tsv

# same as above but only show the 'VM name' and 'osType' properties, instead of all default properties for selected VMs
az vm list --query “[?contains(resourceGroup,’My’)].{name:name, osType:storageProfile.osDisk.osType}” --output table
Azure CLI 2.0 supports management operations against SQL Server on Azure. You can use it to create servers, databases, data warehouses, and other data sources; and to show usage, manage administrative logins, and run other management operations.
# Create a new SQL Server on Azure
az sql server create -n MySqlServer -g MyResourceGroup --administrator-login  --administrator-login-password  -l westus2

# Create a new SQL Server database
az sql db create -n MySqlDB -g MyResourceGroup --server-name MySqlServer -l westus2

# list available SQL databases on Server within a Resource Group
az sql db list -g MyResourceGroup --server-name MySqlServer
Scripting with the new Azure CLI 2.0 features
The new ability to combine Bash and Azure CLI 2.0 commands in the same script can be a big time saver, especially if you’re already familiar with Linux command-line tools like grep, cut, jq and JMESpath queries.
Let’s start with a simple example that stops a VM in a resource group using a VM’s resource ID (or multiple IDs by spaces):
az vm stop –ids ‘’
You can also stop a VM in a resource group using the VM’s name. Here’s how to stop the VM we created above:
az vm stop -g resourceGroup -n simpleVM
For a more complicated use case, let’s imagine we have a large number of VMs in a resource group, running Windows and Linux. To stop all running Linux VMs in that resource group, we can use a JMESpath query, like this:
os="Linux"
rg="resourceGroup"
ps="VM running"
rvq="[].{resourceGroup: resourceGroup, osType: storageProfile.osDisk.osType, powerState: powerState, id:id}| [?osType=='$os']|[?resourceGroup=='$rg']| [?powerState=='$ps']|[].id"
This script issues an az vm stop command, but only for VMs that are returned in the JMESpath query results (as defined in the rvq variable). The osType, resourceGroup and powerState parameters are provided values. The resourceGroup parameter is compared to a VM’s resourceGroup property, and the osType parameter is compared to a VM’s storageProfile.osDisk.osType property, and all matching results are returned (in tsv format) for use by the “az vm stop” command.
Azure Container Services in the CLI
Azure Container Service (ACS) simplifies the creation, configuration, and management of a cluster of virtual machines that are preconfigured to run container applications. You can use Docker images with DC/OS (powered by Apache Mesos), Docker Swarm or Kubernetes for orchestration.
The Azure CLI supports the creation and scaling of ACS clusters via the az acs command. You can discover full documentation for Azure Container Services, as well as a tutorial for deploying an ACS DC/OS cluster with Azure CLI commands.
Scale with Azure Managed Disks using the CLI
Microsoft recently announced the general availability of Azure Managed Disks to simplify the management and scaling of Virtual Machines. You can create a Virtual Machine with an implicit Managed Disk for a specific disk image, and also create managed disks from blob storage or standalone with the az vm disk command. Updates and snapshots are easy as well — check out what you can do with Managed dDisks from the CLI.
Start using Azure CLI 2.0 today!
Whether you are an existing CLI user or starting a new Azure project, it’s easy to get started with the CLI at https://aka.ms/CLI and master the command line with our updated docs and samples. Check out topics like installing and updating the CLI, working with Virtual Machines, creating a complete Linux environment including VMs, Scale Sets, Storage, and network, and deploying Azure Web Apps – and let us know what you think!
Azure CLI 2.0 is open source and on GitHub.
In the next few months, we’ll provide more updates. As ever, we want your ongoing feedback! Customers using the vm, storage and network commands in production can contact Azure Support for any issues, reach out via StackOverflow using the azure-cli tag, or email us directly at azfeedback@microsoft.com.