Developer Tools, How to, Visual Studio
Enabling Command-line or Continuous Delivery of Azure WebJobs
Posted on
6 min read
When we designed the WebJobs publishing tool released in Visual Studio 2013 Update 3, we built it with the idea of being able to accommodate improvements in the Azure APIs and the Management Libraries so that we could release updates to the WebJobs tooling quickly. We knew developers would want to use the publishing capabilities already familiar to them in their continuous integration builds and that our new tooling to publish WebJobs would probably fill a gap in existing tooling and publishing automation scenarios. We found a few areas where we could improve the WebJobs publishing story from the command line and continuous integration stories and have an update that fills these gaps. This post summarizes this update, how we can release it so quickly right after an official Visual Studio update, and how you can reap the benefits and enable continuous integration or command-line publishes of an Azure WebJob.
Enabling Agile Tooling Updates with NuGet
To provide the greatest level of flexibility possible, we published the WebJobs Publishing NuGet package, which contains the majority of the code that actually performs the WebJobs publishing logic. The diagram below demonstrates the high-level architecture of the publishing chain in the WebJobs tooling.
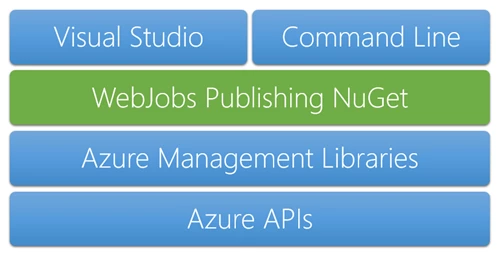
By encapsulating the API calls required to set up Azure resources like Scheduler Job Collections and Websites, and to effectively use the APIs to then glue those components together in a NuGet package, we enable situations such as API improvements, hotfixes, and refactoring to take place without requiring a wider Visual Studio update. The chart above also shows how developers benefit from the decision to ship updates to fundamental tooling workflows via NuGet. Both Visual Studio and the command line processes benefit from the NuGet updates. Since we’re enabling these improvements via NuGet, the absolute first step to getting WebJobs published from the command line is to update the WebJobs publishing NuGet to the 1.0.1 version. The NuGet Update Package dialog screenshot below demonstrates this being done within Visual Studio 2013. 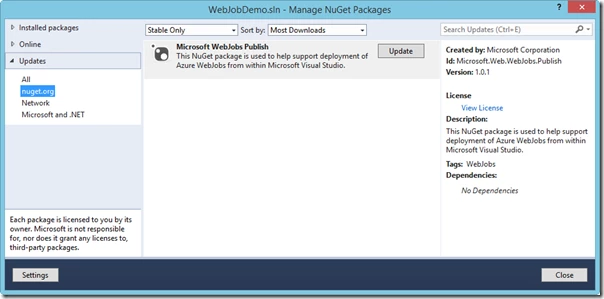
Command-line Publishing Opportunities
This article’s focus is on the command-line improvements available in the Microsoft WebJobs Publish 1.0.1 NuGet package release and how you can enable command-line or continuous delivery of your Azure WebJobs. We knew this would be a core requirement most WebJob owners would need and tried to get it in the overall Visual Studio 3 Update but had a few improvements we wanted to make. So we took our time to test out and enable as many authentication scenarios as possible so that Azure WebJob owners would have options for setting up a repeatable WebJob publishing story.
Enabling Non-interaction Azure Authentication
The chart above shows how the WebJobs tooling is built atop the Microsoft Azure Management Libraries. Since MAML allows for two key types of authentication to Azure – Active Directory tokens and Management Certificates – we had the ability to use both of these types of authentication with the WebJobs tooling. Visual Studio’s got some great methods of dialing in Active Directory tokens, so that’s our default mechanism of authenticating when you’re publishing WebJobs manually. But the key differentiator between being able to publish from within Visual Studio and being able to publish from the command line is that the authentication window below is only really helpful when you’re authenticating manually from within Visual Studio, or from some other client, by a human.
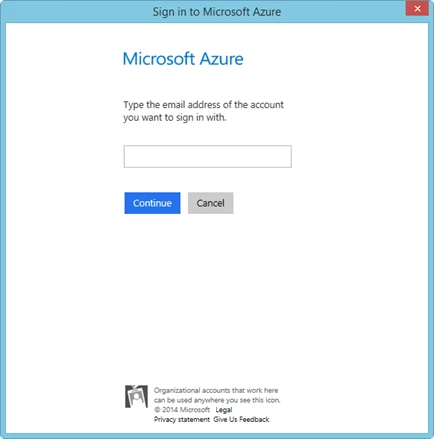
For command-line execution environments run by machines, or services, like a build server, interacting with a login dialog is definitely not optimal. We needed to give customers a way to authenticate their build servers to Azure during a continuous integration build, or automating WebJob publishes wasn’t going to be possible. Ironically, the best solution for enabling the WebJob publishing automation story was right in front of us. We borrowed some tricks from our own testing environments. What better place to look to come up with a way to automate the WebJobs tooling than how we’d been testing it ourselves in our own automation scenarios. Ironically, we’d been testing it so much we’d not really put attention to detail to test the command-line story as an independent one, so once the Visual Studio update was complete we shifted attention to fully testing and improving the command-line story.
Changing the WebJobs Publish Process to Authenticate with Management Certificates
An alternative to authenticating against the Azure APIs to using Active Directory tokens in to use management certificates. In our own tests of the tooling we’d been using management certificates to authenticate our build servers, so we invested in lighting up customers’ ability to use management certificates in the MSBuild process so projects being built within CI environments would result with WebJobs being published to Azure, and their associated scheduler jobs being created and associated properly. Once you’ve installed the WebJobs Publishing NuGet to version 1.0.1 (see above), add a file named webjobs.props to the properties folder of the Web Application Project or Console Application you’re publishing.
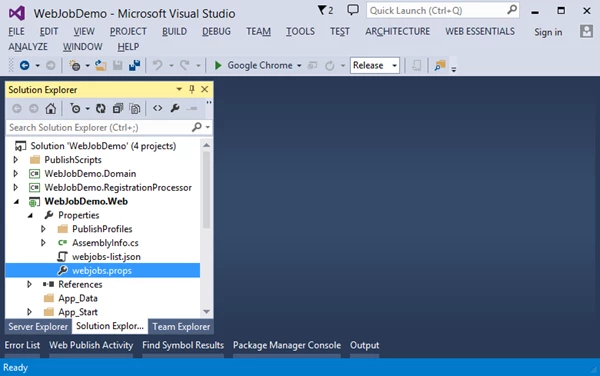
Within this file you’ll have three options for driving the WebJobs publishing process authenticated using management certificates.
Get a Fresh Azure Publish Settings File
The easiest way to authenticate to Azure using management certificates is to use the information stored in an Azure publish settings file. The easiest way to do that is to install the Azure PowerShell Cmdlets, then run the command Get-AzurePublishSettingsFile. This will direct you to the Azure publish settings download URL.

Editing the Webjobs.props File
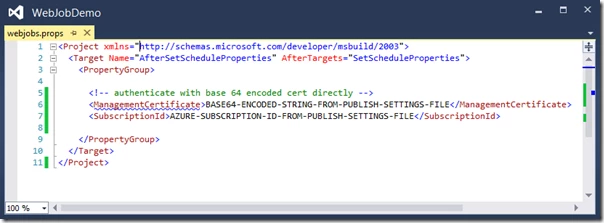
The first option is to manually enter in the Base64-encoded string value of the management certificate. The management certificate’s encoded format can be copied directly from the *.publishsettings file into the webjobs.props file. The presence of the certificate value and the Azure subscription ID informs the WebJobs publishing process it should authenticate using management certificates and not attempt the default tooling path of authenticating using a [probably expired or non-existent] AAD token.
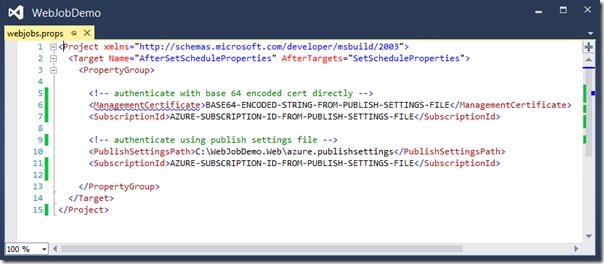
The second option for providing authentication information to the WebJobs publishing process is to use the *.publishsettings file itself in the webjobs.props file. This will direct MSBuild to the publish settings file for authentication information for use in authenticating to the Azure APIs. Note: the screen shot below depicts all of the options, you only need one, not both, for it to work.
The third option is to direct the publish process to a PFX file, that’s paired up with a CER file previously uploaded into Azure. You can either set the PFX file up so that the build server’s user can make use of it, or you can enter the certificate’s password directly into the webjobs.props file.
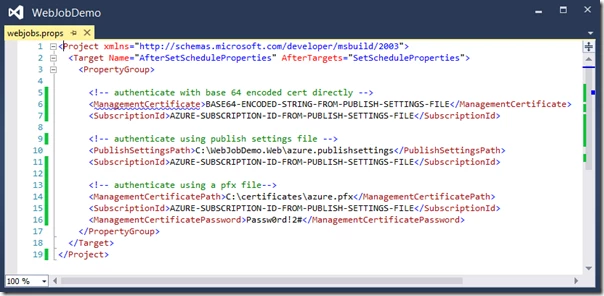
Once the webjobs.props file has at least one method of authenticating the build can be run from the command line.
Publishing WebJobs from the Command Line
Once the webjobs.props file is configured to reflect your environment you can run a command-line MSBuild script like the one below to build the application and deploy it, along with any WebJobs. If the publish process includes any WebJobs with schedules, their Azure Scheduler Jobs will be created to schedule the WebJobs, too. The code below is what you’d copy and paste into a running instance of the Visual Studio 2013 Developer Command Prompt to execute the build and publish.
msbuild WebJobDemo.Web.csproj /p:DeployOnBuild=true /p:PublishProfile=WebJobDemo /p:VisualStudioVersion=12.0 /p:Password=asdfasdf
Once the build is complete the MSBuild output logs indicate the Web publish completed, and that the Scheduler Job Collection and Job were created to schedule the WebJob.
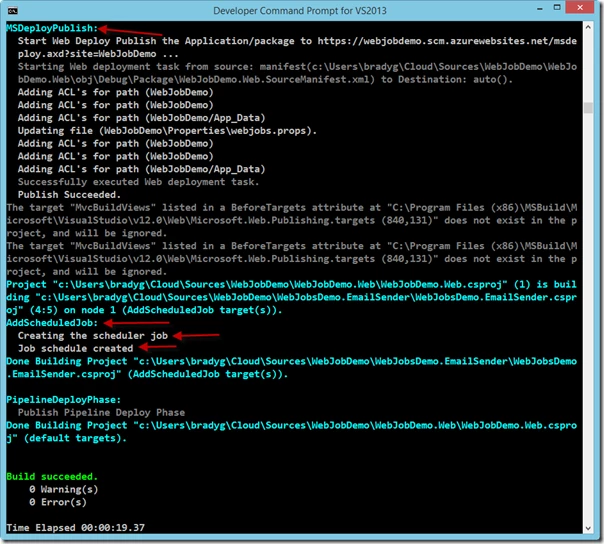
The arrows highlight some of the key steps in the end-to-end process of creating a scheduled WebJob.
Summary and Roadmap
The WebJobs Publishing NuGet 1.0.1 update is available now, and is the only thing you need to enable the command-line scenario, so update your packages now and reap the benefits. As the Azure APIs evolve, and as our middleware and command-line experience continue to share resources such as the Azure Management Libraries, there will be more opportunities for repeatable automation. We’re investigating other opportunities, like providing non-authenticated AAD authentication and supporting some of the new resource management APIs. As those evolve we’ll update the community in the Azure and Web Development and Tools blogs, so stay tuned for more improvements (and let us know if you have any ideas or feedback).