With the launch of the Azure preview portal and the support for the Azure extension model, there are new diagnostic capabilities available that will help you better monitor your Azure IaaS VMs with very little setup and configuration. Azure IaaS monitoring involves collecting and tracking metrics, analyzing log files, defining custom metrics and logging generated by specific applications or workloads running in Virtual Machines.
Monitoring will also involve triggering alarms when certain conditions are met, and providing diagnostic data to help in troubleshooting and root cause analysis. Monitoring can help you gain visibility into your running deployments, resource utilization, application performance, operational health and application diagnostics. You can use these insights to react quickly and keep your application running smoothly. Most of the steps described below can be done directly from the portal.
In future, I will add instructions on how to setup and configure monitoring through the SDK API or PowerShell.
Note 1: This post covers Windows VMs only. For Linux Azure VMs, reference – Using Linux Diagnostic Extension to Monitor Linux VM’s performance and diagnostic data.
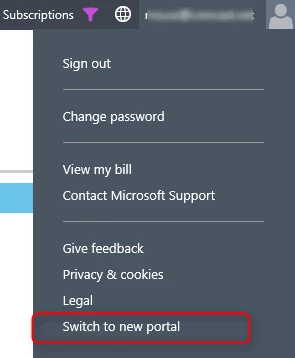
Note 2: The capabilities described are only supported on the new Azure portal; which is currently under preview. If you’re logged in to the default portal, you can switch to the new portal by going to the Subscriptions menu as shown below:
1. Install the VM Agent upon VM creation
The first step in setting up monitoring on the VM, is to ensure the VM Agent is installed within the VM either at creation time (which is the default configuration) or by updating an existing VM to ensure the VM Agent is running. If you used the default portal to create the VM from the portal, select “Install the VM Agent” as shown below; otherwise skip to step 2:
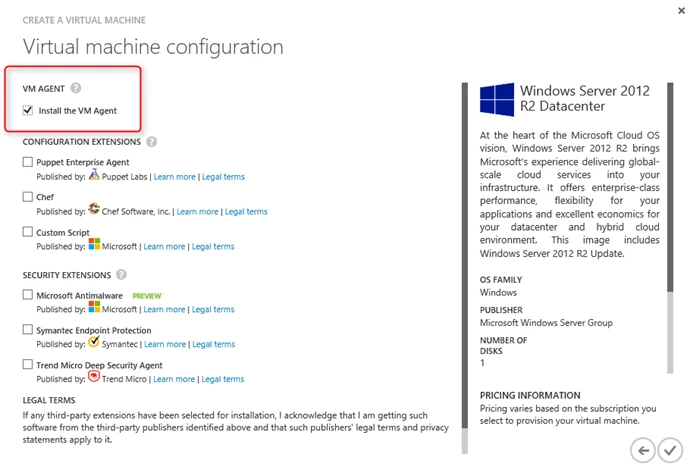
Upon completion, the VM will automatically have the VM Azure extension installed and running which will be responsible for managing other extensions including the new diagnostics agent. For more details on all the diagnostic KPIs that Azure Diagnostics supports and how to further configure it to meet your needs, please refer to the MSDN document: Enabling Diagnostics in Azure Cloud Services and Virtual Machines. For additional details about the Azure VM agent and Azure extensions’ use, please reference: Manage Extensions.
2. Enable Monitoring:
Diagnostics can be enabled at the VM level. To enable diagnostics, follow the below steps:
- Select the VM
- Click Monitoring section
- Click Settings
- Change Status to ON
- Click Ok

3. Configure Metrics:
Once you have enabled diagnostics, you can configure it to pick any sub-set or all the available KPIs to track as shown below. To pick KPIs to track, follow these steps:
- Select the VM
- Click Monitoring section
- Click Settings
- Diagnostics Frame will open
- Select Diagnostics metrics needed
- Click Ok

4. Accessing Diagnostics Data:
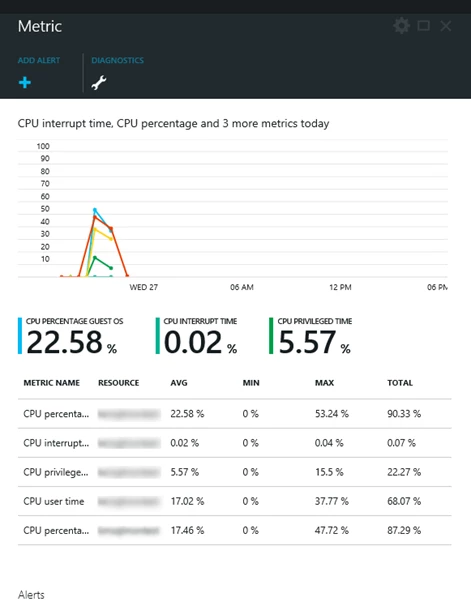
Now that we collected a set of KPIs to track, how do we access this monitoring data? The portal provides rich charts with any of the metrics collected from the VM. You can also select any custom time range and compare multiple metrics side-by-side. To view the charts follow the below steps:
- Select the VM
- Under Monitoring section, right click the chart
- Select Edit Chart
- Select Time Range and list of KPIs to display
- See sample below
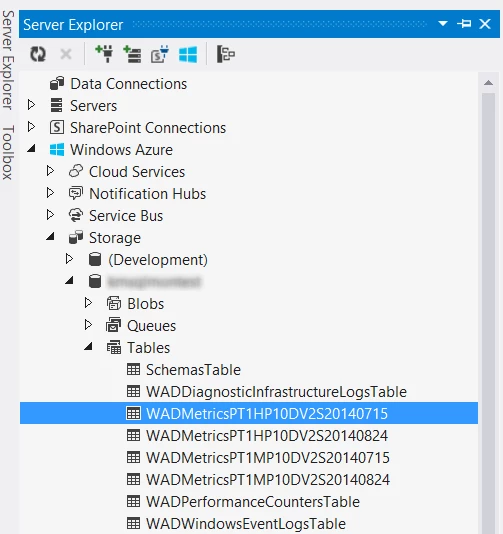
Since all of the diagnostic data collected was saved in a user storage account that we configured in step 3, we can access it using any of our favorite tools. Below for example, we can use Visual Studio to connect to our monitoring storage account and view the data, I can then export this data to my favorite BI application or Excel and build additional analytics from it. Here are the steps to access the data from Visual Studio:
- Go to Server Explorer
- Go to Windows Azure Grouping
- Go to Storage Grouping
- Find the storage account where the monitoring data was configured to be stored
- Go to Table: Monitoring data is stored in Azure tables
- Double click on associated monitoring table
In this post, I have shown how you can take advantage of Azure monitoring infrastructure to enable diagnostics on your Windows VMs running on Azure and how you can get some metrics tracking out of the box from Azure’s new portal in a consistent way as you would be monitoring your other Azure services. In future, we will be providing another post to cover in detail how you can use your existing tools such as SCOM – System Center Operations Manager to monitor your deployed Azure IaaS VMs as well as other supported monitoring scenarios. Until next time!