
Kubernetes: Getting started
Learn how to begin deploying and managing containerized applications.
A primer on containers
Before you get started with Kubernetes, it’s important to understand how containerization works.
In the same way that shipping industries use physical containers to isolate different cargos to transport in ships, trains, trucks and planes, software development technologies increasingly use a concept called containerization.
A single package of software—known as a container—bundles an application’s code together with the related configuration files, libraries, and the dependencies required for the app to run. This allows developers and IT pros to create and deploy applications faster and more securely.
Containerization offers the benefits of isolation, portability, agility, scalability, and control across an application’s whole lifecycle workflow. A container, abstracted away from the host operating system, stands alone and becomes more portable—able to run across any platform or cloud, uniformly and consistently on any infrastructure.
Kubernetes components and concepts
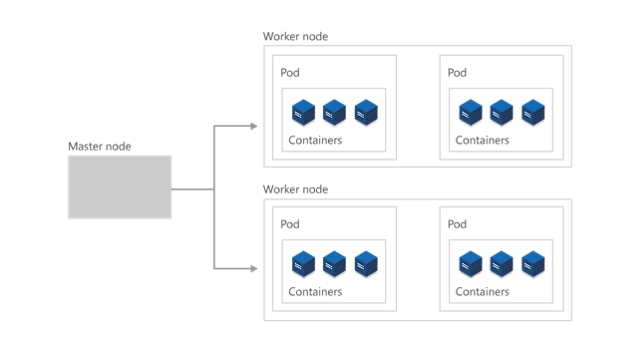
The cluster
At the highest level, Kubernetes is organized as a cluster of virtual or on-premises machines. These machines—called nodes—share compute, network, and storage resources. Each cluster has one master node connected to one or more worker nodes. The worker nodes are responsible for running groups of containerized applications and workloads, known as pods, and the master node manages which pods run on which worker nodes.
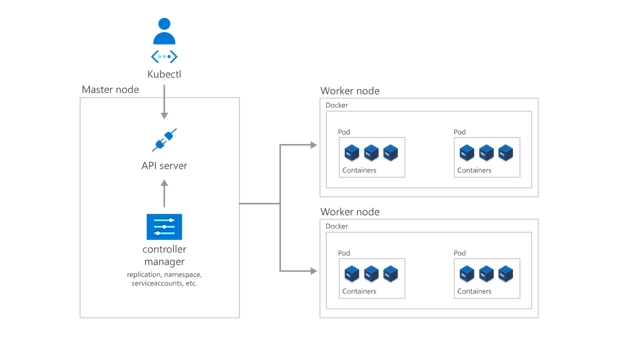
The control plane
In order for the master node to communicate with the worker nodes—and for a person to communicate with the master node—Kubernetes includes a number of objects that collectively form the control plane.
Developers and operators interact with the cluster primarily through the master node by using kubectl, a command-line interface that installs on their local OS. Commands issued to the cluster through kubectl are received by the kube-apiserver, the Kubernetes API that resides on the master node. The kube-apiserver then communicates requests to the kube-controller-manager in the master node, which is in turn responsible for handling worker node operations. Commands from the master node are received by the kubelet on the worker nodes.
Deploying apps and workloads
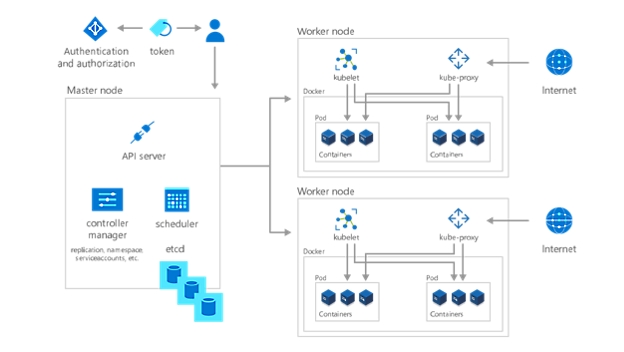
The next step to getting started with Kubernetes is deploying apps and workloads. The master node maintains the current state of the Kubernetes cluster and configuration in the etcd, a key value store database, at all times. To run pods with your containerized apps and workloads, you’ll describe a new desired state to the cluster in the form of a YAML file. The kube-controller-manager takes the YAML file and tasks the kube-scheduler with deciding which worker nodes the app or workload should run based on predetermined constraints. Working in concert with each worker node’s kubelet, the kube-scheduler starts the pods, watches the state of the machines, and is overall responsible for the resource management.
In a Kubernetes deployment, the desired state you describe becomes the current state in the etcd, but the previous state isn’t lost. Kubernetes supports rollbacks, rolling updates, and pausing rollouts. Additionally, deployments use ReplicaSets in the background to ensure that the specified number of identically configured pods are running. If one or more pods happen to fail, the ReplicaSet replaces them. In this way, Kubernetes is said to be self-healing.

Structuring and securing Kubernetes environments
With your app or workload deployed, the last step to getting started with Kubernetes is organizing them—and determining who or what has access to them. By creating a namespace, a grouping method inside Kubernetes, you allow services, pods, controllers, and volumes to easily work together while isolating them from other parts of the cluster. As well, use the Kubernetes concept of namespaces to apply consistent configurations to resources.
Further, each worker node contains a kube-proxy, which determines how various aspects of the cluster can be accessed from the outside. Store sensitive non-public information like tokens, certificates, and passwords in secrets—another Kubernetes object—that are encoded until runtime.
Lastly, specify who can see and interact with which parts of the cluster—and how they’re allowed to interact—by using role-based access control (RBAC).
Implement a fully managed Kubernetes solution
Manage your hosted Kubernetes environment with Azure Kubernetes Service (AKS). Deploy and maintain containerized apps without container orchestration experience. Provision, upgrade, and scale resources on demand—without taking your apps offline.
Kubernetes quickstart: get up and running in 50 days
Use this step-by-step guide to getting started with Kubernetes and gain hands-on experience with Kubernetes components, capabilities, and solutions.
Follow the Kubernetes learning path