자습서: Firebase SDK 버전 0.6을 사용하여 Android 디바이스에 푸시 알림 보내기
이 자습서에서는 Azure Notification Hubs 및 FCM(Firebase Cloud Messaging) SDK 버전 0.6을 사용하여 Android 애플리케이션에 푸시 알림을 보내는 방법을 보여 줍니다. 이 자습서에서는 FCM(Firebase Cloud Messaging)을 사용하여 푸시 알림을 받는 빈 Android 앱을 만듭니다.
Important
Google은 2024년 6월 20일에 FCM 레거시 HTTP 지원을 중단할 예정입니다. 자세한 내용은 Azure Notification Hubs 및 Google Firebase Cloud Messaging 마이그레이션을 참조 하세요.
이 자습서의 완료된 코드는 GitHub에서 다운로드할 수 있습니다.
이 자습서에서 수행하는 단계는 다음과 같습니다.
- Android Studio 프로젝트를 만듭니다.
- Firebase Cloud Messaging을 지원하는 Firebase 프로젝트를 만듭니다.
- 허브를 만듭니다.
- 허브에 앱을 연결합니다.
- 앱을 테스트합니다.
필수 조건
이 자습서를 완료하려면 활성 Azure 계정이 있어야 합니다. 계정이 없는 경우 몇 분 만에 평가판 계정을 만들 수 있습니다. 자세한 내용은 Azure 평가판을 참조하세요.
또한 다음 항목이 필요합니다.
- 최신 버전의 Android Studio
- Firebase Cloud Messaging용 Android 2.3 이상
- Firebase Cloud Messaging에 대한 Google 리포지토리 수정 버전 27 이상
- Firebase Cloud Messaging용 Google Play 서비스 9.0.2 이상
이 자습서를 완료하는 것은 Android 앱에 대한 다른 모든 Notification Hubs 자습서를 수행하기 위한 필수 구성 요소입니다.
Android Studio 프로젝트 만들기
- Android Studio를 시작합니다.
- File(파일)을 선택하고, New(신규)를 가리킨 후, New Project(새 프로젝트)를 선택합니다.
- Choose your project 페이지에서 Empty Activity를 선택한 후 Next를 선택합니다.
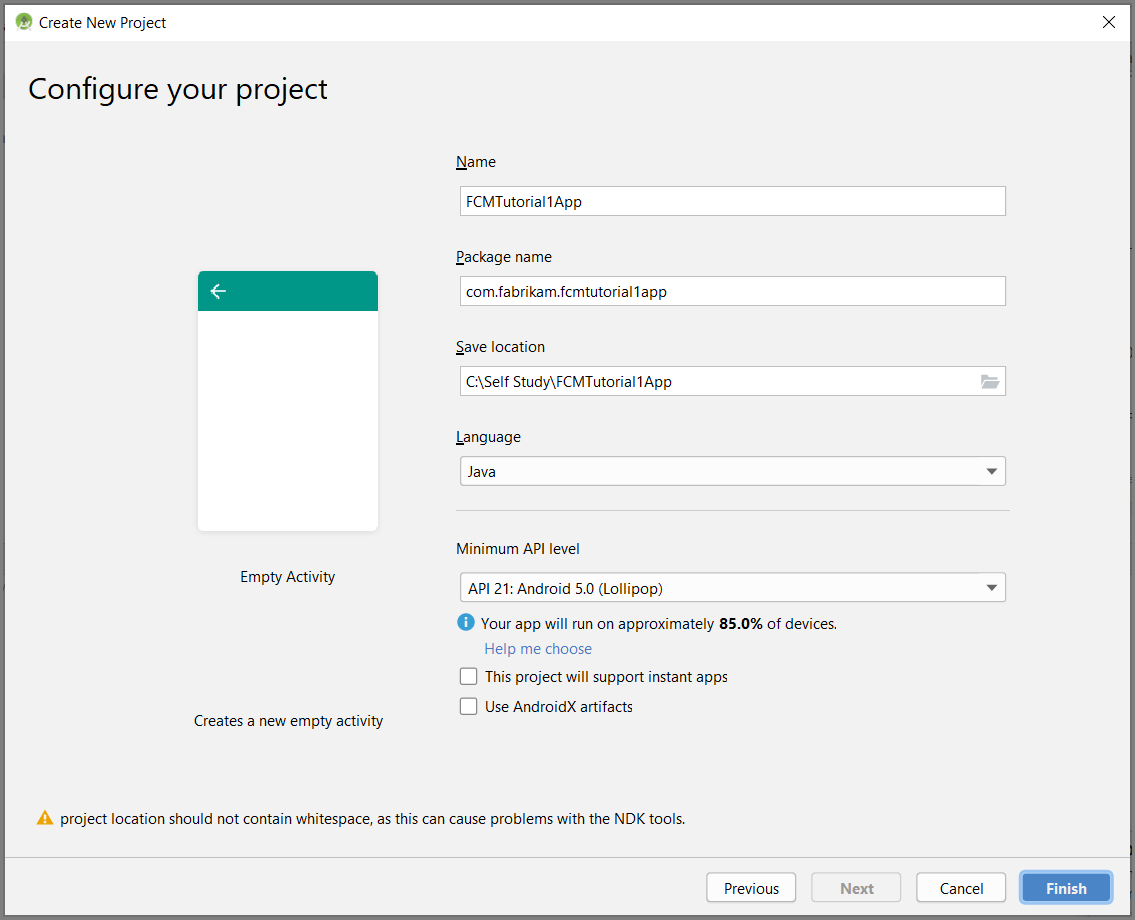
- 프로젝트 구성 페이지에서 다음 단계를 수행합니다.
애플리케이션의 이름을 입력합니다.
프로젝트 파일을 저장할 위치를 지정합니다.
마침을 선택합니다.
FCM을 지원하는 Firebase 프로젝트 만들기
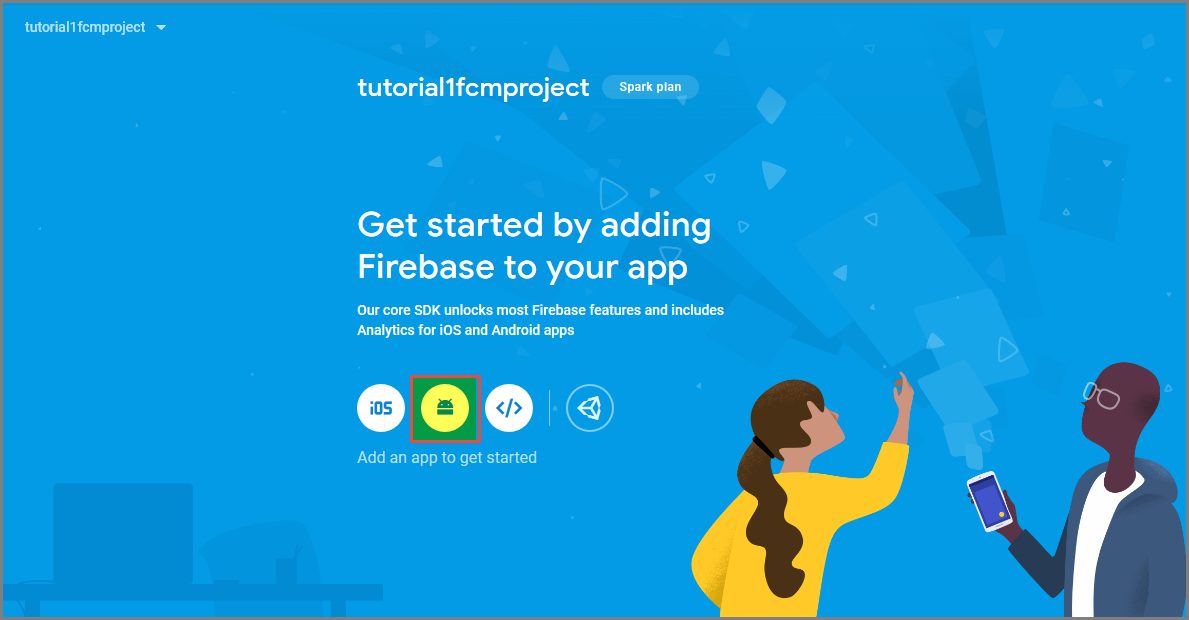
Firebase 콘솔에 로그인합니다. 아직 없는 경우 새 Firebase 프로젝트를 만듭니다.
프로젝트를 만든 후 Android 앱에 Firebase 추가를 선택합니다.
Android 앱에 Firebase 추가 페이지에서 다음 단계를 수행합니다.
Android 패키지 이름에서 애플리케이션의 build.gradle 파일에 있는 applicationId 값을 복사합니다. 이 예에서는
com.fabrikam.fcmtutorial1app입니다.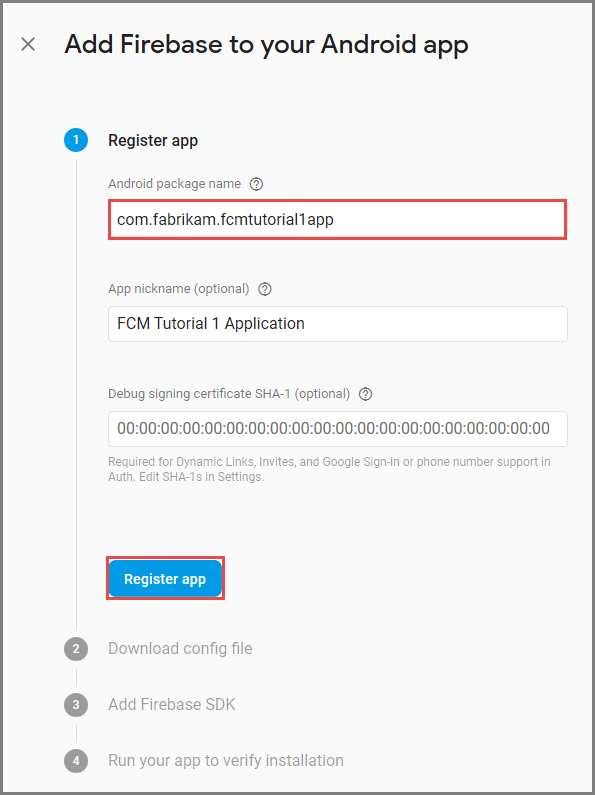
앱 등록을 선택합니다.
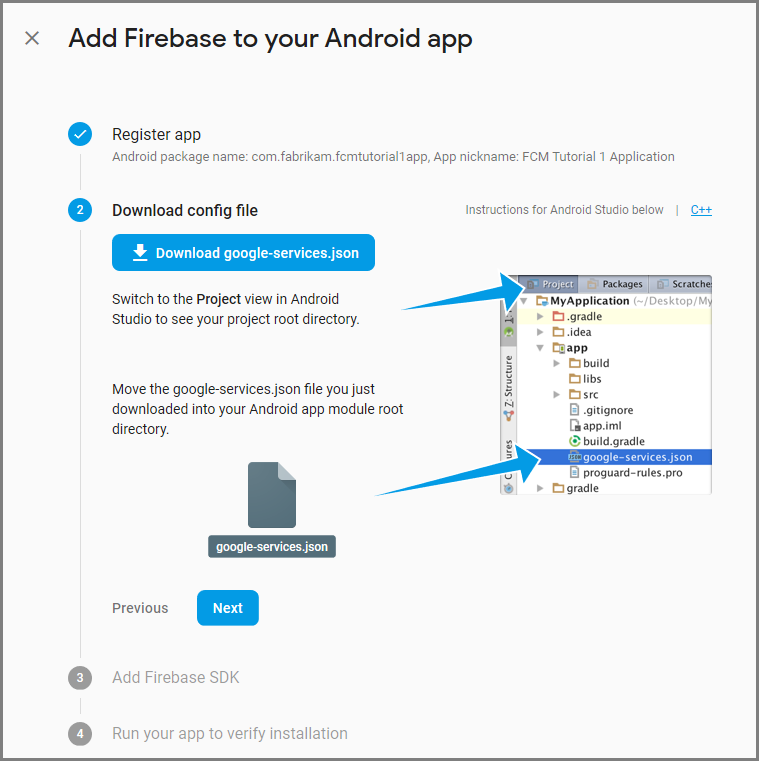
google-services.json 다운로드를 선택하고 프로젝트의 app 폴더에 파일을 저장한 후 다음을 선택합니다.
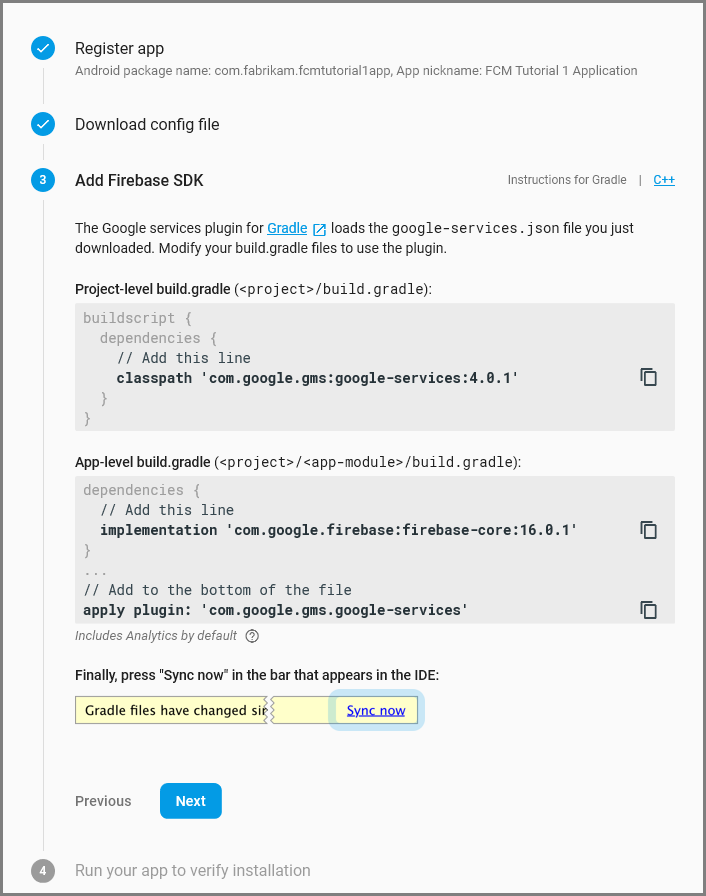
Android Studio에서 프로젝트에 대해 다음과 같은 구성을 변경 합니다.
프로젝트 수준 build.gradle 파일(<project>/build.gradle)에서 종속성 섹션에 다음 문을 추가합니다 .
classpath 'com.google.gms:google-services:4.0.1'app-level build.gradle 파일(<project>/<app-module>/build.gradle)에서 dependencies 섹션에 다음 명령문을 추가합니다.
implementation 'com.google.firebase:firebase-core:16.0.8'
implementation 'com.google.firebase:firebase-messaging:17.3.4'
종속성 섹션 다음에 앱 수준 build.gradle 파일의 끝에 다음 줄을 추가합니다.
apply plugin: 'com.google.gms.google-services'도구 모음에서 지금 동기화를 선택합니다.
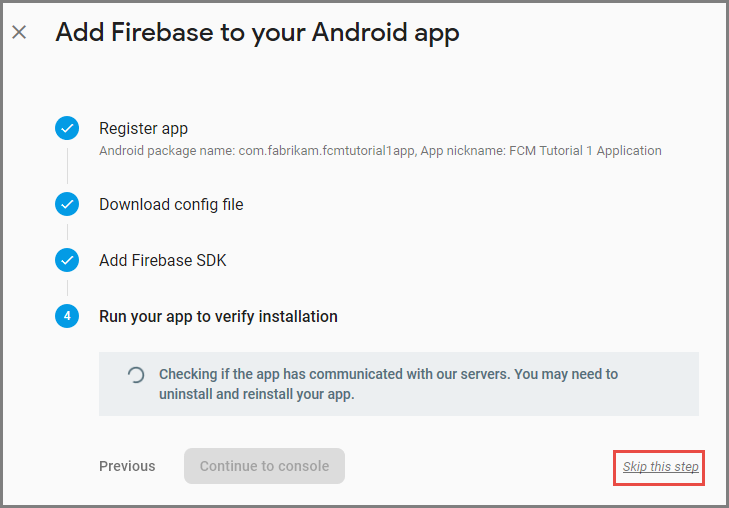
다음을 선택합니다.
이 단계 건너뛰기를 선택합니다.
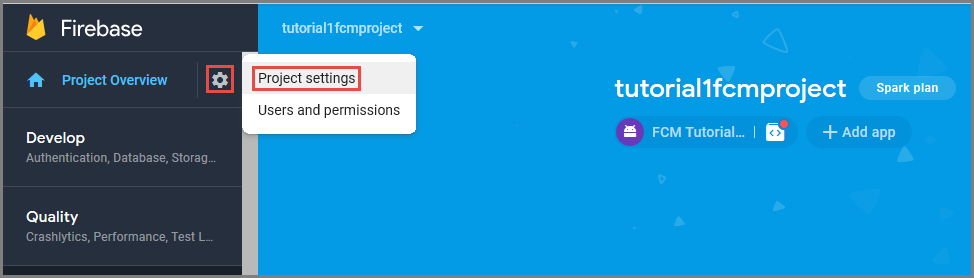
Firebase 콘솔에서 프로젝트의 톱니바퀴를 선택합니다. 그런 후 프로젝트 설정을 선택합니다.
Android Studio 프로젝트의 앱 폴더에 google-services.json 파일을 다운로드하지 않은 경우 이 페이지에서 다운로드할 수 있습니다.
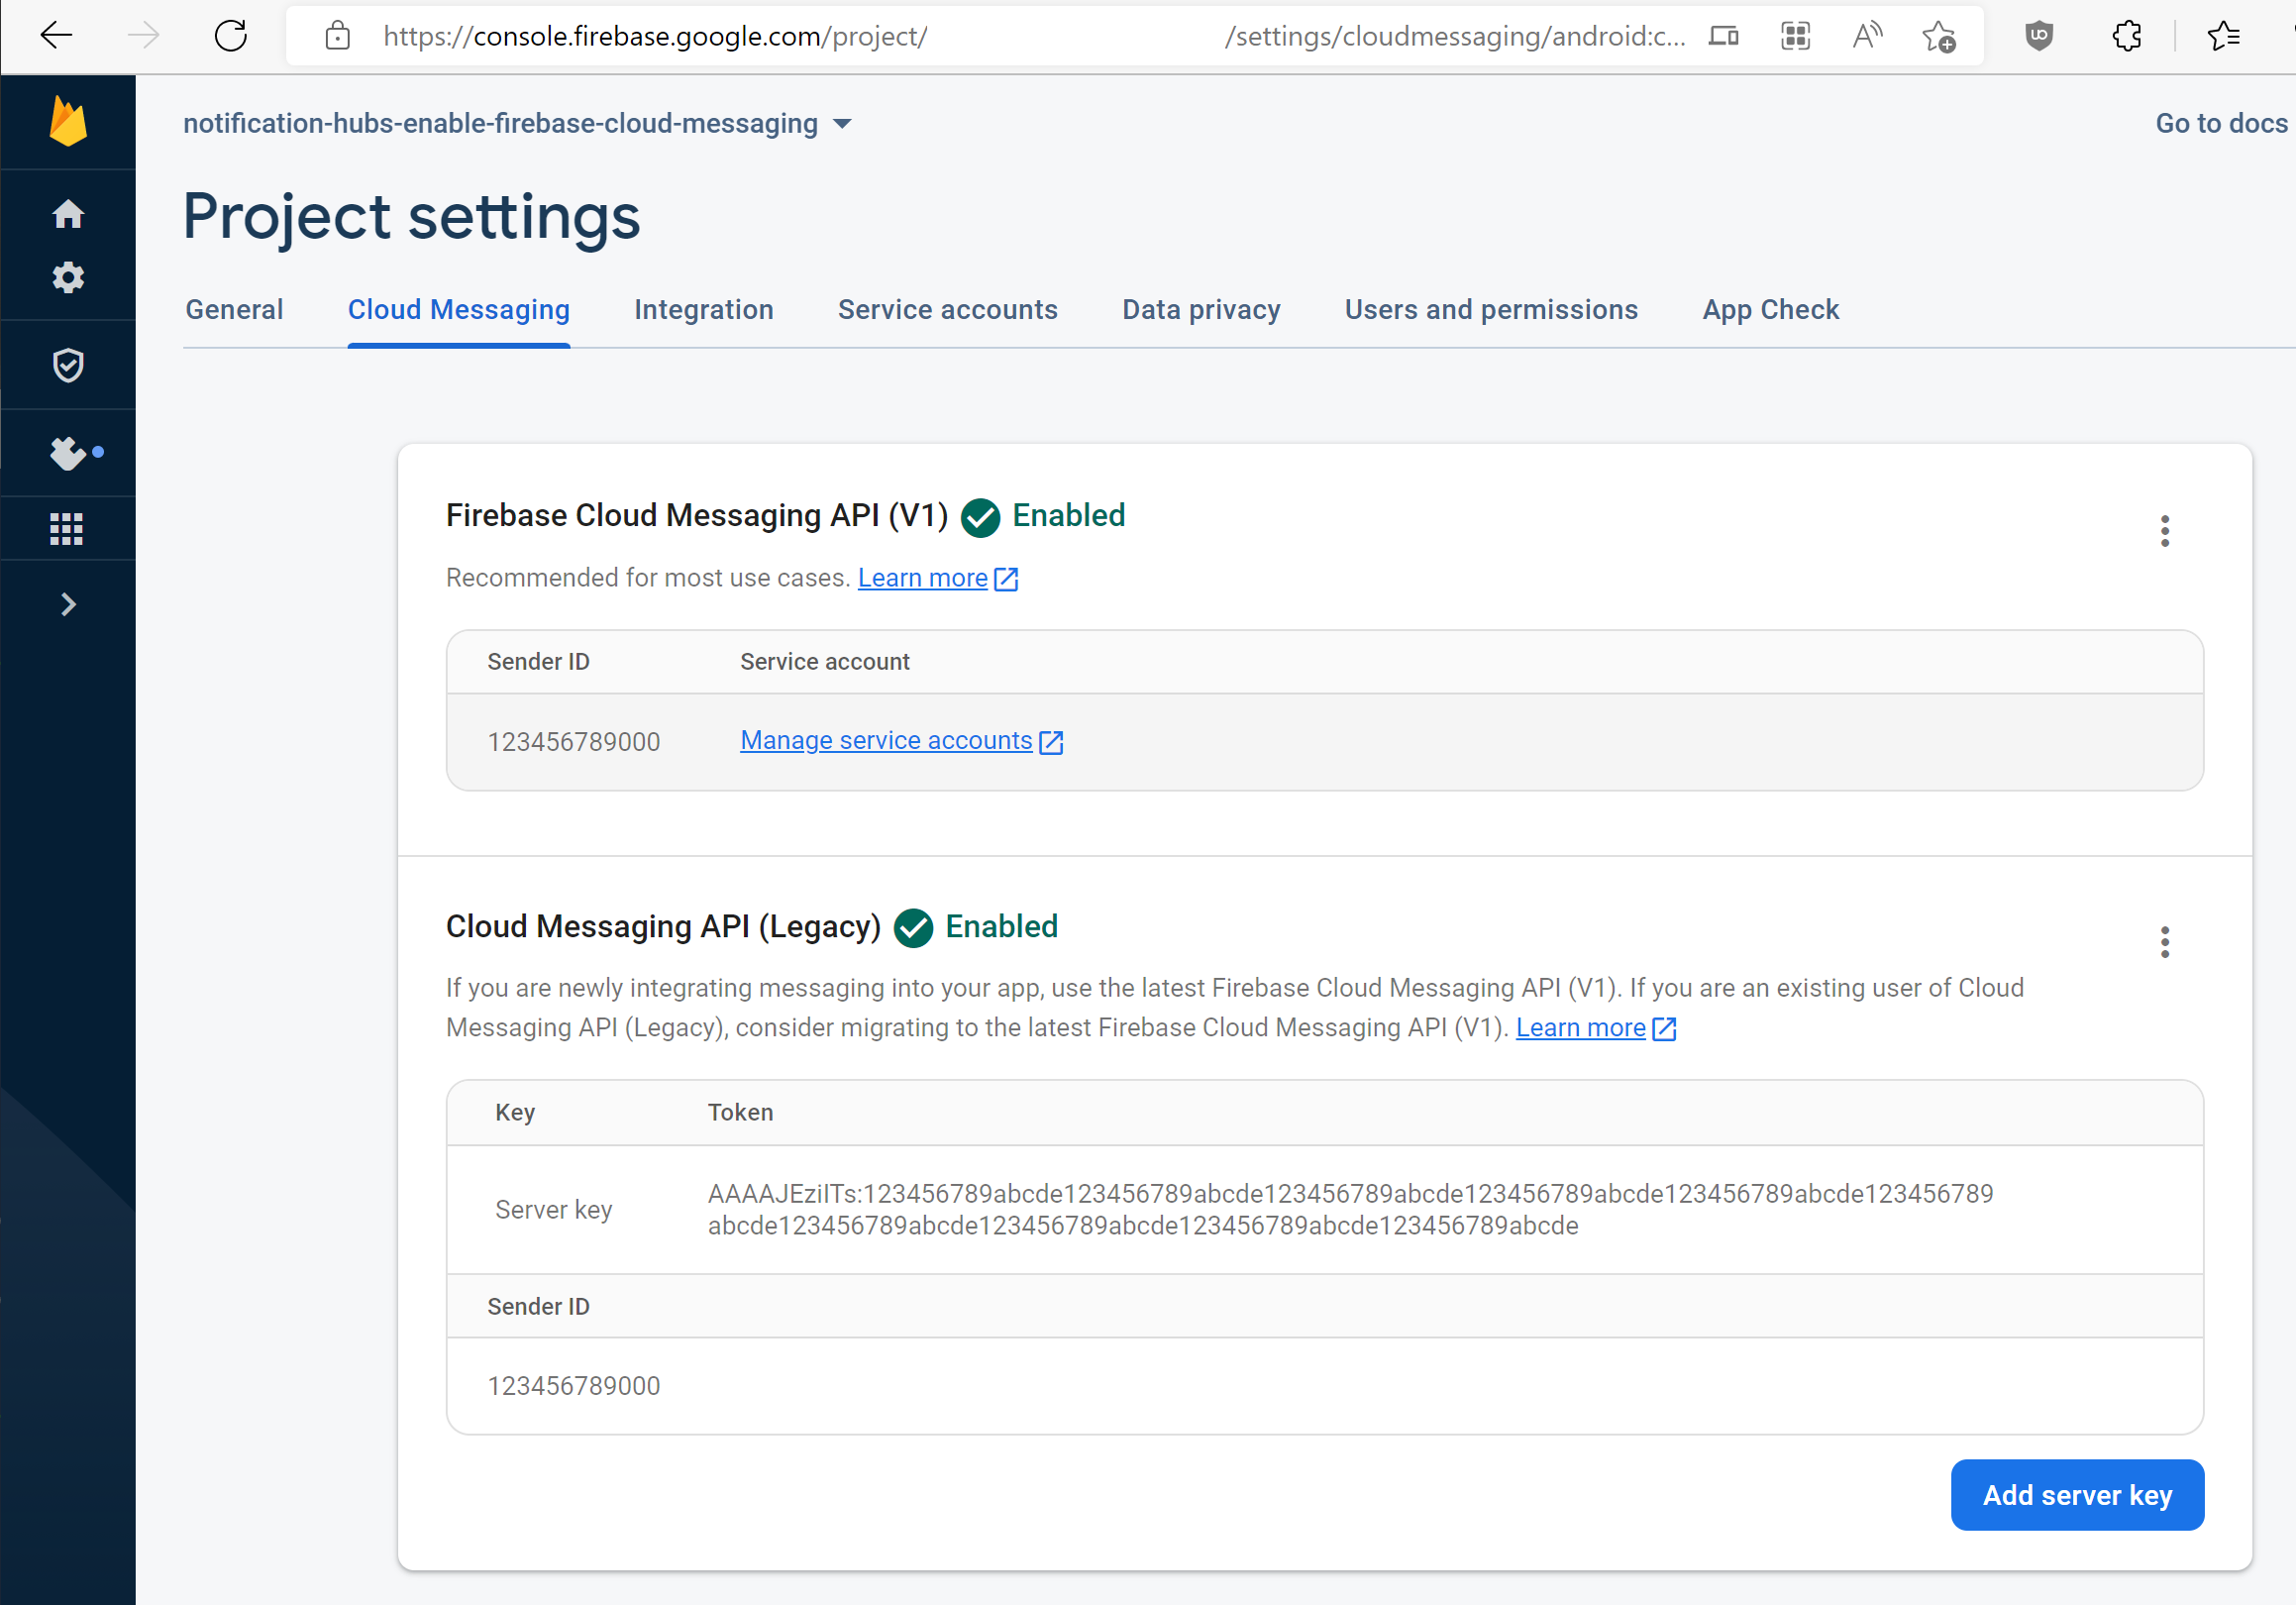
맨 위에 있는 클라우드 메시징 탭으로 전환합니다.
나중에 사용하기 위해 서버 키를 복사하고 저장합니다. 이 값을 사용하여 허브를 구성합니다.
Firebase Cloud Messaging 탭에 서버 키가 표시되지 않으면 다음 추가 단계를 수행합니다.
- "Cloud Messaging API(레거시) 🚫 사용 안 함" 제목의 세 점 메뉴를 클릭합니다.
- "Google Cloud Console에서 API 관리"에 대해 제공된 링크를 따릅니다.
- Google Cloud Console에서 googlecloudmessaging API를 사용하도록 설정하는 단추를 누릅니다.
- 잠시 기다립니다.
- firebase 콘솔 프로젝트 Cloud Messaging 탭으로 돌아가기 페이지를 새로 고칩니다.
- Cloud Messaging API 헤더가 "Cloud Messaging API(레거시) ✅ 사용"으로 변경되었으며 이제 서버 키가 표시되는지 확인합니다.
허브 구성
Azure Portal에 로그인합니다.
왼쪽 메뉴에서 모든 서비스를 선택합니다.
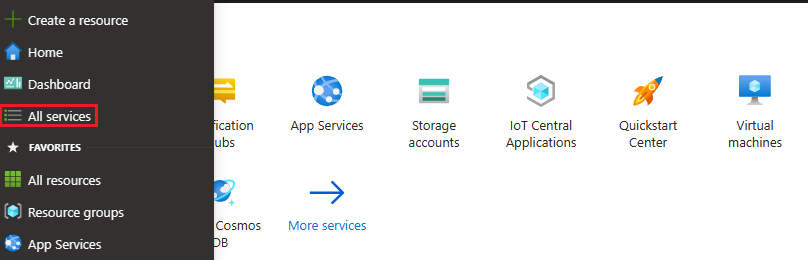
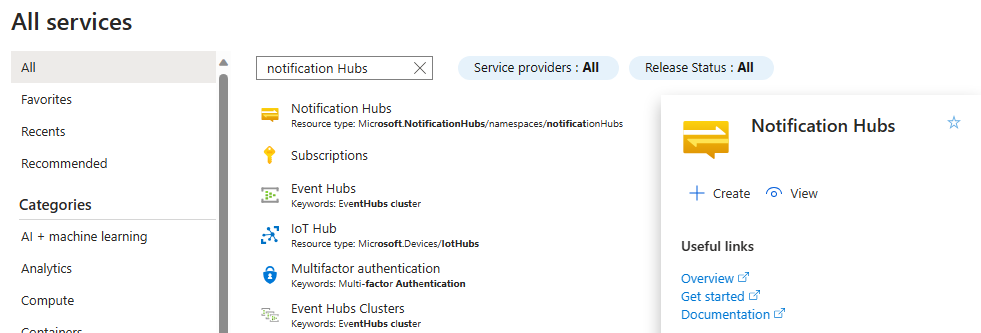
필터 서비스 텍스트 상자에 Notification Hubs를 입력합니다. 서비스 이름 옆의 별표 아이콘을 선택하여 서비스를 왼쪽 메뉴의 즐겨찾기 섹션에 추가합니다. Notification Hubs를 선택합니다.
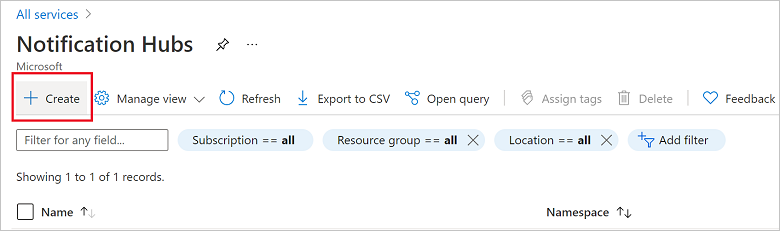
Notification Hubs 페이지의 도구 모음에서 만들기를 선택합니다.
Notification Hub 페이지의 기본 탭에서 다음 단계를 수행합니다.
구독에서 사용하려는 Azure 구독 이름을 선택한 다음, 기존 리소스 그룹을 선택하거나 새 리소스 그룹을 만듭니다.
네임스페이스 세부 정보에 새 네임스페이스의 고유한 이름을 입력합니다.
네임스페이스에 알림 허브가 하나 이상 포함되어 있으므로 Notification Hub 세부 정보에 허브 이름을 입력합니다.
위치 드롭다운 목록 상자에서 값을 선택합니다. 이 값은 허브를 만들려는 위치를 지정합니다.
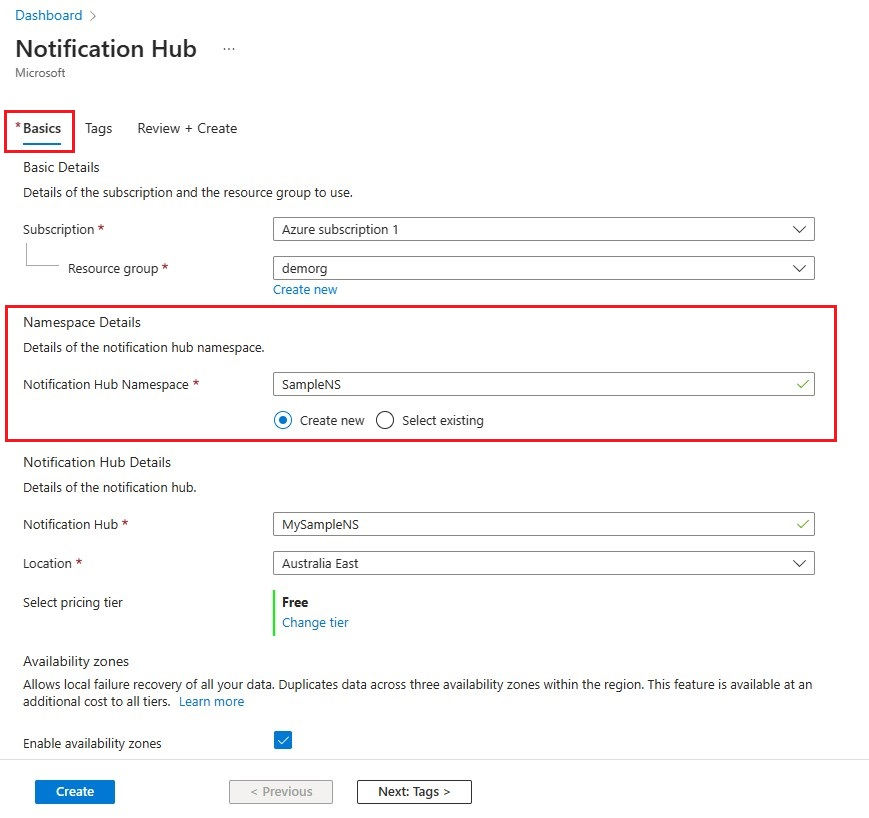
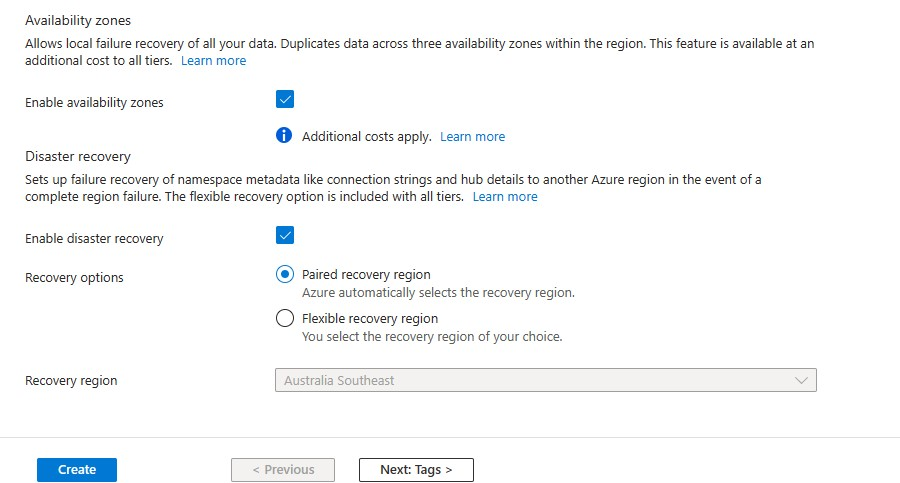
가용성 영역 옵션을 검토합니다. 가용성 영역이 있는 지역을 선택한 경우 기본적으로 확인란이 선택됩니다. 가용성 영역은 유료 기능이므로 계층에 추가 요금이 추가됩니다.
재해 복구 옵션을 선택합니다. 없음, 쌍을 이루는 복구 지역 또는 유연한 복구 지역. 쌍을 이루는 복구 지역을 선택하면 장애 조치(failover) 지역이 표시됩니다. 유연한 복구 지역을 선택한 경우 드롭다운을 사용하여 복구 지역 목록에서 선택합니다.
만들기를 실행합니다.
배포가 완료되면 리소스로 이동을 선택합니다.


허브에 대한 Firebase Cloud Messaging 설정 구성
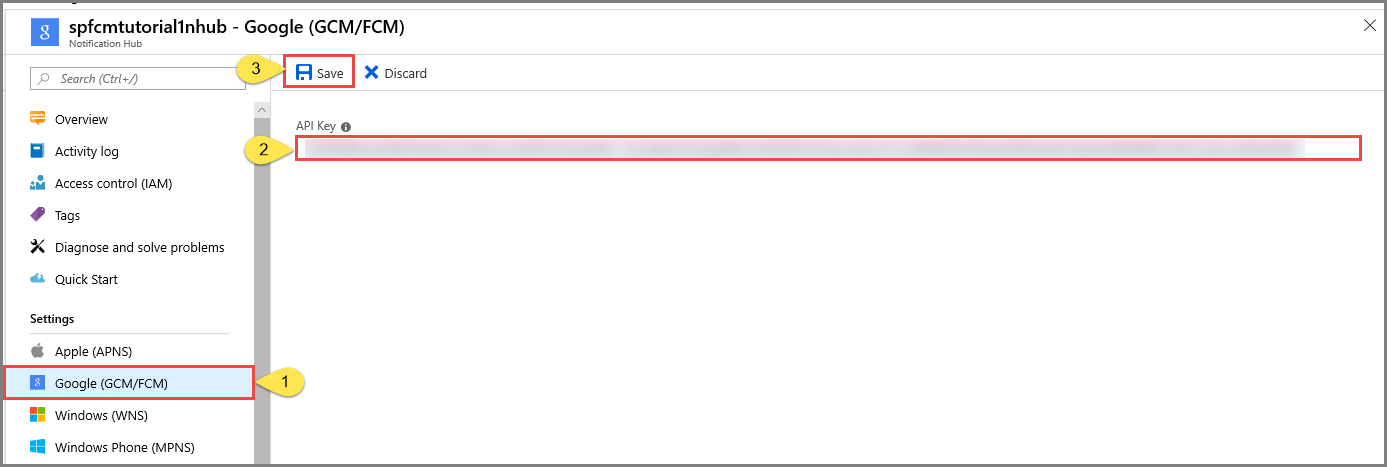
설정 아래의 왼쪽 창에서 Google(GCM/FCM)을 선택합니다.
앞에서 저장한 FCM 프로젝트의 서버 키를 입력합니다.
도구 모음에서 저장을 선택합니다.
Azure Portal은 허브가 성공적으로 업데이트되었다는 메시지를 경고에 표시합니다. Save 단추가 비활성화됩니다.
이제 허브가 Firebase Cloud Messaging과 작동하도록 구성되었습니다. 디바이스에 알림을 보내고, 앱을 등록하여 알림을 수신하는 데 필요한 연결 문자열도 있습니다.
알림 허브에 앱 연결
프로젝트에 Google Play Services 추가
Android Studio의 메뉴에서 도구를 선택하고, SDK Manager를 선택합니다.
프로젝트에서 사용되는 Android SDK의 대상 버전을 선택합니다. 그런 다음 패키지 세부 정보 표시를 선택합니다.
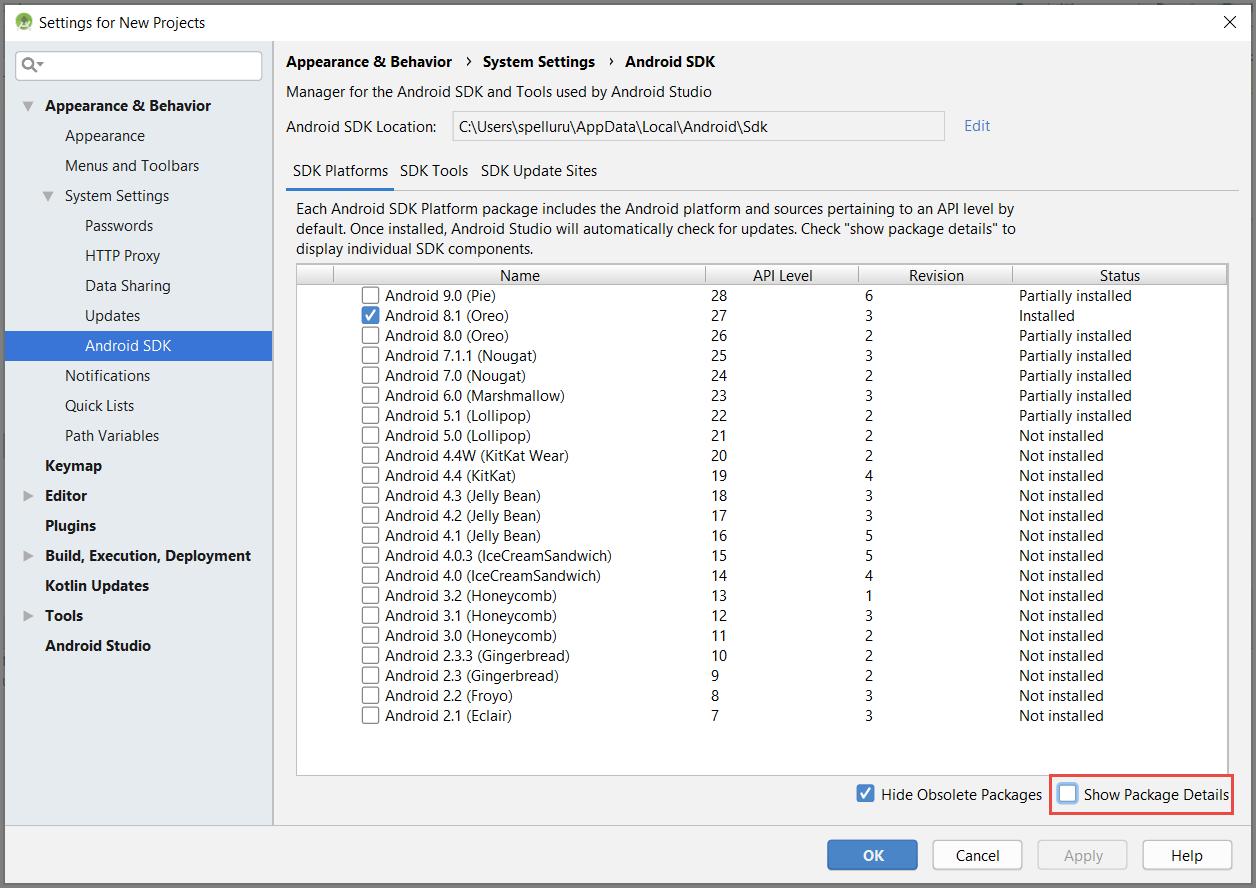
Google API를 선택합니다(아직 설치되지 않은 경우).

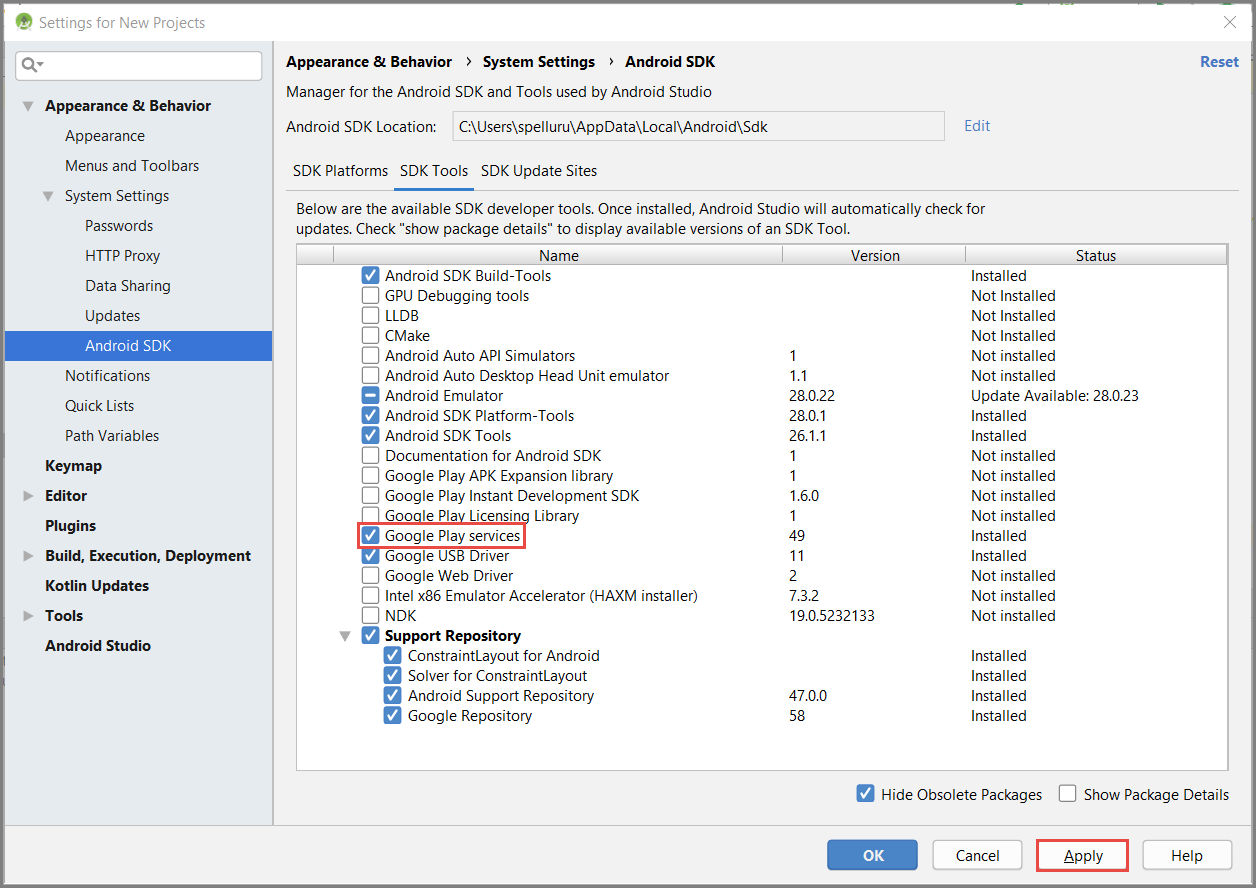
SDK 도구 탭으로 전환합니다. Google Play 서비스를 아직 설치하지 않은 경우 다음 이미지처럼 Google Play 서비스를 선택합니다. 그런 다음 적용을 선택하여 설치합니다. 이후 단계에서 사용할 수 있도록 SDK 경로를 기록해 둡니다.
변경 확인 대화 상자가 나타나면 확인을 선택합니다. 구성 요소 설치 관리자가 요청된 구성 요소를 설치합니다. 구성 요소가 설치되면 완료를 선택합니다.
확인을 선택하여 새 프로젝트 설정 대화 상자를 닫습니다.
AndroidManifest.xml 파일을 연 다음 application 태그에 다음 태그를 추가합니다.
<meta-data android:name="com.google.android.gms.version"
     android:value="@integer/google_play_services_version" />
Azure Notification Hubs 라이브러리 추가
앱의 Build.Gradle 파일에서 종속성 섹션에 다음 줄을 추가합니다.
implementation 'com.microsoft.azure:notification-hubs-android-sdk:0.6@aar'종속성 섹션 뒤에 다음 리포지토리를 추가합니다.
repositories {
    maven {
        url "https://dl.bintray.com/microsoftazuremobile/SDK"
    }
}
Google Firebase 지원 추가
앱의 Build.Gradle 파일에서 종속성 섹션에 아직 없는 경우 다음 줄을 추가합니다.
implementation 'com.google.firebase:firebase-core:16.0.8'
implementation 'com.google.firebase:firebase-messaging:17.3.4'
implementation 'com.google.firebase:firebase-iid:21.1.0'
파일 끝에 다음 플러그 인이 아직 없는 경우 추가합니다.
apply plugin: 'com.google.gms.google-services'도구 모음에서 지금 동기화를 선택합니다.
AndroidManifest.xml 파일 업데이트
FCM 등록 토큰을 받으면 이를 사용하여 Azure Notification Hubs에 등록합니다.
RegistrationIntentService라는IntentService를 사용하여 백그라운드에서 이 등록을 지원합니다. 이 서비스는 FCM 등록 토큰도 새로 고칩니다. 또한 알림을 받고 처리하도록 메서드의 하위 클래스로 명명FirebaseService된 클래스를 만들고 재정onMessageReceived의FirebaseMessagingService합니다.AndroidManifest.xml 파일의
<application>태그 내부에 다음 서비스 정의를 추가합니다.<service android:name=".RegistrationIntentService" android:exported="false"> </service> <service android:name=".FirebaseService" android:exported="false"> <intent-filter> <action android:name="com.google.firebase.MESSAGING_EVENT" /> </intent-filter> </service>태그 아래에
</application>다음 필요한 FCM 관련 권한을 추가합니다.<uses-permission android:name="android.permission.INTERNET"/> <uses-permission android:name="android.permission.GET_ACCOUNTS"/> <uses-permission android:name="com.google.android.c2dm.permission.RECEIVE" />
코드 추가
프로젝트 뷰에서 앱>src>기본>java를 확장합니다. Java에서 패키지 폴더를 마우스 오른쪽 단추로 클릭하고 새로 만들기를 선택한 다음 Java 클래스를 선택합니다. 이름에 대한 알림설정 입력한 다음 확인을 선택합니다.
아래의
NotificationSettings클래스에 대한 코드에서 다음 두 개의 자리 표시자를 업데이트합니다.HubListen커넥트ionString: 허브에 대한 DefaultListenAccessSignature 연결 문자열. Azure Portal의 허브에서 액세스 정책을 클릭하여 해당 연결 문자열 복사할 수 있습니다.
HubName: Azure Portal의 허브 페이지에 표시되는 허브의 이름을 사용합니다.
NotificationSettings코드:public class NotificationSettings { public static String HubName = "<Your HubName>"; public static String HubListenConnectionString = "<Enter your DefaultListenSharedAccessSignature connection string>"; }Important
계속하기 전에 허브의 이름 및 DefaultListenSharedAccessSignature를 입력합니다.
RegistrationIntentService라는 프로젝트에 또 다른 새 클래스를 추가합니다. 이 클래스는IntentService인터페이스를 구현합니다. 또한 FCM 토큰 새로 고침 및 알림 허브에 등록을 처리합니다.이 클래스에 대해 다음 코드를 사용합니다.
import android.app.IntentService;
import android.content.Intent;
import android.content.SharedPreferences;
import android.preference.PreferenceManager;
import android.util.Log;
import com.google.android.gms.tasks.OnSuccessListener;
import com.google.firebase.iid.FirebaseInstanceId;
import com.google.firebase.iid.InstanceIdResult;
import com.microsoft.windowsazure.messaging.NotificationHub;
import java.util.concurrent.TimeUnit;

public class RegistrationIntentService extends IntentService {

    private static final String TAG = "RegIntentService";
    String FCM_token = null;

    private NotificationHub hub;

    public RegistrationIntentService() {
        super(TAG);
    }

    @Override
    protected void onHandleIntent(Intent intent) {

        SharedPreferences sharedPreferences = PreferenceManager.getDefaultSharedPreferences(this);
        String resultString = null;
        String regID = null;
        String storedToken = null;

        try {
            FirebaseInstanceId.getInstance().getInstanceId().addOnSuccessListener(new OnSuccessListener<InstanceIdResult>() {
                @Override
                public void onSuccess(InstanceIdResult instanceIdResult) {
                    FCM_token = instanceIdResult.getToken();
                    Log.d(TAG, "FCM Registration Token: " + FCM_token);
                }
            });
            TimeUnit.SECONDS.sleep(1);

            // Storing the registration ID that indicates whether the generated token has been
            // sent to your server. If it is not stored, send the token to your server.
            // Otherwise, your server should have already received the token.
            if (((regID=sharedPreferences.getString("registrationID", null)) == null)){

                NotificationHub hub = new NotificationHub(NotificationSettings.HubName,
                        NotificationSettings.HubListenConnectionString, this);
                Log.d(TAG, "Attempting a new registration with NH using FCM token : " + FCM_token);
                regID = hub.register(FCM_token).getRegistrationId();

                // If you want to use tags...
                // Refer to : https://azure.microsoft.com/documentation/articles/notification-hubs-routing-tag-expressions/
                // regID = hub.register(token, "tag1,tag2").getRegistrationId();

                resultString = "New NH Registration Successfully - RegId : " + regID;
                Log.d(TAG, resultString);

                sharedPreferences.edit().putString("registrationID", regID ).apply();
                sharedPreferences.edit().putString("FCMtoken", FCM_token ).apply();
            }

            // Check to see if the token has been compromised and needs refreshing.
           else if (!(storedToken = sharedPreferences.getString("FCMtoken", "")).equals(FCM_token)) {

                NotificationHub hub = new NotificationHub(NotificationSettings.HubName,
                        NotificationSettings.HubListenConnectionString, this);
                Log.d(TAG, "NH Registration refreshing with token : " + FCM_token);
                regID = hub.register(FCM_token).getRegistrationId();

                // If you want to use tags...
                // Refer to : https://azure.microsoft.com/documentation/articles/notification-hubs-routing-tag-expressions/
                // regID = hub.register(token, "tag1,tag2").getRegistrationId();

                resultString = "New NH Registration Successfully - RegId : " + regID;
                Log.d(TAG, resultString);

                sharedPreferences.edit().putString("registrationID", regID ).apply();
                sharedPreferences.edit().putString("FCMtoken", FCM_token ).apply();
            }

            else {
                resultString = "Previously Registered Successfully - RegId : " + regID;
            }
        } catch (Exception e) {
            Log.e(TAG, resultString="Failed to complete registration", e);
            // If an exception happens while fetching the new token or updating registration data
            // on a third-party server, this ensures that we'll attempt the update at a later time.
        }

        // Notify UI that registration has completed.
        if (MainActivity.isVisible) {
            MainActivity.mainActivity.ToastNotify(resultString);
        }
    }
}
클래스에서
MainActivity클래스 선언 위에 다음import문을 추가합니다.import com.google.android.gms.common.ConnectionResult; import com.google.android.gms.common.GoogleApiAvailability; import android.content.Intent; import android.util.Log; import android.widget.TextView; import android.widget.Toast;클래스의 맨 위에 다음 멤버를 추가합니다. 이러한 필드를 사용하여 Google에서 권장한 대로 Google Play 서비스의 가용성을 확인합니다.
public static MainActivity mainActivity; public static Boolean isVisible = false; private static final String TAG = "MainActivity"; private static final int PLAY_SERVICES_RESOLUTION_REQUEST = 9000;MainActivity클래스에서 다음 메서드를 추가하여 Google Play 서비스의 가용성을 검사./** * Check the device to make sure it has the Google Play Services APK. If * it doesn't, display a dialog box that enables users to download the APK from * the Google Play Store or enable it in the device's system settings. */ private boolean checkPlayServices() { GoogleApiAvailability apiAvailability = GoogleApiAvailability.getInstance(); int resultCode = apiAvailability.isGooglePlayServicesAvailable(this); if (resultCode != ConnectionResult.SUCCESS) { if (apiAvailability.isUserResolvableError(resultCode)) { apiAvailability.getErrorDialog(this, resultCode, PLAY_SERVICES_RESOLUTION_REQUEST) .show(); } else { Log.i(TAG, "This device is not supported by Google Play Services."); ToastNotify("This device is not supported by Google Play Services."); finish(); } return false; } return true; }MainActivity클래스에서 FCM 등록 토큰을 가져오고 허브에 등록하기 위해 호출IntentService하기 전에 Google Play 서비스에 검사 다음 코드를 추가합니다.public void registerWithNotificationHubs() { if (checkPlayServices()) { // Start IntentService to register this application with FCM. Intent intent = new Intent(this, RegistrationIntentService.class); startService(intent); } }클래스의
OnCreateMainActivity메서드에서 다음 코드를 추가하여 활동을 만들 때 등록 프로세스를 시작합니다.@Override protected void onCreate(Bundle savedInstanceState) { super.onCreate(savedInstanceState); setContentView(R.layout.activity_main); mainActivity = this; registerWithNotificationHubs(); FirebaseService.createChannelAndHandleNotifications(getApplicationContext()); }앱 상태를 확인하고 앱에서 상태 보고하려면 다음 추가 메서드를 추가합니다
MainActivity.@Override protected void onStart() { super.onStart(); isVisible = true; } @Override protected void onPause() { super.onPause(); isVisible = false; } @Override protected void onResume() { super.onResume(); isVisible = true; } @Override protected void onStop() { super.onStop(); isVisible = false; } public void ToastNotify(final String notificationMessage) { runOnUiThread(new Runnable() { @Override public void run() { Toast.makeText(MainActivity.this, notificationMessage, Toast.LENGTH_LONG).show(); TextView helloText = (TextView) findViewById(R.id.text_hello); helloText.setText(notificationMessage); } }); }ToastNotify메서드는 "Hello World"TextView컨트롤을 사용하여 앱에서 영구적으로 상태 및 알림을 보고합니다. res>레이아웃>activity_기본.xml 레이아웃에서 해당 컨트롤에 대해 다음 ID를 추가합니다.android:id="@+id/text_hello"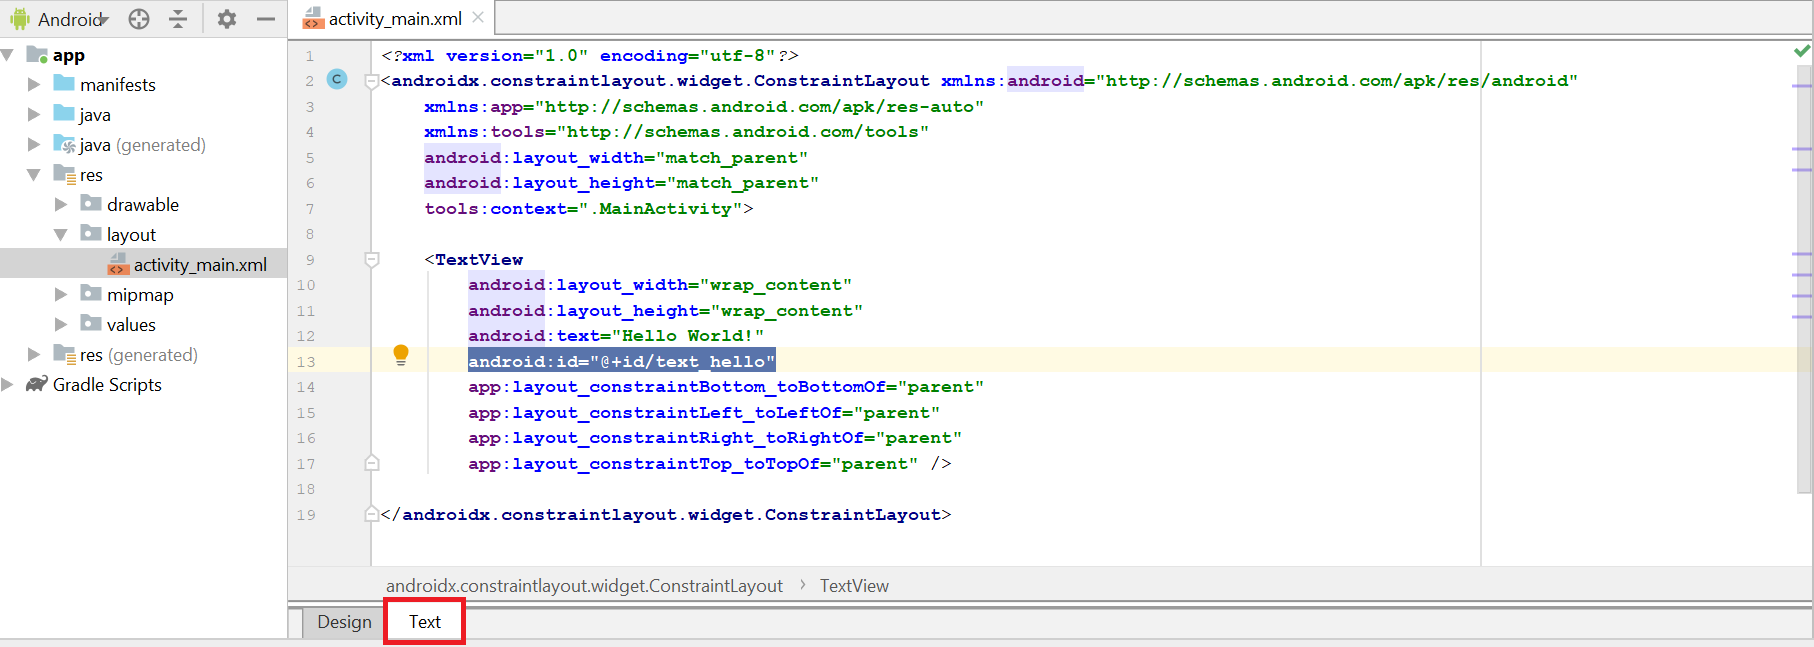
다음으로 AndroidManifest.xml 정의한 수신기에 대한 서브클래스를 추가합니다.
FirebaseService라는 프로젝트에 또 다른 새 클래스를 추가합니다.그런 다음
FirebaseService.java의 맨 위에 다음 import 문을 추가합니다.import com.google.firebase.messaging.FirebaseMessagingService; import com.google.firebase.messaging.RemoteMessage; import android.util.Log; import android.app.NotificationChannel; import android.app.NotificationManager; import android.app.PendingIntent; import android.content.Context; import android.content.Intent; import android.media.RingtoneManager; import android.net.Uri; import android.os.Build; import android.os.Bundle; import androidx.core.app.NotificationCompat;FirebaseService클래스에 다음 코드를 추가하여FirebaseMessagingService의 하위 클래스로 만듭니다.이 코드는 메서드를 재정의
onMessageReceived하고 수신된 알림을 보고합니다. 또한 이 메서드를 사용하여sendNotification()Android 알림 관리자에게 푸시 알림을 보냅니다. 앱이sendNotification()실행되고 있지 않고 알림이 수신되면 메서드를 호출합니다.public class FirebaseService extends FirebaseMessagingService { private String TAG = "FirebaseService"; public static final String NOTIFICATION_CHANNEL_ID = "nh-demo-channel-id"; public static final String NOTIFICATION_CHANNEL_NAME = "Notification Hubs Demo Channel"; public static final String NOTIFICATION_CHANNEL_DESCRIPTION = "Notification Hubs Demo Channel"; public static final int NOTIFICATION_ID = 1; private NotificationManager mNotificationManager; NotificationCompat.Builder builder; static Context ctx; @Override public void onMessageReceived(RemoteMessage remoteMessage) { // ... // TODO(developer): Handle FCM messages here. // Not getting messages here? See why this may be: https://goo.gl/39bRNJ Log.d(TAG, "From: " + remoteMessage.getFrom()); String nhMessage; // Check if message contains a notification payload. if (remoteMessage.getNotification() != null) { Log.d(TAG, "Message Notification Body: " + remoteMessage.getNotification().getBody()); nhMessage = remoteMessage.getNotification().getBody(); } else { nhMessage = remoteMessage.getData().values().iterator().next(); } // Also if you intend on generating your own notifications as a result of a received FCM // message, here is where that should be initiated. See sendNotification method below. if (MainActivity.isVisible) { MainActivity.mainActivity.ToastNotify(nhMessage); } sendNotification(nhMessage); } private void sendNotification(String msg) { Intent intent = new Intent(ctx, MainActivity.class); intent.addFlags(Intent.FLAG_ACTIVITY_CLEAR_TOP); mNotificationManager = (NotificationManager) ctx.getSystemService(Context.NOTIFICATION_SERVICE); PendingIntent contentIntent = PendingIntent.getActivity(ctx, 0, intent, PendingIntent.FLAG_ONE_SHOT); Uri defaultSoundUri = RingtoneManager.getDefaultUri(RingtoneManager.TYPE_NOTIFICATION); NotificationCompat.Builder notificationBuilder = new NotificationCompat.Builder( ctx, NOTIFICATION_CHANNEL_ID) .setContentText(msg) .setPriority(NotificationCompat.PRIORITY_HIGH) .setSmallIcon(android.R.drawable.ic_popup_reminder) .setBadgeIconType(NotificationCompat.BADGE_ICON_SMALL); notificationBuilder.setContentIntent(contentIntent); mNotificationManager.notify(NOTIFICATION_ID, notificationBuilder.build()); } public static void createChannelAndHandleNotifications(Context context) { ctx = context; if (Build.VERSION.SDK_INT >= Build.VERSION_CODES.O) { NotificationChannel channel = new NotificationChannel( NOTIFICATION_CHANNEL_ID, NOTIFICATION_CHANNEL_NAME, NotificationManager.IMPORTANCE_HIGH); channel.setDescription(NOTIFICATION_CHANNEL_DESCRIPTION); channel.setShowBadge(true); NotificationManager notificationManager = context.getSystemService(NotificationManager.class); notificationManager.createNotificationChannel(channel); } } }Android Studio의 메뉴 모음에서 프로젝트 빌드>를 선택하여 코드에 오류가 없는지 확인합니다. 아이콘에 대한
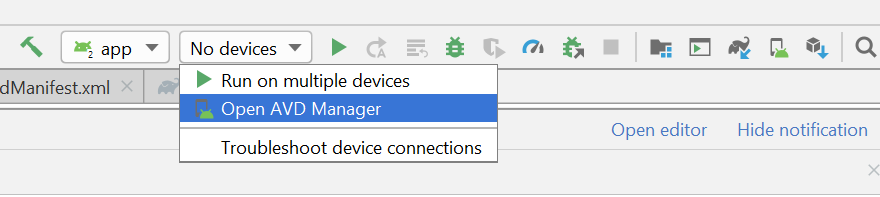
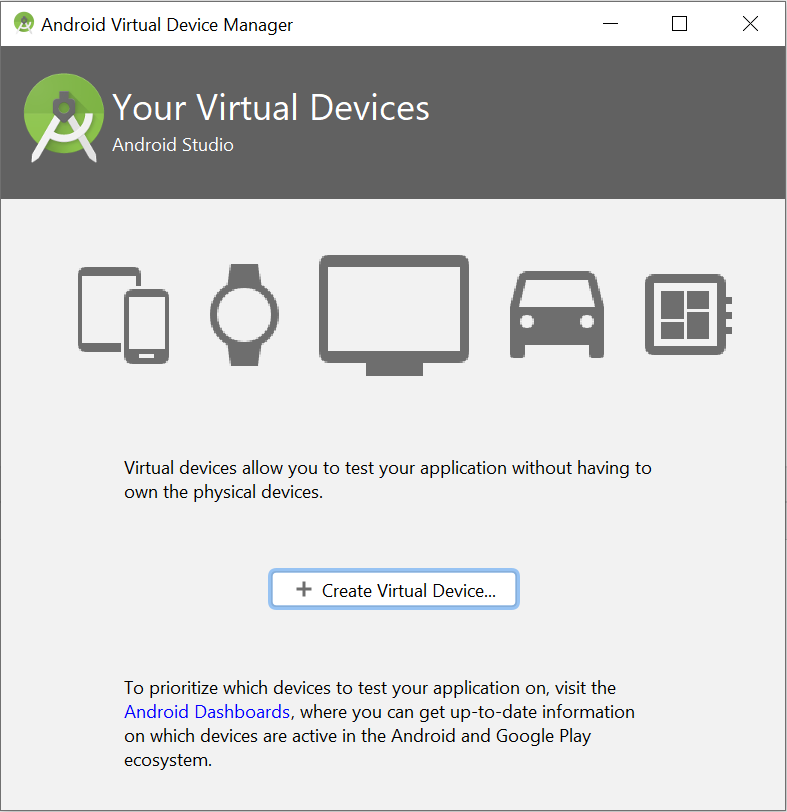
ic_launcher오류가 표시되면 AndroidManifest.xml 파일에서 다음 문을 제거합니다.android:icon="@mipmap/ic_launcher"앱을 실행하기 위한 가상 디바이스가 있는지 확인합니다. 없으면 다음과 같이 추가합니다.
선택한 디바이스에서 앱을 실행하고 허브에 성공적으로 등록되었는지 확인합니다.
참고 항목
인스턴스 ID 서비스의 메서드가 호출될 때까지
onTokenRefresh()초기 시작 중에 등록이 실패할 수 있습니다. 새로 고침은 알림 허브에 대한 성공적인 등록을 시작해야 합니다.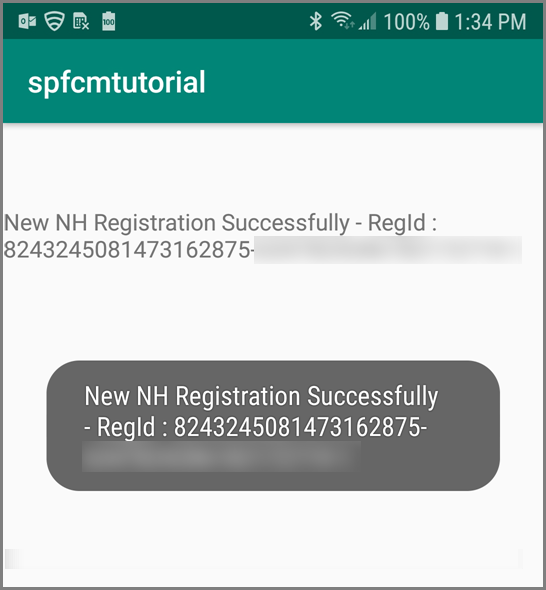
알림 허브에서 알림 보내기 테스트
다음 단계를 수행하여 Azure Portal에서 푸시 알림을 보낼 수 있습니다.
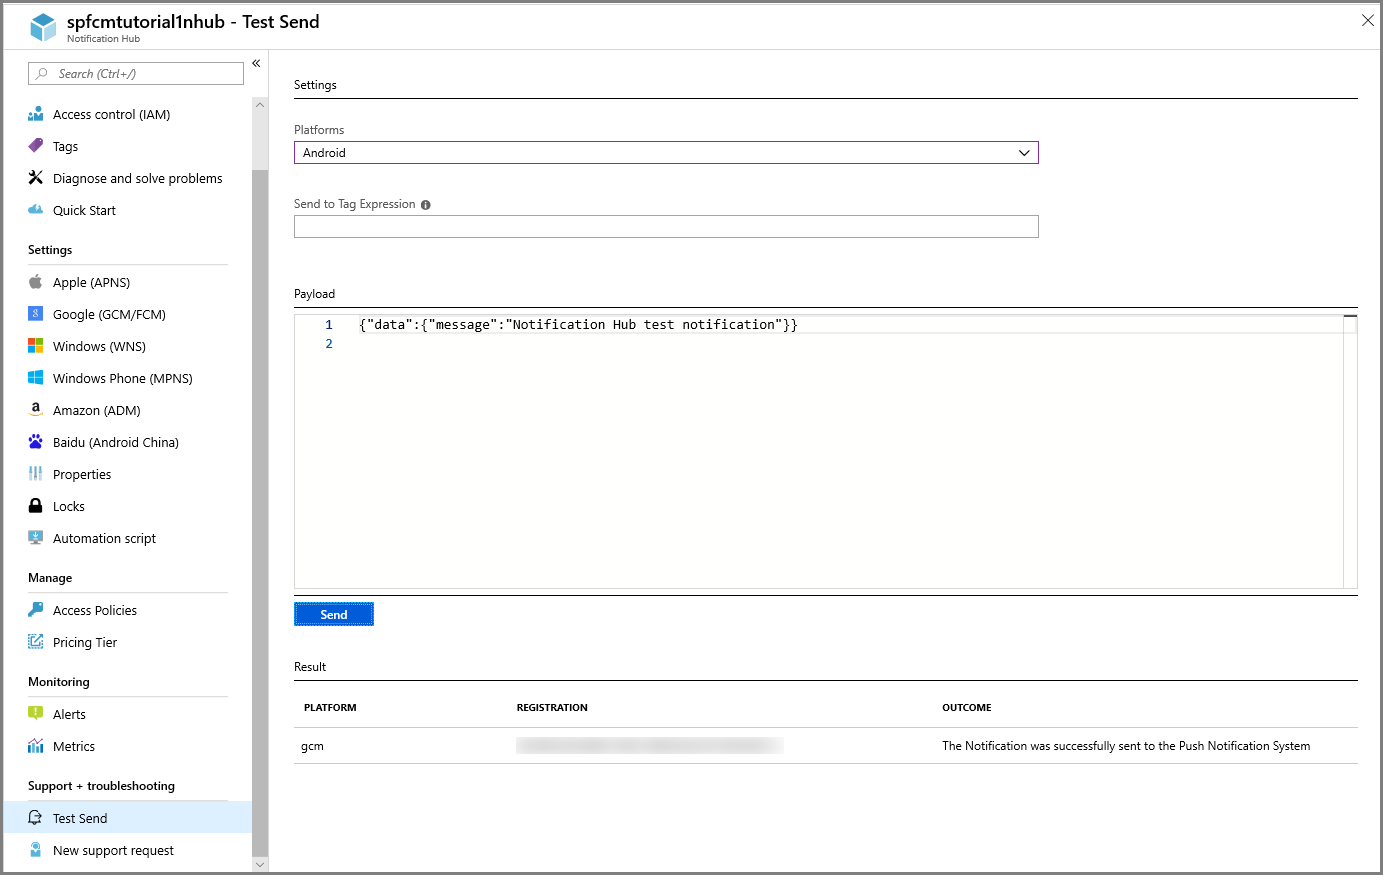
Azure Portal의 허브에 대한 알림 허브 페이지의 문제 해결 섹션에서 테스트 보내기를 선택합니다.
플랫폼에 대해 Android를 선택합니다.
보내기를 선택합니다. Android 디바이스에서 알림이 아직 보이지 않으면 모바일 앱을 실행하지 않았기 때문입니다. 모바일 앱을 실행한 후 보내기 단추를 다시 선택하여 알림 메시지를 표시합니다.
맨 아래에 있는 목록에서 작업 결과를 확인합니다.
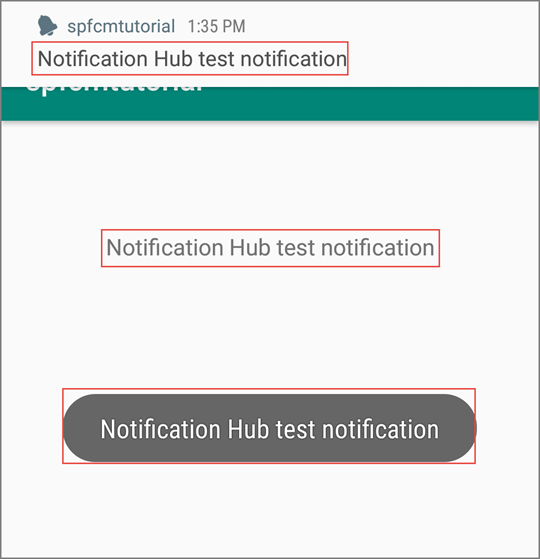
디바이스에 알림 메시지가 표시됩니다.
푸시 알림은 일반적으로 호환 라이브러리를 사용하는 Mobile Apps 또는 ASP.NET과 같은 백 엔드 서비스에서 전송됩니다. 백 엔드에서 라이브러리를 사용할 수 없는 경우 REST API를 직접 사용하여 알림 메시지를 보낼 수도 있습니다.
알림을 보내기 위해 검토할 수 있는 다른 자습서 목록은 다음과 같습니다.
- Azure Mobile Apps: Notification Hubs와 통합된 Mobile Apps 백 엔드에서 알림을 보내는 방법에 대한 예제는 iOS 앱에 푸시 알림 추가를 참조하세요.
- ASP.NET: Notification Hubs를 사용하여 사용자에게 알림 푸시를 참조하세요.
- Azure Notification Hubs Java SDK: Java에서 알림을 보내는 방법은 Java에서 Notification Hubs를 사용하는 방법 을 참조하세요. 이는 Eclipse for Android Development에서 테스트되었습니다.
- PHP: PHP에서 Notification Hubs를 사용하는 방법을 참조하세요.
에뮬레이터에서 모바일 앱 실행
에뮬레이터 내부에서 푸시 알림을 테스트하기 전에 에뮬레이터 이미지가 앱에 대해 선택한 Google API 수준을 지원하는지 확인합니다. 이미지에서 네이티브 Google API를 지원하지 않으면 SERVICE_NOT_AVAILABLE 예외가 발생할 수 있습니다.
또한 설정>계정에서 실행 중인 에뮬레이터에 Google 계정을 추가했는지 확인합니다. 그렇지 않으면 FCM 등록 시 AUTHENTICATION_FAILED 예외가 발생할 수 있습니다.
다음 단계
이 자습서에서는 Firebase Cloud Messaging을 사용하여 서비스에 등록된 모든 Android 디바이스로 알림을 브로드캐스트했습니다. 특정 디바이스로 알림을 푸시하는 방법을 알아보려면 다음 자습서를 계속 진행합니다.