자습서: Notification Hubs 및 Google Firebase Cloud Messaging을 사용하여 특정 디바이스에 알림 보내기
개요
Important
2024년 6월부터 FCM 레거시 API는 더 이상 지원되지 않으며 사용이 중지됩니다. 푸시 알림 서비스가 중단되지 않도록 하려면 가능한 한 빨리 FCM v1 프로토콜로 마이그레이션해야 합니다.
이 자습서에서는 Azure Notification Hubs를 사용하여 Android 앱에 속보 알림을 브로드캐스트하는 방법을 보여줍니다. 완료하면, 관심이 있는 속보 범주를 등록하고 해당 범주의 푸시 알림만 받을 수 있습니다. 이 시나리오는 RSS 수집기, 음악 애호가를 위한 앱 등 이전에 관심을 보인 사용자 그룹에 알림을 보내야 하는 많은 앱에 공통된 패턴입니다.
브로드캐스트 시나리오를 사용하려면 알림 허브에서 등록을 만들 때 하나 이상의 태그를 포함하면 됩니다. 태그에 알림이 전송되면 태그에 대해 등록된 모든 디바이스에서 알림을 받게 됩니다. 태그는 단순히 문자열이므로 사전에 프로비전해야 할 필요가 없습니다. 태그에 대한 자세한 내용은 Notification Hubs 라우팅 및 태그 식을 참조하세요.
이 자습서에서는 다음 작업을 수행합니다.
- 모바일 앱에 범주 선택 추가
- 태그를 사용하여 알림 등록
- 태그가 지정된 알림 보내기
- 앱 테스트
필수 조건
이 자습서는 자습서: Azure Notification Hubs 및 Firebase Cloud Messaging을 사용하여 Android 디바이스에 알림 푸시에서 만든 앱을 기반으로 합니다. 이 자습서를 시작하기 전에 자습서: Azure Notification Hubs 및 Firebase Cloud Messaging을 사용하여 Android 디바이스에 알림 푸시를 완료합니다.
앱에 범주 선택 추가
첫 번째 단계는 기존의 기본 활동에 사용자가 등록할 범주를 선택할 수 있도록 하는 UI 요소를 추가하는 것입니다. 사용자가 선택한 범주는 디바이스에 저장됩니다. 앱을 시작하면 디바이스 등록이 선택한 범주와 함께 태그로서 알림 허브에 생성됩니다.
res/layout/activity_main.xml file을 열고 콘텐츠를 다음으로 바꿉니다.<LinearLayout xmlns:android="http://schemas.android.com/apk/res/android" xmlns:tools="http://schemas.android.com/tools" android:layout_width="match_parent" android:layout_height="match_parent" tools:context="com.example.breakingnews.MainActivity" android:orientation="vertical"> <CheckBox android:id="@+id/worldBox" android:layout_width="wrap_content" android:layout_height="wrap_content" android:text="@string/label_world" /> <CheckBox android:id="@+id/politicsBox" android:layout_width="wrap_content" android:layout_height="wrap_content" android:text="@string/label_politics" /> <CheckBox android:id="@+id/businessBox" android:layout_width="wrap_content" android:layout_height="wrap_content" android:text="@string/label_business" /> <CheckBox android:id="@+id/technologyBox" android:layout_width="wrap_content" android:layout_height="wrap_content" android:text="@string/label_technology" /> <CheckBox android:id="@+id/scienceBox" android:layout_width="wrap_content" android:layout_height="wrap_content" android:text="@string/label_science" /> <CheckBox android:id="@+id/sportsBox" android:layout_width="wrap_content" android:layout_height="wrap_content" android:text="@string/label_sports" /> <Button android:layout_width="wrap_content" android:layout_height="wrap_content" android:onClick="subscribe" android:text="@string/button_subscribe" /> <TextView android:layout_width="wrap_content" android:layout_height="wrap_content" android:text="Hello World!" android:id="@+id/text_hello" /> </LinearLayout>res/values/strings.xml파일을 열고 다음 줄을 추가합니다.<string name="button_subscribe">Subscribe</string> <string name="label_world">World</string> <string name="label_politics">Politics</string> <string name="label_business">Business</string> <string name="label_technology">Technology</string> <string name="label_science">Science</string> <string name="label_sports">Sports</string>main_activity.xml그래픽 레이아웃은 다음 이미지와 같이 표시되어야 합니다.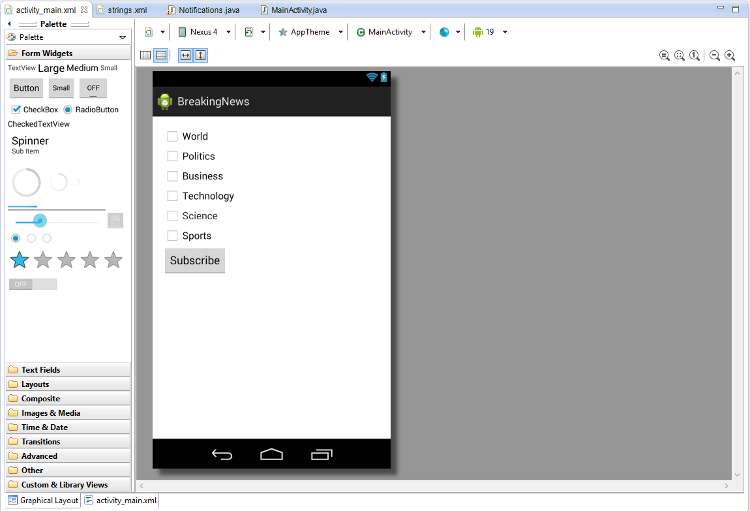
MainActivity클래스와 동일한 패키지에서Notifications클래스를 만듭니다.import java.util.HashSet; import java.util.Set; import java.util.concurrent.TimeUnit; import android.content.Context; import android.content.SharedPreferences; import android.os.AsyncTask; import android.util.Log; import android.widget.Toast; import com.google.android.gms.tasks.OnSuccessListener; import com.google.firebase.iid.FirebaseInstanceId; import com.google.firebase.iid.InstanceIdResult; import com.microsoft.windowsazure.messaging.NotificationHub; public class Notifications { private static final String PREFS_NAME = "BreakingNewsCategories"; private FirebaseInstanceId fcm; private NotificationHub hub; private Context context; private String senderId; public static String FCM_token = ""; private static final String TAG = "Notifications"; public Notifications(Context context, String hubName, String listenConnectionString) { this.context = context; this.senderId = senderId; fcm = FirebaseInstanceId.getInstance(); hub = new NotificationHub(hubName, listenConnectionString, context); } public void storeCategoriesAndSubscribe(Set<String> categories) { SharedPreferences settings = context.getSharedPreferences(PREFS_NAME, 0); settings.edit().putStringSet("categories", categories).commit(); subscribeToCategories(categories); } public Set<String> retrieveCategories() { SharedPreferences settings = context.getSharedPreferences(PREFS_NAME, 0); return settings.getStringSet("categories", new HashSet<String>()); } public void subscribeToCategories(final Set<String> categories) { new AsyncTask<Object, Object, Object>() { @Override protected Object doInBackground(Object... params) { try { FirebaseInstanceId.getInstance().getInstanceId().addOnSuccessListener(new OnSuccessListener<InstanceIdResult>() { @Override public void onSuccess(InstanceIdResult instanceIdResult) { FCM_token = instanceIdResult.getToken(); Log.d(TAG, "FCM Registration Token: " + FCM_token); } }); TimeUnit.SECONDS.sleep(1); String templateBodyFCM = "{\"data\":{\"message\":\"$(messageParam)\"}}"; hub.registerTemplate(FCM_token,"simpleFCMTemplate", templateBodyFCM, categories.toArray(new String[categories.size()])); } catch (Exception e) { Log.e("MainActivity", "Failed to register - " + e.getMessage()); return e; } return null; } protected void onPostExecute(Object result) { String message = "Subscribed for categories: " + categories.toString(); Toast.makeText(context, message, Toast.LENGTH_LONG).show(); } }.execute(null, null, null); } }이 클래스는 로컬 스토리지를 사용하여, 이 디바이스에서 받아야 할 뉴스의 범주를 저장합니다. 이러한 범주를 등록하기 위한 메서드도 이 클래스에 포함됩니다.
MainActivity클래스에Notifications에 대한 필드를 추가합니다.private Notifications notifications;그런 후, 다음 코드와 같이
onCreate메서드를 업데이트합니다. Notification Hubs를 Notifications 클래스의 subscribeToCategories 메서드에 등록합니다.@Override protected void onCreate(Bundle savedInstanceState) { super.onCreate(savedInstanceState); setContentView(R.layout.activity_main); mainActivity = this; FirebaseService.createChannelAndHandleNotifications(getApplicationContext()); notifications = new Notifications(this, NotificationSettings.HubName, NotificationSettings.HubListenConnectionString); notifications.subscribeToCategories(notifications.retrieveCategories()); }NotificationSettings 클래스에서 허브 이름 및 연결 문자열이 올바르게 설정되어 있는지 확인합니다.
참고 항목
클라이언트 앱과 함께 배포되는 자격 증명은 일반적으로 안전하지 않기 때문에 클라이언트 앱과 함께 listen access용 키만 배포해야 합니다. Listen access를 통해 앱에서 알림을 등록할 수 있지만, 기존 등록을 수정할 수 없으며 알림을 전송할 수도 없습니다. 안전한 백 엔드 서비스에서 알림을 보내고 기존 등록을 변경하는 데에는 모든 액세스 키가 사용됩니다.
그런 다음, 다음 가져오기를 추가합니다.
import android.widget.CheckBox;
import java.util.HashSet;
import java.util.Set;
import android.view.View;
다음
subscribe메서드를 추가하여 구독 단추 클릭 이벤트를 처리합니다.public void subscribe(View sender) { final Set<String> categories = new HashSet<String>(); CheckBox world = (CheckBox) findViewById(R.id.worldBox); if (world.isChecked()) categories.add("world"); CheckBox politics = (CheckBox) findViewById(R.id.politicsBox); if (politics.isChecked()) categories.add("politics"); CheckBox business = (CheckBox) findViewById(R.id.businessBox); if (business.isChecked()) categories.add("business"); CheckBox technology = (CheckBox) findViewById(R.id.technologyBox); if (technology.isChecked()) categories.add("technology"); CheckBox science = (CheckBox) findViewById(R.id.scienceBox); if (science.isChecked()) categories.add("science"); CheckBox sports = (CheckBox) findViewById(R.id.sportsBox); if (sports.isChecked()) categories.add("sports"); notifications.storeCategoriesAndSubscribe(categories); }이 메서드는 범주 목록을 만들고
Notifications클래스를 사용하여, 로컬 스토리지에 목록을 저장하고 알림 허브에 해당 태그를 등록합니다. 범주가 변경되면 새 범주로 등록이 다시 생성됩니다.
이제 사용자가 범주 선택을 변경할 때마다 앱은 범주 집합을 디바이스의 로컬 스토리지에 저장하고 알림 허브에 등록할 수 있습니다.
알림 등록
다음 단계에서는 로컬 스토리지에 저장된 범주를 사용하여 시작 시 알림 허브에 등록합니다.
다음 코드가
MainActivity클래스의onCreate메서드 끝에 있는지 확인합니다.notifications.subscribeToCategories(notifications.retrieveCategories());이 코드를 통해 앱이 시작될 때마다 로컬 스토리지에서 범주를 검색하고, 이러한 범주에 대한 등록을 요청하게 됩니다.
그런 후 다음과 같이
MainActivity클래스의onStart()메서드를 업데이트합니다.@Override protected void onStart() { super.onStart(); isVisible = true; Set<String> categories = notifications.retrieveCategories(); CheckBox world = (CheckBox) findViewById(R.id.worldBox); world.setChecked(categories.contains("world")); CheckBox politics = (CheckBox) findViewById(R.id.politicsBox); politics.setChecked(categories.contains("politics")); CheckBox business = (CheckBox) findViewById(R.id.businessBox); business.setChecked(categories.contains("business")); CheckBox technology = (CheckBox) findViewById(R.id.technologyBox); technology.setChecked(categories.contains("technology")); CheckBox science = (CheckBox) findViewById(R.id.scienceBox); science.setChecked(categories.contains("science")); CheckBox sports = (CheckBox) findViewById(R.id.sportsBox); sports.setChecked(categories.contains("sports")); }이 코드는 이전에 저장한 범주의 상태를 기반으로 기본 활동을 업데이트합니다.
이제 앱이 완료되며, 사용자가 범주 선택을 변경할 때마다 알림 허브 등록에 사용된 디바이스의 로컬 스토리지에 범주 집합을 저장할 수 있습니다. 다음에는 범주 알림을 이 앱에 보낼 수 있는 백 엔드를 정의합니다.
태그가 지정된 알림 보내기
이 섹션에서는 .NET 콘솔 앱에서 태그가 지정된 템플릿 알림으로 속보를 보냅니다.
Visual Studio에서 다음과 같이 새로운 Visual C# 콘솔 애플리케이션을 만듭니다.
- 메뉴에서 파일>새로 만들기>프로젝트를 선택합니다.
- 새 프로젝트 만들기의 템플릿 목록에서 C#용 콘솔 앱(.NET Framework)을 선택하고 다음을 선택합니다.
- 앱의 이름을 입력합니다.
- 솔루션의 경우 솔루션에 추가를 선택하고 만들기를 선택하여 프로젝트를 만듭니다.
도구>NuGet 패키지 관리자>패키지 관리자 콘솔을 선택한 다음, 콘솔 창에서 다음 명령을 실행합니다.
Install-Package Microsoft.Azure.NotificationHubs이 작업은 Microsoft.Azure.NotificationHubs 패키지를 사용하여 Azure Notification Hubs SDK에 대한 참조를 추가합니다.
Program.cs 파일을 열고 다음
using문을 추가합니다.using Microsoft.Azure.NotificationHubs;Program클래스에서 다음 메서드를 추가하거나 이미 있으면 바꿉니다.private static async void SendTemplateNotificationAsync() { // Define the notification hub. NotificationHubClient hub = NotificationHubClient.CreateClientFromConnectionString("<connection string with full access>", "<hub name>"); // Apple requires the apns-push-type header for all requests var headers = new Dictionary<string, string> {{"apns-push-type", "alert"}}; // Create an array of breaking news categories. var categories = new string[] { "World", "Politics", "Business", "Technology", "Science", "Sports"}; // Send the notification as a template notification. All template registrations that contain // "messageParam" and the proper tags will receive the notifications. // This includes APNS, GCM/FCM, WNS, and MPNS template registrations. Dictionary<string, string> templateParams = new Dictionary<string, string>(); foreach (var category in categories) { templateParams["messageParam"] = "Breaking " + category + " News!"; await hub.SendTemplateNotificationAsync(templateParams, category); } }이 코드는 문자열 배열에 있는 6개의 각 태그에 대한 템플릿 알림을 보냅니다. 태그를 사용하면 등록된 범주의 알림만 디바이스에서 받습니다.
위의 코드에서
<hub name>및<connection string with full access>자리 표시자를 알림 허브 이름과 알림 허브의 대시보드에서 얻은 DefaultFullSharedAccessSignature의 연결 문자열로 바꿔야 합니다.Main()메서드에 다음 줄을 추가합니다.SendTemplateNotificationAsync(); Console.ReadLine();콘솔 앱을 시작합니다.
앱 테스트
Android Studio의 Android 디바이스 또는 에뮬레이터에서 앱을 실행합니다. 앱 UI는 구독할 범주를 선택하도록 하는 토글 집합을 제공합니다.
하나 이상의 범주 토글을 사용하도록 설정한 후 구독을 클릭합니다. 앱은 선택한 범주를 태그로 변환하고 알림 허브에서 선택한 태그에 대한 새로운 디바이스 등록을 요청합니다. 등록된 범주가 반환되어 알림 메시지에 표시됩니다.
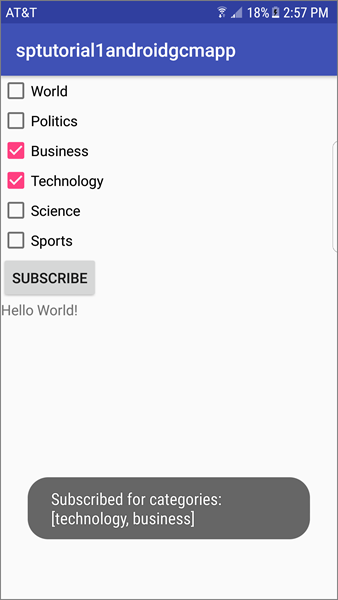
각 범주에 대한 알림을 전송하는 .NET 콘솔 앱을 실행합니다. 선택한 범주에 대한 알림이 알림 메시지로 나타납니다.

다음 단계
이 자습서에서는 범주에 등록한 특정 Android 디바이스에 브로드캐스트 알림을 보냈습니다. 특정 사용자에게 알림을 푸시하는 방법을 알아보려면 다음 자습서를 계속 진행합니다.