[UPDATE: This blog has been “deprecated” by the release of the Hybrid Runbook Worker feature. This feature provides a first-class way to achieve the functionality described here. Check it out!]
Thanks to the Windows PowerShell Remoting feature, Azure Automation can not only manage your Azure resources at an infrastructural level, but also reach inside VMs and execute commands. However, PowerShell Remoting is not always a viable option – perhaps a public WinRM port on your Azure VM cannot be opened for security reasons, or perhaps your VMs are strictly on-premises and therefore unreachable from Azure Automation. If you find yourself in one of these situations, all hope is not lost!
In the first case, where you have Azure-hosted VMs but cannot open a public WinRM port, the solution is simple. A recent Microsoft blog post provides a runbook for running PowerShell commands on such VMs by utilizing the Azure VM Agent’s Custom Script Extension.
In this post, we present an extension to this solution which handles the second case – where your VMs are on-premises. If you have an on-premises network connected to an Azure virtual network, our solution will enable you to manage on-premises VMs from Azure Automation! And it does so with just a single runbook. But first, a little bit of setup is required…
Configuring Your Environment
Our runbook depends on a few resources being present in your Azure environment: a “Proxy VM”, an Azure Storage Account, and a certificate installed both in Azure Automation and on your Proxy VM (for security reasons, explained below).
“Proxy VM”
The “Proxy VM” is an Azure VM which will be used to invoke commands on other machines in its network – it is the mechanism by which Azure Automation will interact with these machines, hence “proxy”. The Proxy VM must have the Azure VM Agent installed. This agent is installed by default when an Azure VM is created, so most likely you already have such a machine. If you need to install the agent on an existing VM, you can learn how to do so from this blog post.
Running our runbook will enable the VM Agent’s Custom Script Extension on the Proxy VM you specify, which allows that VM to download and execute scripts stored in an Azure Storage Account. Note that the Proxy VM will use PowerShell Remoting to communicate with other VMs in its network, so those VMs must have WinRM ports open to the network.
The Proxy VM is what enables management of on-premises machines, since Azure Virtual Networks can be connected to on-premises networks (details here). If you have such a network, and use an Azure VM belonging to it as your Proxy VM, then that VM will be able to run commands on your on-premises machines.
Azure Storage Account
The Custom Script Extension (running on the Proxy VM) downloads scripts from a given Azure Storage account, so you will need to have one in your Azure environment. You can create a specific container for the extension to use, or allow the runbook to create and use a default container.
Certificate
Since our runbook enlists a Proxy VM to execute PowerShell on other machines, it will need to know what credentials to use to do so. However, we don’t want these credentials sitting around in plain text, so the runbook needs a way to encrypt them before they are baked into a script and handed off to Azure Storage (and ultimately, to the Proxy VM). The Proxy VM will then need to decrypt the credentials at runtime. So, our runbook requires a certificate to be installed both in Azure Automation and on the Proxy VM.
- Create the certificate: You will need to create a .pfx certificate to install on your Proxy VM. Either that certificate or its corresponding .cer certificate will also need to be uploaded to Azure Automation. For instructions on creating a certificate, see this page.
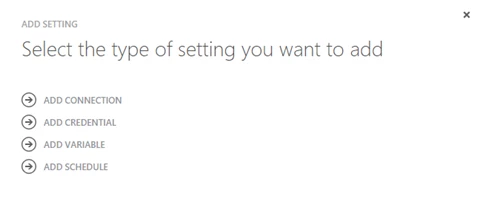
- Upload the certificate to Azure Automation: In the Azure portal, navigate to the Automation service, choose your Automation Account, and click on the Assets tab. At the bottom of the page, click “Add Setting” and you should see this wizard appear:

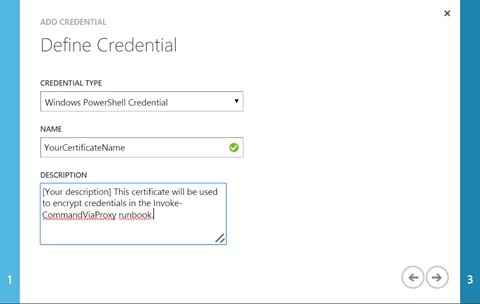
Click on “Add Credential” and configure it like so:
On the last page of the wizard, upload your certificate file. For security reasons, you should upload the .cer certificate to Azure Automation (since it lacks the private key, which Azure Automation doesn’t need). Either the .cer or .pfx file will work, but if you upload the .pfx, please note that it should not be marked as exportable in Azure Automation.
- Install the certificate into the certificate store on your Proxy VM: Copy your .pfx certificate onto the Proxy VM, and double-click the file to start the import process. Make sure you select “Local Machine” for the Store Location, and place the certificate in the Personal store (Cert:LocalMachineMy). This is where the code run by the Custom Script Extension will look to decrypt the credentials it needs. Using this location creates an important security boundary: only Administrators and SYSTEM can access the private keys of certificates in this store. This prevents unauthorized users from decrypting credentials used by the runbook after they are sent to the Proxy VM.
Congratulations, you are now ready to…
Run the Runbook!
Now that you have the requisite resources available, it’s time to run some code! Grab the runbook from Script Center or the Azure Automation Runbook Gallery.
Here’s an example call to this runbook:
$Results = Invoke-CommandViaProxy `
        -ProxyVmName VM01 `
        -ProxyServiceName VM01 `
        -ScriptBlock "{ 'Hello, my name is '; `$env:COMPUTERNAME}" `
        -TargetComputers VM02,VM03 `
        -RunAsCredential $NetworkCred `
        -CertificateAssetName "MyProxyVmCert" `
        -AzureOrgIdCredential $OrgCred `
        -AzureSubscriptionName $SubscriptionName `
        -StorageAccountName $StorageAccountName
And explanations of the parameters involved:
- ProxyVmName, ProxyServiceName
These parameters identify your Proxy VM, which needs to have the Azure VM Agent installed and be on the same network as the machines you want to run commands on. - ScriptBlock
The commands you want executed on machines in the Proxy VM’s network, given as a string. Make sure you escape special characters properly when writing this script block (e.g., “{`$a = Get-Date }”). This is necessary to prevent the runbook execution engine from trying to substitute values for any variables in your script. - TargetComputers
A list of the host names of machines where the script block should be run. Note that these machines must have the WinRM port open, since the Proxy VM will use PowerShell Remoting to execute the given script block on them. - RunAsCredential
A PowerShell Credential Object. The script block will be run on the targeted computers with this credential. - CertificateAssetName
The runbook will use this certificate asset to encrypt the RunAsCredential’s password. On the Proxy VM, the same certificate’s private key will be used to decrypt that password. - AzureOrgIdCredential
A PowerShell Credential Object, which will be used by the runbook to authenticate itself to Azure. - AzureSubscriptionName
The name of the Azure Subscription containing your Proxy VM and Azure Storage Account. - StorageAccountName
The name of the Azure Storage Account in which the runbook will store the script file it generates. This file will be removed when the runbook has finished.
There are some optional parameters as well for further customizing the runbook’s behavior, all of which have default values which are described in the runbook itself.
The runbook will return the script block’s output as a PowerShell object by default. If the script runs on multiple machines, you will get an array of objects back, one for each machine on which the script ran. There is one small “gotcha” here: because the output comes back through the Custom Script Extension’s somewhat small output field, objects that are “large” may get truncated (the output field can store 4096 characters). If you expect your serialized output to exceed that length, you may want to do some script-side filtering, or you can set the runbook’s SerializeOutput parameter to $False, and get raw text back.
Finally, note that the Custom Script Extension can only run one script at a time. If you call this runbook against the same Proxy VM multiple times without waiting for completion, it will only run the most recent request, or whatever it was busy running first.
Conclusion
That’s it! Now you know how to use Azure Automation to securely run scripts on VMs that are in private networks, or even on-premises. For more cool ways to use Azure Automation, be sure to check out other posts under the Azure IT Pro/DevOps category.
Just getting started with Azure Automation? Learn about the service here, and follow Azure Automation on Twitter.
Happy Automating!