你当前正在访问 Microsoft Azure Global Edition 技术文档网站。 如果需要访问由世纪互联运营的 Microsoft Azure 中国技术文档网站,请访问 https://docs.azure.cn。
教程:查看远程渲染的模型
在本教程中,你将了解如何执行以下操作:
- 预配 Azure 远程渲染 (ARR) 实例
- 创建和停止渲染会话
- 重用现有渲染会话
- 连接会话以及从会话断开连接
- 将模型载入渲染会话
先决条件
本教程需要:
- 有效的即用即付 Azure 订阅 创建帐户
- Windows SDK 10.0.18362.0(下载)
- Visual Studio 2022 的最新版本(下载)
- Git (下载)
- Git LFS 插件(下载)
- Unity(有关受支持的版本,请参阅系统要求)
- 中级程度的 Unity 与 C# 语言知识(例如:创建脚本和对象、使用预制项、配置 Unity 事件等)
预配 Azure 远程渲染 (ARR) 实例
若要获取对 Azure 远程渲染服务的访问权限,首先需要创建一个帐户。
创建新的 Unity 项目
提示
ARR 示例存储库 包含一个已完成了所有教程的项目,可将其用作参考。 在 Unity\Tutorial-Complete 中查找完整的 Unity 项目。
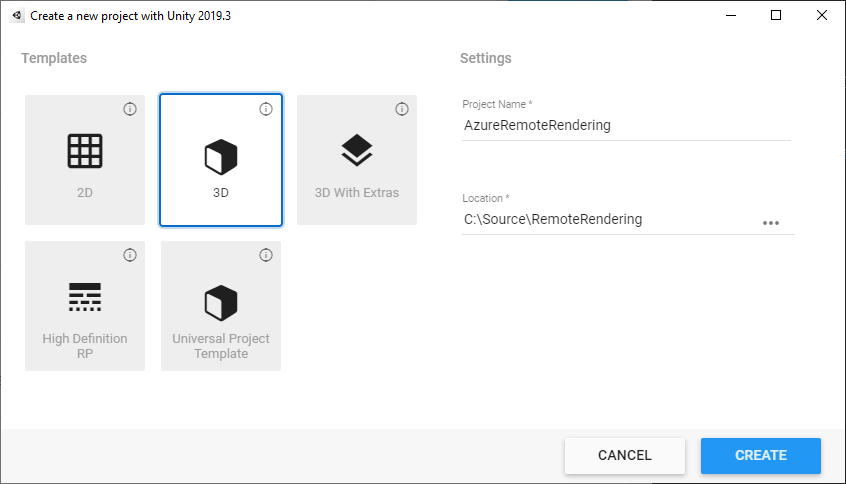
在 Unity Hub 中创建一个新项目。 本示例假设在名为 RemoteRendering 的文件夹中创建项目。
包括 Azure 远程渲染和 OpenXR 包
按照说明将 Azure 远程渲染和 OpenXR 包添加到 Unity 项目。
注意
如果 Unity 在导入 OpenXR 包后显示警告对话框,询问是否为新的输入系统启用本机平台后端,则立即单击“否”。 你将在后面的步骤中启用它。
配置相机
选择“主相机”节点。
右键单击“转换”组件并选择“重置”选项,打开上下文菜单:

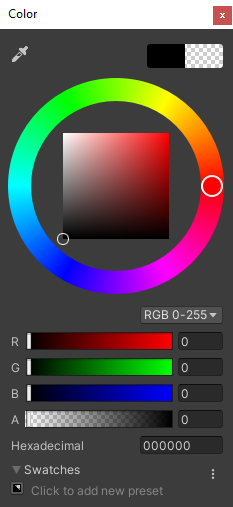
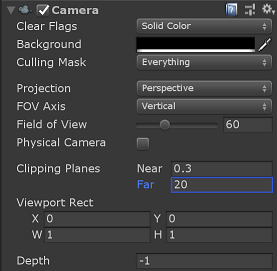
将“清除标志”设置为“纯色”
将“背景”设置为“黑色”(#000000),并将 alpha (A) 设置为完全透明 (0)
将“剪裁平面”设置为“近距 = 0.1”、“远距 = 20”。 此设置意味着,渲染功能将剪裁 10 厘米以内或者 20 米以外的几何结构。
调整项目设置
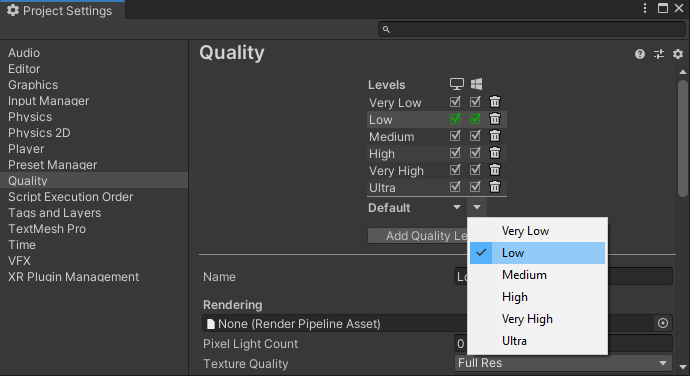
打开“编辑”>“项目设置...”
在左侧列表菜单中,选择“质量”
将所有平台的“默认质量水平”更改为“低”。 此设置可以更高效地渲染本地内容,并且不会影响远程渲染内容的质量。
注意
在本教程的范围内,我们坚持使用 Unity 内置渲染器管道。 若要使用通用渲染器管道,请参阅 Unity 渲染器管道,了解其他设置步骤。
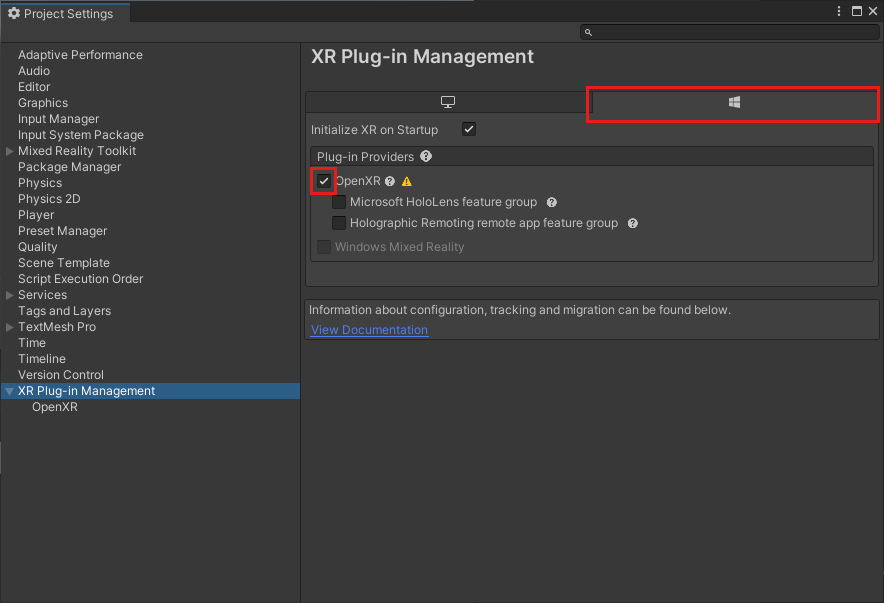
从左侧列表菜单中选择“XR 插件管理”
- 单击“安装 XR 插件管理”按钮。
- 选择“通用 Windows 平台设置”选项卡,以 Windows 图标表示。
- 选择“插件提供程序”下的“Open XR”复选框
- 如果一个对话框打开,要求你为新的输入系统启用本机平台后端,请选择“否”。
注意
如果禁用 Microsoft HoloLens 功能组,则项目中会缺少 Windows 混合现实 OpenXR 插件。 按照说明添加 Azure 远程渲染和 OpenXR 包以安装它。
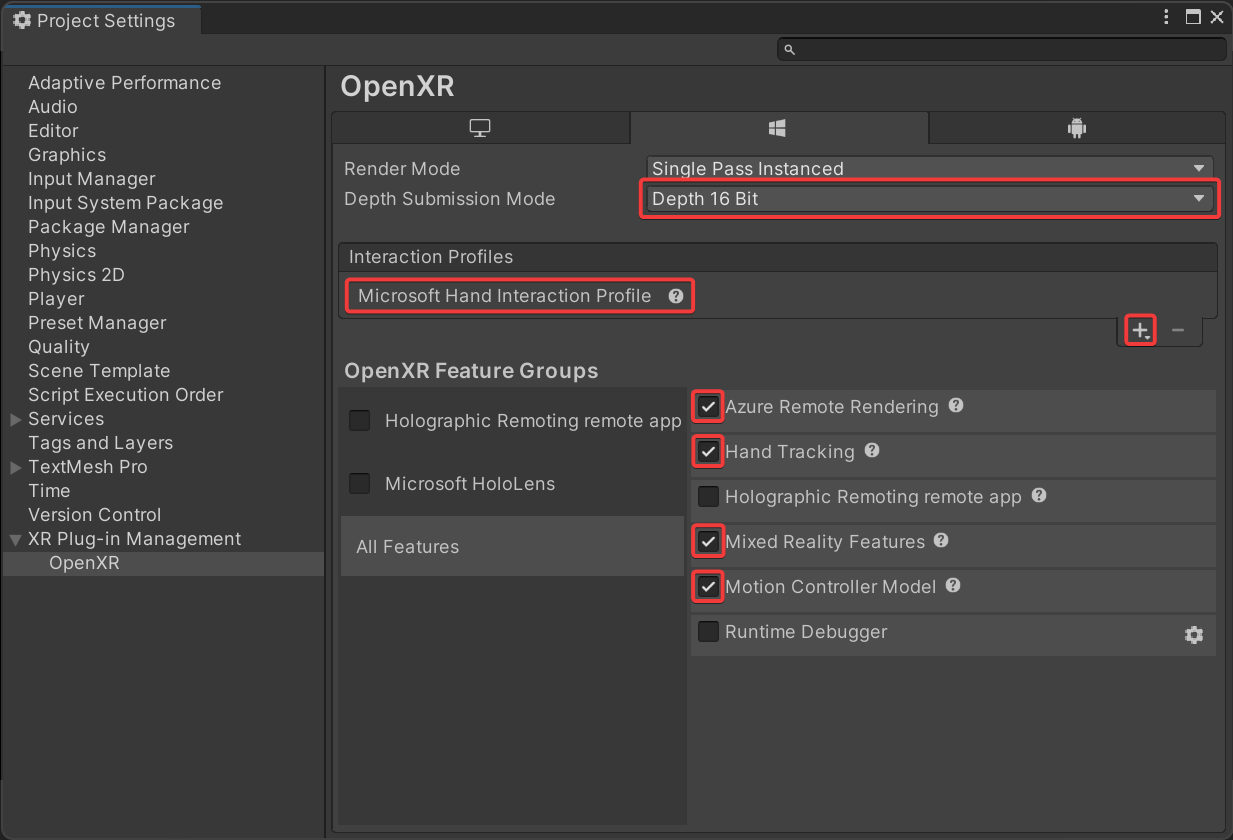
在左侧列表菜单中,选择“OpenXR”
- 将“深度提交模式”设置为“深度 16 位”
- 将“Microsoft 手部交互配置文件”添加到“交互配置文件”。
- 启用以下 OpenXR 功能:
- Azure 远程渲染
- 手部跟踪
- 混合现实功能
- 运动控制器模型
注意
如果没有看到所需的 OpenXR 功能列出,则项目中缺少 Windows 混合现实 OpenXR 插件。 按照说明添加 Azure 远程渲染和 OpenXR 包以安装它。
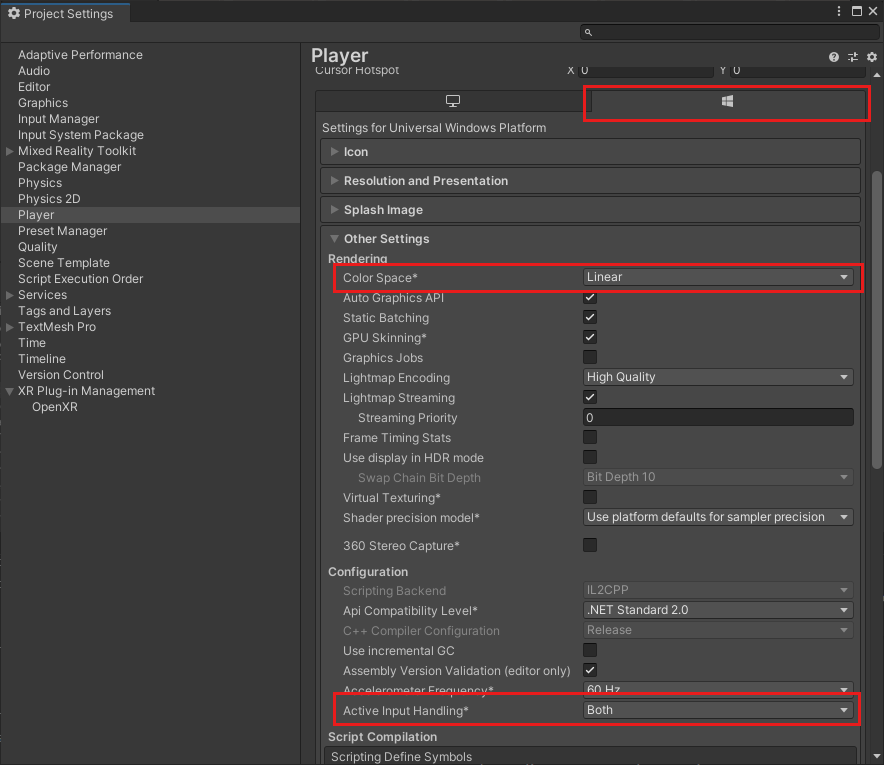
在左侧列表菜单中,选择“播放机”
- 选择“通用 Windows 平台设置”选项卡,以 Windows 图标表示。
- 展开“其他设置”
- 在“渲染”下,将“颜色空间”更改为“线性”,并按要求重启 Unity。
- 在“配置”下,将“活动输入处理”更改为“两者”,并按要求重启 Unity。
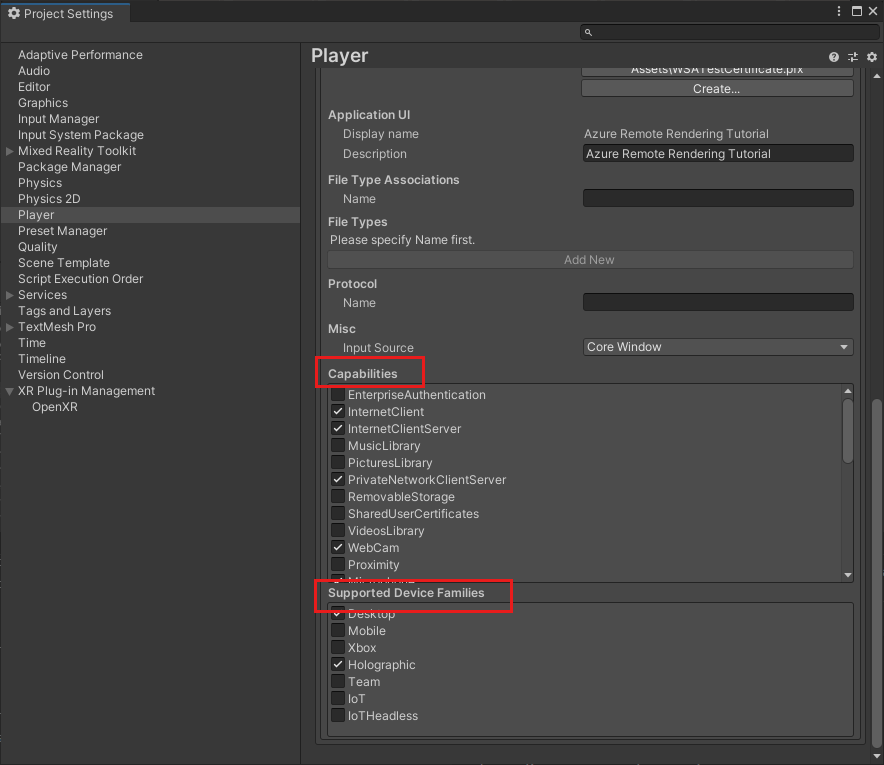
- 展开“发布设置”
- 向下滚动到“功能”并选择:
- InternetClient
- InternetClientServer
- SpatialPerception
- PrivateNetworkClientServer(可选)。 若要将 Unity 远程调试器连接到设备,请选择此选项。
- 在“支持的设备系列”下,启用“Holographic”和“桌面”
关闭或停靠“项目设置”面板
打开“文件”->“生成设置”
- 选择“通用 Windows 平台”
- 配置你的设置以匹配下面的设置
- 按“切换平台”按钮。
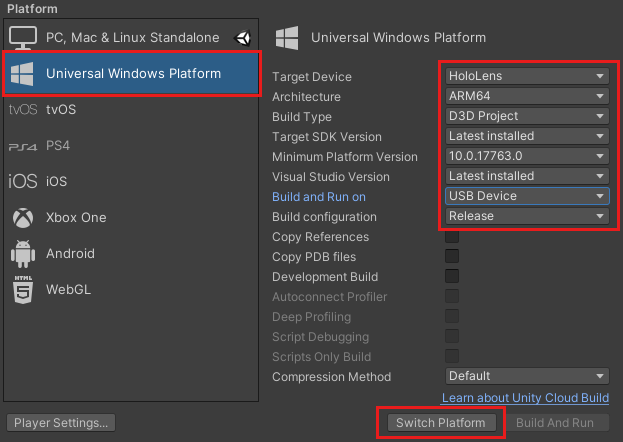
Unity 更改平台后,请关闭生成面板。
验证项目设置
执行以下步骤来验证项目设置是否正确。
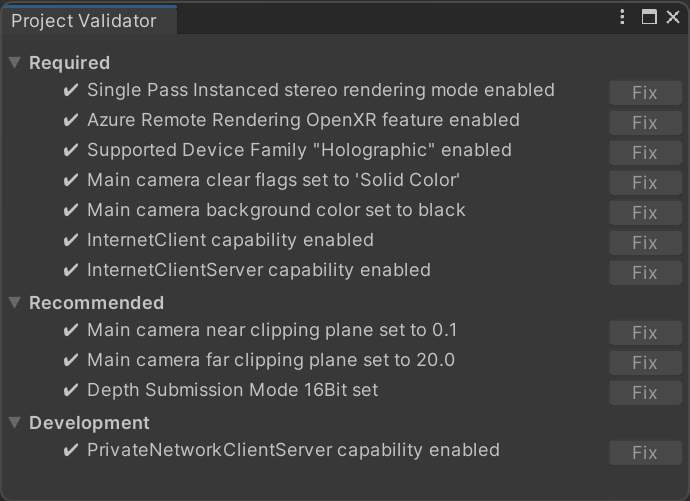
从 Unity 编辑器工具栏上的“RemoteRendering”菜单中选择“ValidateProject”菜单项 。
查看“项目验证程序”窗口是否存在错误并按需修复项目设置。
注意
如果在项目中使用 MRTK 并启用相机子系统,MRTK 将替代你应用到相机的手动更改。 这包括来自 ValidateProject 工具的修补程序。
创建一个脚本用于协调 Azure 远程渲染连接和状态
需要完成四个基本阶段才能显示远程渲染的模型,如下面的流程图所示。 必须按顺序完成每个阶段。 下一步是创建一个脚本,该脚本将管理应用程序状态并完成每个必需的阶段。

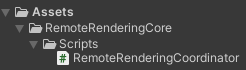
在“项目”窗格中的“资产”文件夹下,创建名为“RemoteRenderingCore”的新文件夹。 然后在“RemoteRenderingCore”中,创建名为“Scripts”的文件夹 。
创建一个名为 RemoteRenderingCoordinator 的新 C# 脚本。 项目应如下所示:
此协调器脚本跟踪和管理远程渲染状态。 值得注意的是,其中有一些代码用于维护状态,向其他组件公开功能,触发事件以及存储不直接与 Azure 远程渲染相关的特定于应用程序的数据。 以下面的代码为起点,我们将在本教程的后面介绍和实现特定的 Azure 远程渲染代码。
在代码编辑器中打开 RemoteRenderingCoordinator 并将其全部内容替换为以下代码:
// Copyright (c) Microsoft Corporation. All rights reserved.
// Licensed under the MIT License. See LICENSE in the project root for license information.

using Microsoft.Azure.RemoteRendering;
using Microsoft.Azure.RemoteRendering.Unity;
using System;
using System.Linq;
using System.Threading.Tasks;
using UnityEngine;
using UnityEngine.Events;

#if UNITY_WSA
using UnityEngine.XR.WSA;
#endif

/// <summary>
/// Remote Rendering Coordinator is the controller for all Remote Rendering operations.
/// </summary>

// Require the GameObject with a RemoteRenderingCoordinator to also have the ARRServiceUnity component
[RequireComponent(typeof(ARRServiceUnity))]
public class RemoteRenderingCoordinator : MonoBehaviour
{
    public enum RemoteRenderingState
    {
        NotSet,
        NotInitialized,
        NotAuthorized,
        NoSession,
        ConnectingToExistingRemoteSession,
        ConnectingToNewRemoteSession,
        RemoteSessionReady,
        ConnectingToRuntime,
        RuntimeConnected
    }

    public static RemoteRenderingCoordinator instance;

    // Account
    // RemoteRenderingDomain must be '<region>.mixedreality.azure.com' - if no '<region>' is specified, connections will fail
    // For most people '<region>' is either 'westus2' or 'westeurope'
    [SerializeField]
    private string remoteRenderingDomain = "westus2.mixedreality.azure.com";
    public string RemoteRenderingDomain
    {
        get => remoteRenderingDomain.Trim();
        set => remoteRenderingDomain = value;
    }

    [Header("Development Account Credentials")]
    [SerializeField]
    private string accountDomain = "<enter your account domain here>";
    public string AccountDomain
    {
        get => accountDomain.Trim();
        set => accountDomain = value;
    }

    [SerializeField]
    private string accountId = "<enter your account id here>";
    public string AccountId {
        get => accountId.Trim();
        set => accountId = value;
    }

    [SerializeField]
    private string accountKey = "<enter your account key here>";
    public string AccountKey {
        get => accountKey.Trim();
        set => accountKey = value;
    }

    // These settings are important. All three should be set as low as possible, while maintaining a good user experience
    // See the documentation around session management and the technical differences in session VM size
    [Header("New Session Defaults")]

    public RenderingSessionVmSize renderingSessionVmSize = RenderingSessionVmSize.Standard;
    public uint maxLeaseHours = 0;
    public uint maxLeaseMinutes = 20;

    [Header("Other Configuration")]

    [Tooltip("If you have a known active SessionID, you can fill it in here before connecting")]
    [SerializeField]
    private string sessionIDOverride;
    public string SessionIDOverride {
        get => sessionIDOverride.Trim();
        set => sessionIDOverride = value;
    }

    // When Automatic Mode is true, the coordinator will attempt to automatically proceed through the process of connecting and loading a model
    public bool automaticMode = true;

    public event Action RequestingAuthorization;
    public UnityEvent OnRequestingAuthorization = new UnityEvent();

    public event Action AuthorizedChanged;
    public UnityEvent OnAuthorizationChanged = new UnityEvent();
    private bool authorized;
    public bool Authorized
    {
        get => authorized;
        set
        {
            if (value == true) //This is a one-way value, once we're authorized it lasts until the app is shutdown.
            {
                authorized = value;
                AuthorizedChanged?.Invoke();
            }
        }
    }

    public delegate Task<SessionConfiguration> AccountInfoGetter();

    public static AccountInfoGetter ARRCredentialGetter
    {
        private get;
        set;
    }

    private RemoteRenderingState currentCoordinatorState = RemoteRenderingState.NotSet;
    public RemoteRenderingState CurrentCoordinatorState
    {
        get => currentCoordinatorState;
        private set
        {
            if (currentCoordinatorState != value)
            {
                currentCoordinatorState = value;
                Debug.LogFormat(LogType.Log, LogOption.NoStacktrace, null, "{0}", $"State changed to: {currentCoordinatorState}");
                CoordinatorStateChange?.Invoke(currentCoordinatorState);
            }
        }
    }

    public static event Action<RemoteRenderingState> CoordinatorStateChange;

    public static RenderingSession CurrentSession => instance?.ARRSessionService?.CurrentActiveSession;

    private ARRServiceUnity arrSessionService;

    private ARRServiceUnity ARRSessionService
    {
        get
        {
            if (arrSessionService == null)
                arrSessionService = GetComponent<ARRServiceUnity>();
            return arrSessionService;
        }
    }

    private async Task<SessionConfiguration> GetDevelopmentCredentials()
    {
        Debug.LogWarning("Using development credentials! Not recommended for production.");
        return await Task.FromResult(new SessionConfiguration(AccountDomain, RemoteRenderingDomain, AccountId, AccountKey));
    }

    /// <summary>
    /// Keep the last used SessionID, when launching, connect to this session if its available
    /// </summary>
    private string LastUsedSessionID
    {
        get
        {
            if (!string.IsNullOrEmpty(SessionIDOverride))
                return SessionIDOverride;

            if (PlayerPrefs.HasKey("LastUsedSessionID"))
                return PlayerPrefs.GetString("LastUsedSessionID");
            else
                return null;
        }
        set
        {
            PlayerPrefs.SetString("LastUsedSessionID", value);
        }
    }

    public void Awake()
    {
        //Forward events to Unity events
        RequestingAuthorization += () => OnRequestingAuthorization?.Invoke();
        AuthorizedChanged += () => OnAuthorizationChanged?.Invoke();

        //Attach to event
        AuthorizedChanged += RemoteRenderingCoordinator_AuthorizedChanged;

        if (instance == null)
            instance = this;
        else
            Destroy(this);

        CoordinatorStateChange += AutomaticMode;

        CurrentCoordinatorState = RemoteRenderingState.NotInitialized;
    }

    private void RemoteRenderingCoordinator_AuthorizedChanged()
    {
        if (CurrentCoordinatorState != RemoteRenderingState.NotAuthorized)
            return; //This isn't valid from any other state than NotAuthorized


        //We just became authorized to connect to Azure
        InitializeSessionService();
    }

    /// <summary>
    /// Automatic mode attempts to automatically progress through the connection and loading steps. Doesn't handle error states.
    /// </summary>
    /// <param name="currentState">The current state</param>
    private async void AutomaticMode(RemoteRenderingState currentState)
    {
        if (!automaticMode)
            return;

        //Add a small delay for visual effect
        await Task.Delay(1500);
        switch (currentState)
        {
            case RemoteRenderingState.NotInitialized:
                InitializeARR();
                break;
            case RemoteRenderingState.NotAuthorized:
                RequestAuthorization();
                break;
            case RemoteRenderingState.NoSession:
                JoinRemoteSession();
                break;
            case RemoteRenderingState.RemoteSessionReady:
                ConnectRuntimeToRemoteSession();
                break;
        }
    }

    /// <summary>
    /// Initializes ARR, associating the main camera
    /// Note: This must be called on the main Unity thread
    /// </summary>
    public void InitializeARR()
    {
        //Implement me
    }

    /// <summary>
    /// Create a new remote session manager
    /// If the ARRCredentialGetter is set, use it as it, otherwise use the development credentials
    /// </summary>
    public async void InitializeSessionService()
    {
        //Implement me
    }

    /// <summary>
    /// Trigger the event for checking authorization, respond to this event by prompting the user for authentication
    /// If authorized, set Authorized = true
    /// </summary>
    public void RequestAuthorization()
    {
        RequestingAuthorization?.Invoke();
    }

    public void BypassAuthorization()
    {
        Authorized = true;
    }

    /// <summary>
    /// Attempts to join an existing session or start a new session
    /// </summary>
    public async void JoinRemoteSession()
    {
        //Implement me
    }

    public async void StopRemoteSession()
    {
        //Implement me
    }

    private async Task<bool> IsSessionAvailable(string sessionID)
    {
        bool sessionAvailable = false;
        try
        {
            RenderingSessionPropertiesArrayResult result = await ARRSessionService.Client.GetCurrentRenderingSessionsAsync();
            if (result.ErrorCode == Result.Success)
            {
                RenderingSessionProperties[] properties = result.SessionProperties;
                if (properties != null)
                {
                    sessionAvailable = properties.Any(x => x.Id == sessionID && (x.Status == RenderingSessionStatus.Ready || x.Status == RenderingSessionStatus.Starting));
                }
            }
            else
            {
                Debug.LogError($"Failed to get current rendering sessions. Error: {result.Context.ErrorMessage}");
            }
        }
        catch (RRException ex)
        {
            Debug.LogError($"Failed to get current rendering sessions. Error: {ex.Message}");
        }
        return sessionAvailable;
    }

    /// <summary>
    /// Connects the local runtime to the current active session, if there's a session available
    /// </summary>
    public async void ConnectRuntimeToRemoteSession()
    {
        //Implement me
    }

    public void DisconnectRuntimeFromRemoteSession()
    {
        //Implement me
    }

    /// <summary>
    /// The session must have its runtime pump updated.
    /// The Connection.Update() will push messages to the server, receive messages, and update the frame-buffer with the remotely rendered content.
    /// </summary>
    private void LateUpdate()
    {
        ARRSessionService?.CurrentActiveSession?.Connection?.Update();
    }

    /// <summary>
    /// Loads a model into the remote session for rendering
    /// </summary>
    /// <param name="modelPath">The model's path</param>
    /// <param name="progress">A call back method that accepts a float progress value [0->1]</param>
    /// <param name="parent">The parent Transform for this remote entity</param>
    /// <returns>An awaitable Remote Rendering Entity</returns>
    public async Task<Entity> LoadModel(string modelPath, UnityEngine.Transform parent = null, Action<float> progress = null)
    {
        //Implement me
        return null;
    }

    private async void OnRemoteSessionStatusChanged(ARRServiceUnity caller, RenderingSession session)
    {
        var properties = await session.GetPropertiesAsync();

        switch (properties.SessionProperties.Status)
        {
            case RenderingSessionStatus.Error:
            case RenderingSessionStatus.Expired:
            case RenderingSessionStatus.Stopped:
            case RenderingSessionStatus.Unknown:
                CurrentCoordinatorState = RemoteRenderingState.NoSession;
                break;
            case RenderingSessionStatus.Starting:
                CurrentCoordinatorState = RemoteRenderingState.ConnectingToNewRemoteSession;
                break;
            case RenderingSessionStatus.Ready:
                CurrentCoordinatorState = RemoteRenderingState.RemoteSessionReady;
                break;
        }
    }

    private void OnLocalRuntimeStatusChanged(ConnectionStatus status, Result error)
    {
        switch (status)
        {
            case ConnectionStatus.Connected:
                CurrentCoordinatorState = RemoteRenderingState.RuntimeConnected;
                break;
            case ConnectionStatus.Connecting:
                CurrentCoordinatorState = RemoteRenderingState.ConnectingToRuntime;
                break;
            case ConnectionStatus.Disconnected:
                CurrentCoordinatorState = RemoteRenderingState.RemoteSessionReady;
                break;
        }
    }
}
创建 Azure 远程渲染 GameObject
远程渲染协调器及其所需的脚本 (ARRServiceUnity) 都是必须附加到场景中的 GameObject 上的 MonoBehaviours。 ARR 提供了 ARRServiceUnity 脚本,用于公开 ARR 的许多功能,这些功能用于连接和管理远程会话。
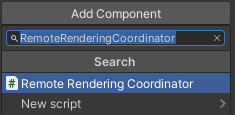
- 在场景中创建一个新的 GameObject(Ctrl+Shift+N 或 GameObject -> Create Empty),并将其命名为 RemoteRenderingCoordinator。
- 将 RemoteRenderingCoordinator 脚本添加到 RemoteRenderingCoordinator GameObject 中。
- 确认 ARRServiceUnity 脚本(在检查器中显示为 Service)已自动添加到 GameObject 中 。 这里解释一下,这是将
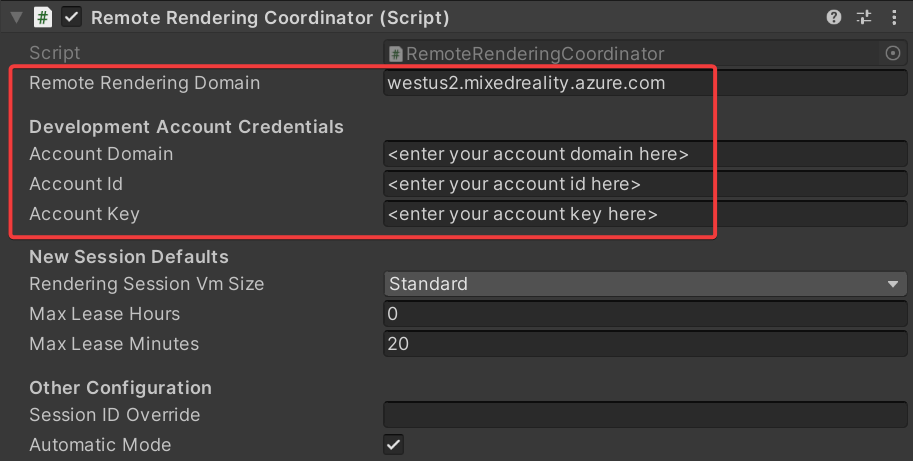
[RequireComponent(typeof(ARRServiceUnity))]放在 RemoteRenderingCoordinator 脚本顶部所产生的效果。 - 将 Azure 远程渲染凭据、帐户域和远程渲染域添加到协调器脚本:
初始化 Azure 远程渲染
现在我们有了协调器的框架,我们将从初始化远程渲染开始,实现这四个阶段中的每个阶段。

“初始化”可指示 Azure 远程渲染使用哪个相机对象进行渲染,并促使状态机进入“NotAuthorized”状态 。 此状态意味着它已初始化,但尚未获得连接会话的授权。 由于启动 ARR 会话会产生费用,因此我们需要确认用户是否希望继续。
进入 NotAuthorized 状态时,将调用 CheckAuthorization,这将调用 RequestingAuthorization 事件并确定要使用的帐户凭据(AccountInfo 在类顶部附近定义,并使用你在上述步骤中通过 Unity 检查器定义的凭据) 。
注意
ARR 不支持运行时重新编译。 在激活播放模式时修改并保存该脚本可能会导致 Unity 冻结,且需要通过任务管理器强制关闭。 在编辑脚本之前,请务必确保已停止播放模式。
将 InitializeARR 和 InitializeSessionService 的内容替换为以下代码 :
/// <summary>
/// Initializes ARR, associating the main camera
/// Note: This must be called on the main Unity thread
/// </summary>
public void InitializeARR()
{
    RemoteManagerUnity.InitializeManager(new RemoteUnityClientInit  (Camera.main));

    CurrentCoordinatorState = RemoteRenderingState.NotAuthorized;
}

/// <summary>
/// Create a new remote session manager
/// If the ARRCredentialGetter is set, use it as it, otherwise use  the development credentials
/// </summary>
public async void InitializeSessionService()
{
    if (ARRCredentialGetter == null)
        ARRCredentialGetter = GetDevelopmentCredentials;

    var sessionConfiguration = await ARRCredentialGetter.Invoke();

    ARRSessionService.OnSessionStatusChanged +=     OnRemoteSessionStatusChanged;

    try
    {
        ARRSessionService.Initialize(sessionConfiguration);
    }
    catch (ArgumentException argumentException)
    {
        Debug.LogError(argumentException.Message);
        CurrentCoordinatorState = RemoteRenderingState. NotAuthorized;
        return;
    }

    CurrentCoordinatorState = RemoteRenderingState.NoSession;
}
为从 NotAuthorized 状态进展到 NoSession 状态,通常会向用户呈现一个模式对话框,以便他们可以选择(我们将在另一章中进行介绍)。 现在,我们会在触发 RequestingAuthorization 事件时立即调用 ByPassAuthentication 来自动绕过授权检查。
选择 RemoteRenderingCoordinator GameObject 并找到在 RemoteRenderingCoordinator 组件的检查器中公开的 OnRequestingAuthorization Unity 事件 。
按右下方的“+”添加新事件。
将组件拖到其自己的事件上,以引用其自身。
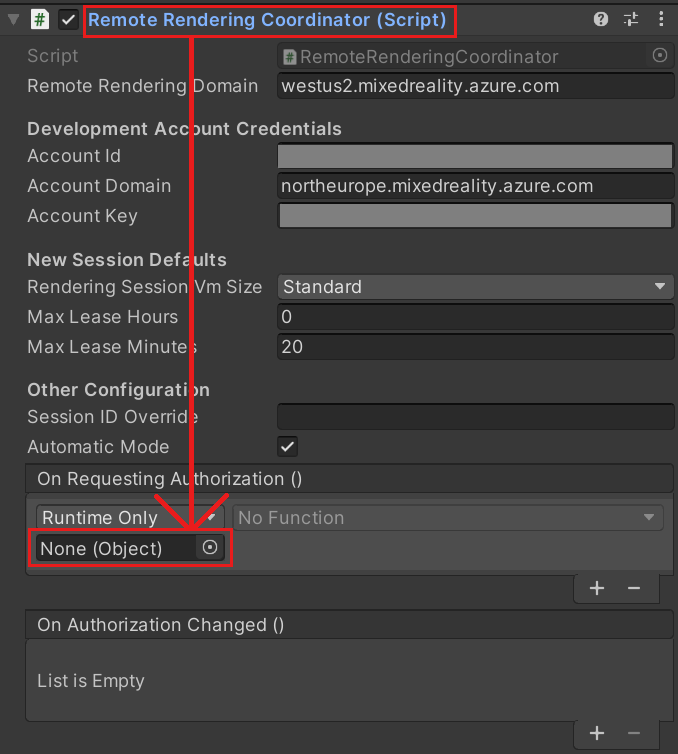
在下拉列表中,选择“RemoteRenderingCoordinator”-“>BypassAuthorization”。

创建或加入远程会话
第二个阶段是创建或加入远程渲染会话(有关渲染会话的详细信息,请参阅远程渲染会话)。

远程会话是渲染模型的地方。 JoinRemoteSession( ) 方法将尝试加入使用 LastUsedSessionID 属性跟踪的现有会话或是在 SessionIDOverride 上有已分配的活动会话 ID 的情况下加入。 SessionIDOverride 仅用于调试目的,应只在知道会话存在并要显式连接到该会话时使用。
如果没有可用的会话,则会创建新会话。 然而,创建新会话是一个相当耗时的操作。 因此,应该尝试只在需要时创建会话,并尽可能重用它们(有关管理会话的详细信息,请参阅商业就绪:会话池、计划和最佳做法)。
提示
StopRemoteSession() 将结束活动会话。 若要避免产生不必要的费用,应在不再需要会话时将其停止。
根据可用会话,状态机现在将进展到 ConnectingToNewRemoteSession 或 ConnectingToExistingRemoteSession 。 打开现有会话或创建新会话都将触发 ARRSessionService.OnSessionStatusChanged 事件,并执行我们的 OnRemoteSessionStatusChanged 方法。 理想情况下,这会使状态机进展到 RemoteSessionReady。
- 若要加入新会话,请修改代码,将 JoinRemoteSession( ) 和 StopRemoteSession( ) 方法替换为以下完整示例内容 :
/// <summary>
/// Attempts to join an existing session or start a new session
/// </summary>
public async void JoinRemoteSession()
{
    //If there's a session available that previously belonged to us, and it's ready, use it. Otherwise start a new session.
    RenderingSessionProperties joinResult;
    if (await IsSessionAvailable(LastUsedSessionID))
    {
        CurrentCoordinatorState = RemoteRenderingState.ConnectingToExistingRemoteSession;
        joinResult = await ARRSessionService.OpenSession(LastUsedSessionID);
    }
    else
    {
        CurrentCoordinatorState = RemoteRenderingState.ConnectingToNewRemoteSession;
        joinResult = await ARRSessionService.StartSession(new RenderingSessionCreationOptions(renderingSessionVmSize, (int)maxLeaseHours, (int)maxLeaseMinutes));
    }

    if (joinResult.Status == RenderingSessionStatus.Ready || joinResult.Status == RenderingSessionStatus.Starting)
    {
        LastUsedSessionID = joinResult.Id;
    }
    else
    {
        //The session should be ready or starting, if it's not, something went wrong
        await ARRSessionService.StopSession();
        if(LastUsedSessionID == SessionIDOverride)
            SessionIDOverride = "";
        CurrentCoordinatorState = RemoteRenderingState.NoSession;
    }
}

public async void StopRemoteSession()
{
    if (ARRSessionService.CurrentActiveSession != null)
    {
        await ARRSessionService.CurrentActiveSession.StopAsync();
    }
}
如果要通过重用会话来节省时间,请确保停用 ARRServiceUnity 组件中的“自动停止会话”选项。 请记住,即使没有人连接到会话,这也会使会话保持运行状态。 会话可以持续运行 MaxLeaseTime 指定的时间长度,此时间过后,会话将被服务器关闭(可在远程渲染协调器的“新会话默认值”下修改 MaxLeaseTime 的值) 。 另一方面,如果在断开连接时自动关闭每个会话,那么每次都必须等待新会话启动,这可能是一个漫长的过程。
注意
停止会话的操作会立即生效,且无法撤消。 停止会话后,必须创建新会话,其启动开销是相同的。
将本地运行时连接到远程会话
接下来,应用程序需要将其本地运行时连接到远程会话。

应用程序还需要侦听有关运行时与当前会话之间的连接的事件;这些状态更改将在 OnLocalRuntimeStatusChanged 中进行处理。 此代码会使状态进展至 ConnectingToRuntime。 在 OnLocalRuntimeStatusChanged 中建立连接后,状态将进展至 RuntimeConnected。 连接到运行时是与协调器本身相关的最后一种状态,这意味着应用程序已完成所有通用配置,并且已准备好开始加载和渲染模型的特定于会话的工作。
- 将 ConnectRuntimeToRemoteSession( ) 和 DisconnectRuntimeFromRemoteSession( ) 方法替换为以下已完成的版本 。
- 请务必注意 Unity 方法 LateUpdate,它正在更新当前的活动会话。 这允许当前会话发送/接收消息,并通过远程会话接收的帧更新帧缓冲区。 这对 ARR 的正常运行至关重要。
/// <summary>
/// Connects the local runtime to the current active session, if there's a session available
/// </summary>
public async void ConnectRuntimeToRemoteSession()
{
    if (ARRSessionService == null || ARRSessionService.CurrentActiveSession == null)
    {
        Debug.LogError("Not ready to connect runtime");
        return;
    }

    // Connect the local runtime to the currently connected session
    // This session is set when connecting to a new or existing session

    ARRSessionService.CurrentActiveSession.ConnectionStatusChanged += OnLocalRuntimeStatusChanged;
    await ARRSessionService.CurrentActiveSession.ConnectAsync(new RendererInitOptions());
}

public void DisconnectRuntimeFromRemoteSession()
{
    if (ARRSessionService == null || ARRSessionService.CurrentActiveSession == null || ARRSessionService.CurrentActiveSession.ConnectionStatus != ConnectionStatus.Connected)
    {
        Debug.LogError("Runtime not connected!");
        return;
    }

    ARRSessionService.CurrentActiveSession.Disconnect();
    ARRSessionService.CurrentActiveSession.ConnectionStatusChanged -= OnLocalRuntimeStatusChanged;
    CurrentCoordinatorState = RemoteRenderingState.RemoteSessionReady;
}
注意
将本地运行时连接到远程会话取决于在当前活动会话上调用 Update。 如果发现应用程序的进展从未超过 ConnectingToRuntime 状态,请确保在活动会话中定期调用 Update 。
加载模型
设置好所需的基础结构后,就可以将模型加载到远程会话并开始接收帧了。

LoadModel 方法的作用是接受模型路径、进度处理程序和父转换。 这些参数用于将模型加载到远程会话中,向用户更新加载进度,并基于父转换确定远程渲染模型的方向。
将 LoadModel 方法完全替换为以下代码:
/// <summary>
/// Loads a model into the remote session for rendering
/// </summary>
/// <param name="modelName">The model's path</param>
/// <param name="parent">The parent Transform for this remote entity</param>
/// <param name="progress">A call back method that accepts a float progress value [0->1]</param>
/// <returns>An awaitable Remote Rendering Entity</returns>
public async Task<Entity> LoadModel(string modelPath, UnityEngine.Transform parent = null, Action<float> progress = null)
{
    //Create a root object to parent a loaded model to
    var modelEntity = ARRSessionService.CurrentActiveSession.Connection.CreateEntity();

    //Get the game object representation of this entity
    var modelGameObject = modelEntity.GetOrCreateGameObject(UnityCreationMode.DoNotCreateUnityComponents);

    //Ensure the entity will sync its transform with the server
    var sync = modelGameObject.GetComponent<RemoteEntitySyncObject>();
    sync.SyncEveryFrame = true;

    //Parent the new object under the defined parent
    if (parent != null)
    {
        modelGameObject.transform.SetParent(parent, false);
        modelGameObject.name = parent.name + "_Entity";
    }

    //Load a model that will be parented to the entity
    var loadModelParams = new LoadModelFromSasOptions(modelPath, modelEntity);
    var loadModelAsync = ARRSessionService.CurrentActiveSession.Connection.LoadModelFromSasAsync(loadModelParams, progress);
    var result = await loadModelAsync;
    return modelEntity;
}
上述代码将执行以下步骤:
- 创建远程实体。
- 创建用于表示远程实体的本地 GameObject。
- 配置本地 GameObject 以将其状态(即“转换”)同步到每个帧的远程实体。
- 将模型数据从 Blob 存储加载到远程实体。
- 返回父实体,供以后引用。
查看测试模型
现在,我们拥有了查看远程渲染模型所需的所有代码,并完成了远程渲染必需的所有四个阶段。 现在我们需要添加一些代码来启动模型加载过程。

将以下代码添加到 RemoteRenderingCoordinator 类,就在 LoadModel 方法的正下方 :
private bool loadingTestModel = false;
[ContextMenu("Load Test Model")]
public async void LoadTestModel()
{
    if(CurrentCoordinatorState != RemoteRenderingState.RuntimeConnected)
    {
        Debug.LogError("Please wait for the runtime to connect before loading the test model. Try again later.");
        return;
    }
    if(loadingTestModel)
    {
        Debug.Log("Test model already loading or loaded!");
        return;
    }
    loadingTestModel = true;

    // Create a parent object to use for positioning
    GameObject testParent = new GameObject("TestModelParent");
    testParent.transform.position = new Vector3(0f, 0f, 3f);

    // The 'built in engine path' is a special path that references a test model built into Azure Remote Rendering.
    await LoadModel("builtin://Engine", testParent.transform, (progressValue) => Debug.Log($"Loading Test Model progress: {Math.Round(progressValue * 100, 2)}%"));
}
此代码创建一个 GameObject 作为测试模型的父项。 然后,它调用 LoadModel 方法来加载模型“builtin://Engine”,这是 Azure 远程渲染中内置的资产,用于测试渲染。
保存代码。
按 Unity 编辑器中的“播放”按钮以启动连接到 Azure 远程渲染并创建新会话的过程。
在“游戏”视图中不会看到太多内容,但是,控制台将显示应用程序状态的变化。 可能会进展至
ConnectingToNewRemoteSession,并保持最多五分钟。选择 RemoteRenderingCoordinator GameObject,以在检查器中查看其附加的脚本。 观察“服务”组件在其初始化和连接步骤中的更新。
监视控制台输出 - 等待状态更改为 RuntimeConnected。
连接运行时后,右键单击检查器中的 RemoteRenderingCoordinator 以显示上下文菜单。 然后,选择上下文菜单中的“加载测试模型”选项,该选项由上面代码的
[ContextMenu("Load Test Model")]部分添加。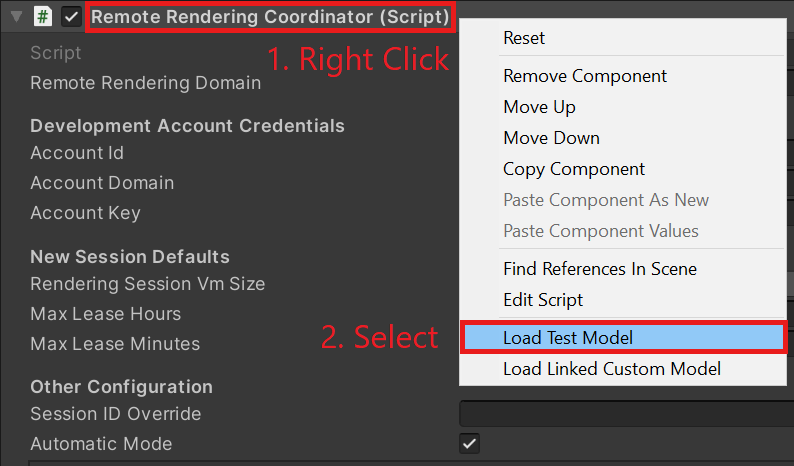
监视控制台,查看传递给 LoadModel 方法的 ProgressHandler 的输出 。
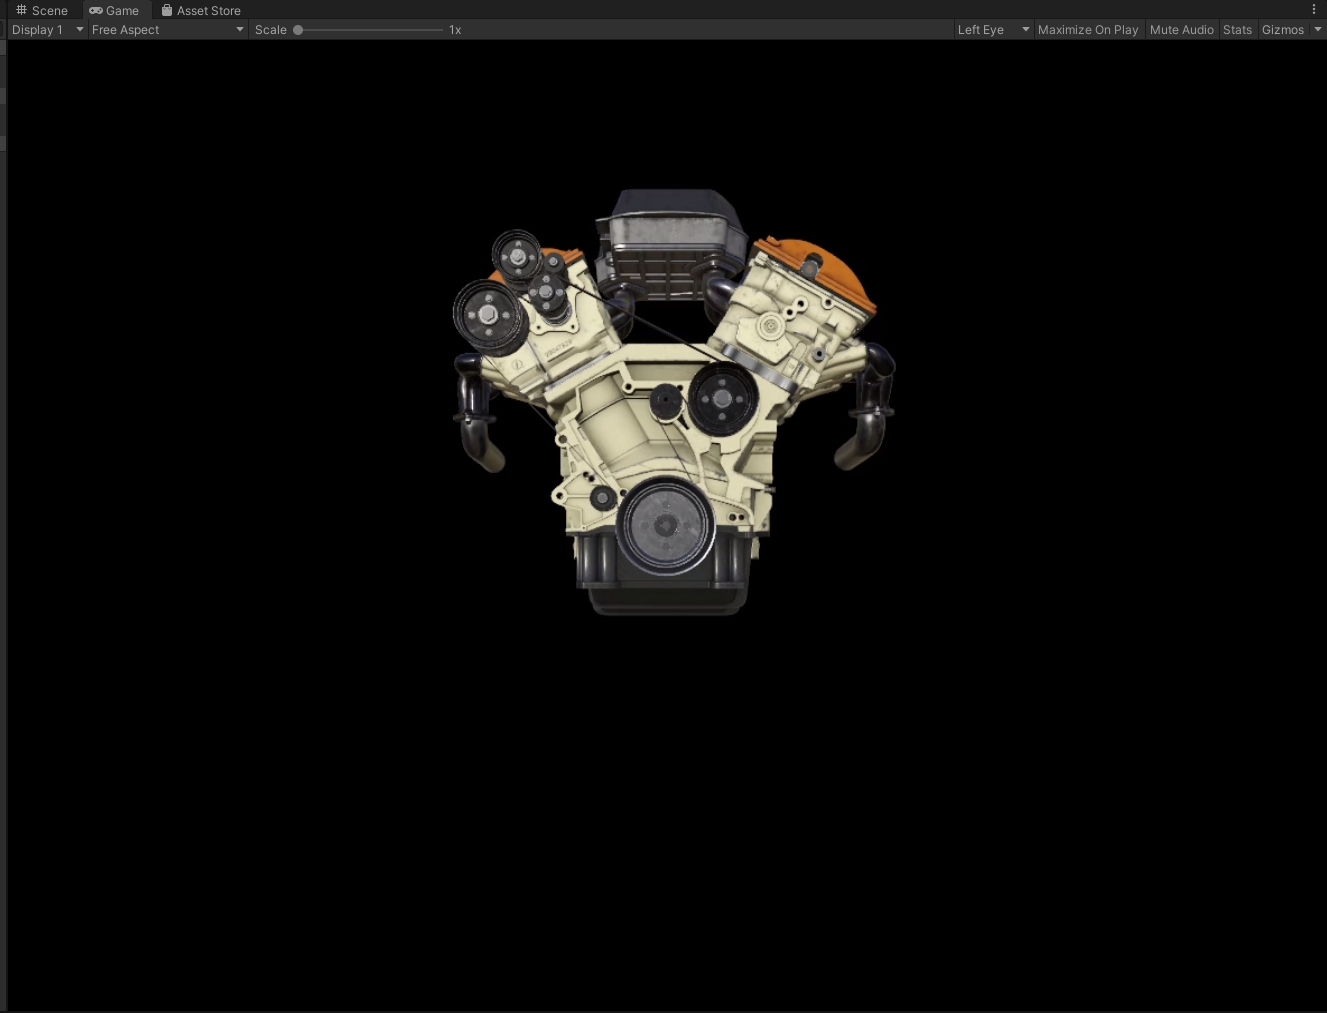
查看远程渲染的模型!
注意
远程模型永远不会显示在“场景”视图中,只显示在“游戏”视图中。 这是因为 ARR 专门从“游戏”视图照相机的角度远程渲染帧,而不感知编辑器照相机(用于渲染“场景”视图)。
后续步骤
祝贺你! 你已经创建了一个基本应用程序,该应用程序能够使用 Azure 远程渲染来查看远程渲染的模型。 在下一教程中,我们将集成 MRTK 并导入我们自己的模型。