你当前正在访问 Microsoft Azure Global Edition 技术文档网站。 如果需要访问由世纪互联运营的 Microsoft Azure 中国技术文档网站,请访问 https://docs.azure.cn。
教程:优化材料、照明和效果
在本教程中,你将了解如何执行以下操作:
- 突出显示和大纲显示模型和模型组件
- 将不同材料应用于模型
- 使用剪切平面,穿过模型进行切片
- 为远程渲染对象添加简单动画
先决条件
- 本教程以教程:操作模型为基础构建。
突出显示和大纲显示
向用户提供视觉反馈是任何应用程序中用户体验的重要组成部分。 Azure 远程渲染通过分层状态替代提供视觉反馈机制。 分层状态替代通过附加到模型本地实例的组件来实现。 我们已通过将远程对象图同步到 Unity 层次结构中中的介绍了解了如何创建这些本地实例。
首先,我们将围绕 HierarchicalStateOverrideComponent 组件创建一个包装器。 HierarchicalStateOverrideComponent 是控制远程实体上替代操作的本地脚本。 Tutorial Assets 包含一个名为 BaseEntityOverrideController 的抽象基类,我们将对其进行扩展以创建包装器 。
创建名为 EntityOverrideController 的新脚本,并将其内容替换为以下代码:
// Copyright (c) Microsoft Corporation. All rights reserved.
// Licensed under the MIT License. See LICENSE in the project root for license information.

using Microsoft.Azure.RemoteRendering;
using Microsoft.Azure.RemoteRendering.Unity;
using System;
using UnityEngine;

public class EntityOverrideController : BaseEntityOverrideController
{
    public override event Action<HierarchicalStates> FeatureOverrideChange;

    private ARRHierarchicalStateOverrideComponent localOverride;
    public override ARRHierarchicalStateOverrideComponent LocalOverride
    {
        get
        {
            if (localOverride == null)
            {
                localOverride = gameObject.GetComponent<ARRHierarchicalStateOverrideComponent>();
                if (localOverride == null)
                {
                    localOverride = gameObject.AddComponent<ARRHierarchicalStateOverrideComponent>();
                }

                var remoteStateOverride = TargetEntity.Entity.FindComponentOfType<HierarchicalStateOverrideComponent>();

                if (remoteStateOverride == null)
                {
                    // if there is no HierarchicalStateOverrideComponent on the remote side yet, create one
                    localOverride.Create(RemoteManagerUnity.CurrentSession);
                }
                else
                {
                    // otherwise, bind our local stateOverride component to the remote component
                    localOverride.Bind(remoteStateOverride);

                }
            }
            return localOverride;
        }
    }

    private RemoteEntitySyncObject targetEntity;
    public override RemoteEntitySyncObject TargetEntity
    {
        get
        {
            if (targetEntity == null)
                targetEntity = gameObject.GetComponent<RemoteEntitySyncObject>();
            return targetEntity;
        }
    }

    private HierarchicalEnableState ToggleState(HierarchicalStates feature)
    {
        HierarchicalEnableState setToState = HierarchicalEnableState.InheritFromParent;
        switch (LocalOverride.RemoteComponent.GetState(feature))
        {
            case HierarchicalEnableState.ForceOff:
            case HierarchicalEnableState.InheritFromParent:
                setToState = HierarchicalEnableState.ForceOn;
                break;
            case HierarchicalEnableState.ForceOn:
                setToState = HierarchicalEnableState.InheritFromParent;
                break;
        }

        return SetState(feature, setToState);
    }

    private HierarchicalEnableState SetState(HierarchicalStates feature, HierarchicalEnableState enableState)
    {
        if (GetState(feature) != enableState) //if this is actually different from the current state, act on it
        {
            LocalOverride.RemoteComponent.SetState(feature, enableState);
            FeatureOverrideChange?.Invoke(feature);
        }

        return enableState;
    }

    public override HierarchicalEnableState GetState(HierarchicalStates feature) => LocalOverride.RemoteComponent.GetState(feature);

    public override void ToggleHidden() => ToggleState(HierarchicalStates.Hidden);

    public override void ToggleSelect() => ToggleState(HierarchicalStates.Selected);

    public override void ToggleSeeThrough() => ToggleState(HierarchicalStates.SeeThrough);

    public override void ToggleTint(Color tintColor = default)
    {
        if (tintColor != default) LocalOverride.RemoteComponent.TintColor = tintColor.toRemote();
        ToggleState(HierarchicalStates.UseTintColor);
    }

    public override void ToggleDisabledCollision() => ToggleState(HierarchicalStates.DisableCollision);

    public override void RemoveOverride()
    {
        var remoteStateOverride = TargetEntity.Entity.FindComponentOfType<HierarchicalStateOverrideComponent>();
        if (remoteStateOverride != null)
        {
            remoteStateOverride.Destroy();
        }

        if (localOverride == null)
            localOverride = gameObject.GetComponent<ARRHierarchicalStateOverrideComponent>();

        if (localOverride != null)
        {
            Destroy(localOverride);
        }
    }
}
LocalOverride 的主要工作是在自身与其 RemoteComponent 之间建立链接。 然后,我们可以通过 LocalOverride 在本地组件上设置绑定到远程实体的状态标志。 分层状态替代页中对这些替代及其状态进行了描述。
此实现一次只切换一个状态。 但是,完全有可能合并单个实体上的多个替代并在层次结构的不同级别上创建合并。 例如,在单个组件上合并 Selected 和 SeeThrough 可以向组件提供一个边框,同时还可以使它透明。 或者,将根实体的 Hidden 替代设置为 ForceOn,同时将子实体的 Hidden 替代设置为 ForceOff,这样会隐藏除具有替代内容的子项以外的所有内容。
若要将状态应用于实体,可以修改先前创建的 RemoteEntityHelper。
修改 RemoteEntityHelper 类以实现 BaseRemoteEntityHelper 抽象类 。 此修改将允许使用 Tutorial Assets 中提供的视图控制器。 修改后,它应如下所示:
public class RemoteEntityHelper : BaseRemoteEntityHelper使用以下代码重写抽象方法:
public override BaseEntityOverrideController EnsureOverrideComponent(Entity entity)
{
    var entityGameObject = entity.GetOrCreateGameObject(UnityCreationMode.DoNotCreateUnityComponents);
    var overrideComponent = entityGameObject.GetComponent<EntityOverrideController>();
    if (overrideComponent == null)
        overrideComponent = entityGameObject.AddComponent<EntityOverrideController>();
    return overrideComponent;
}

public override HierarchicalEnableState GetState(Entity entity, HierarchicalStates feature)
{
    var overrideComponent = EnsureOverrideComponent(entity);
    return overrideComponent.GetState(feature);
}

public override void ToggleHidden(Entity entity)
{
    var overrideComponent = EnsureOverrideComponent(entity);
    overrideComponent.ToggleHidden();
}

public override void ToggleSelect(Entity entity)
{
    var overrideComponent = EnsureOverrideComponent(entity);
    overrideComponent.ToggleSelect();
}

public override void ToggleSeeThrough(Entity entity)
{
    var overrideComponent = EnsureOverrideComponent(entity);
    overrideComponent.ToggleSeeThrough();
}

public Color TintColor = new Color(0.0f, 1.0f, 0.0f, 0.1f);
public override void ToggleTint(Entity entity)
{
    var overrideComponent = EnsureOverrideComponent(entity);
    overrideComponent.ToggleTint(TintColor);
}

public override void ToggleDisableCollision(Entity entity)
{
    var overrideComponent = EnsureOverrideComponent(entity);
    overrideComponent.ToggleHidden();
}

public override void RemoveOverrides(Entity entity)
{
    var entityGameObject = entity.GetOrCreateGameObject(UnityCreationMode.DoNotCreateUnityComponents);
    var overrideComponent = entityGameObject.GetComponent<EntityOverrideController>();
    if (overrideComponent != null)
    {
        overrideComponent.RemoveOverride();
        Destroy(overrideComponent);
    }
}
此代码可确保将 EntityOverrideController 组件添加到目标实体,然后调用其中一个切换方法。 如果需要,可以在 TestModel GameObject 上,通过添加 RemoteEntityHelper 作为对 RemoteRayCastPointerHandler 组件上 OnRemoteEntityClicked 事件的回调来调用这些帮助程序方法 。
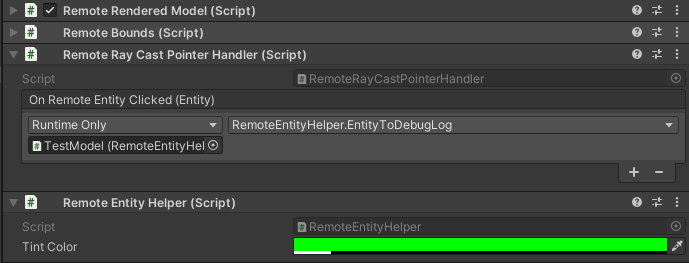
现在已经将这些脚本添加到模型中,当与运行时连接时,AppMenu 视图控制器应会再启用一个接口,以便与 EntityOverrideController 脚本进行交互 。 查看“模型工具”菜单以查看未锁定的视图控制器。
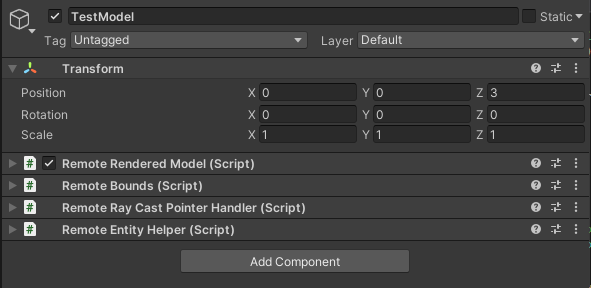
此时,TestModel GameObject 的组件应如下所示:
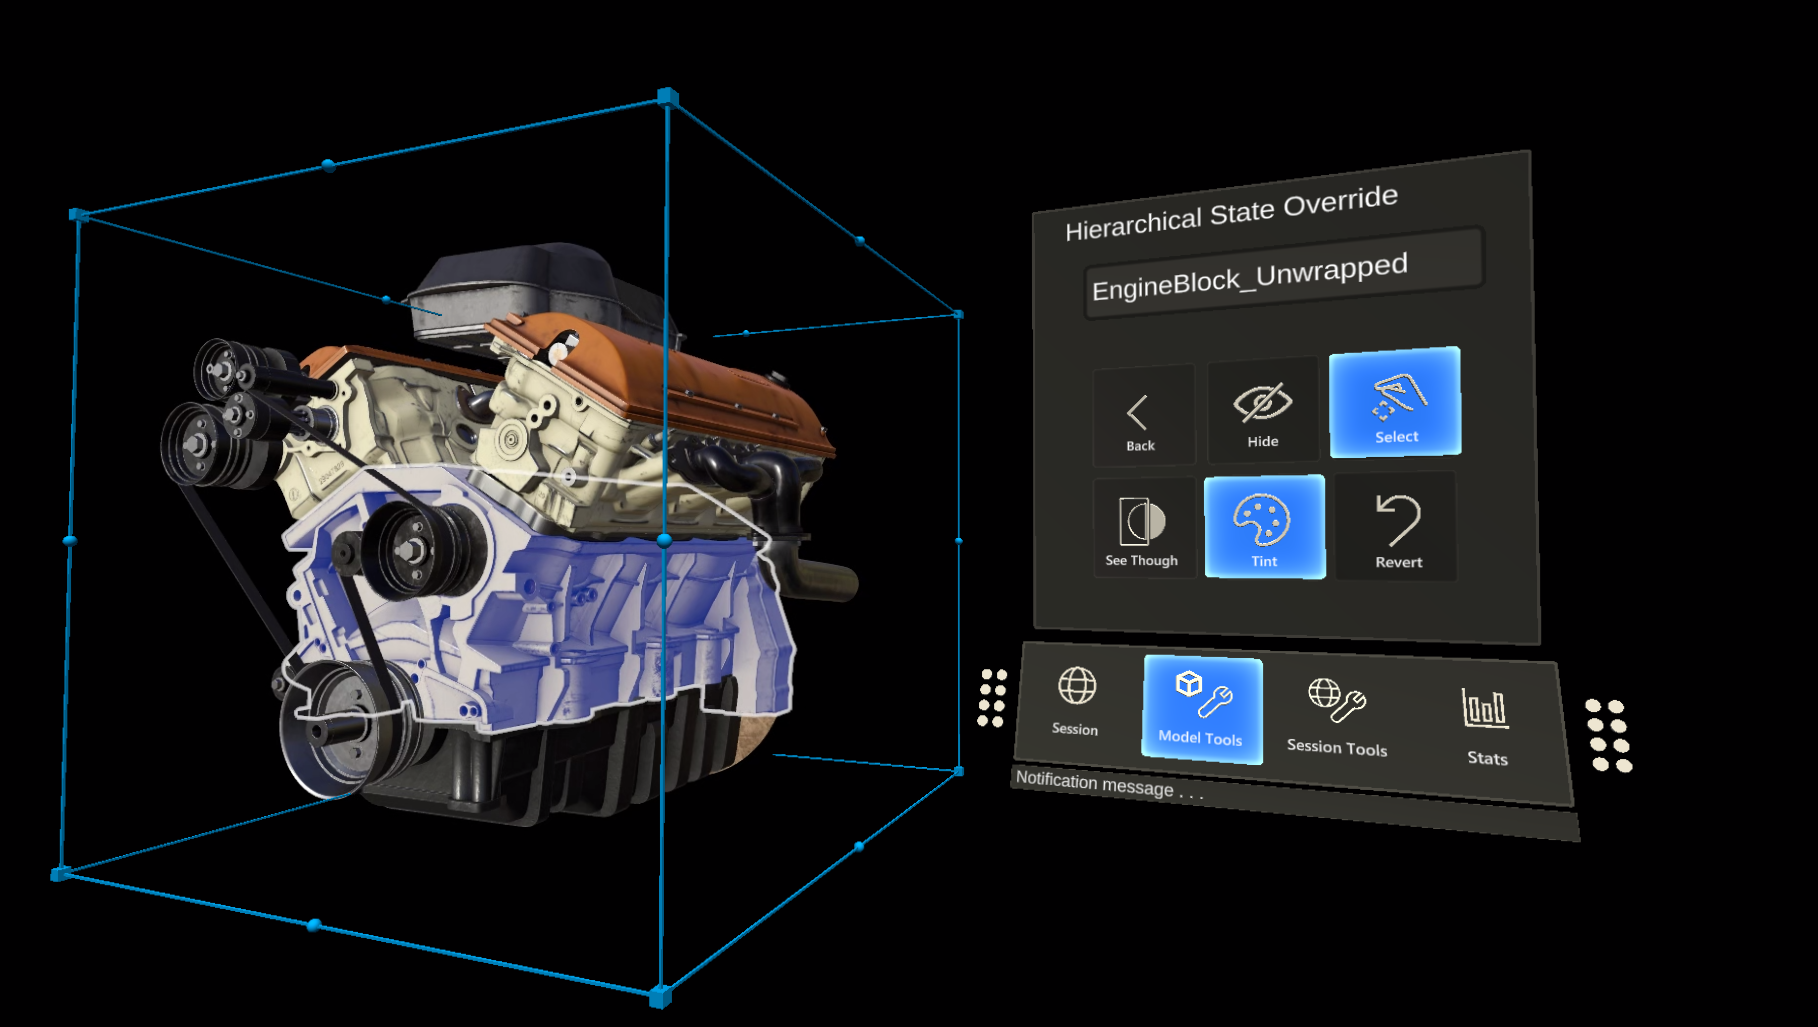
下面是在单个实体上堆叠替代的示例。 我们使用 Select 和 Tint 来提供边框和着色:
剪切平面
剪切平面是可以添加到任何远程实体的功能。 最常见的方案是,创建一个与任何网格数据都不关联的新远程实体来保存剪切平面组件。 剪切平面的位置和方向取决于其附加到的远程实体的位置和方向。
我们将创建一个脚本,该脚本将自动创建远程实体、添加剪切平面组件并同步本地对象与剪切平面实体的转换。 然后,可以使用 CutPlaneViewController 将剪切平面包装在一个接口中,从而允许我们对其进行操作。
创建一个名为 RemoteCutPlane 的新脚本,并将其代码替换为以下内容:
// Copyright (c) Microsoft Corporation. All rights reserved.
// Licensed under the MIT License. See LICENSE in the project root for license information.

using Microsoft.Azure.RemoteRendering;
using Microsoft.Azure.RemoteRendering.Unity;
using System;
using UnityEngine;

public class RemoteCutPlane : BaseRemoteCutPlane
{
    public Color SliceColor = new Color(0.5f, 0f, 0f, .5f);
    public float FadeLength = 0.01f;
    public Axis SliceNormal = Axis.NegativeY;

    public bool AutomaticallyCreate = true;

    private CutPlaneComponent remoteCutPlaneComponent;
    private bool cutPlaneReady = false;

    public override bool CutPlaneReady
    {
        get => cutPlaneReady;
        set
        {
            cutPlaneReady = value;
            CutPlaneReadyChanged?.Invoke(cutPlaneReady);
        }
    }

    public override event Action<bool> CutPlaneReadyChanged;

    public UnityBoolEvent OnCutPlaneReadyChanged = new UnityBoolEvent();

    public void Start()
    {
        // Hook up the event to the Unity event
        CutPlaneReadyChanged += (ready) => OnCutPlaneReadyChanged?.Invoke(ready);

        RemoteRenderingCoordinator.CoordinatorStateChange += RemoteRenderingCoordinator_CoordinatorStateChange;
        RemoteRenderingCoordinator_CoordinatorStateChange(RemoteRenderingCoordinator.instance.CurrentCoordinatorState);
    }

    private void RemoteRenderingCoordinator_CoordinatorStateChange(RemoteRenderingCoordinator.RemoteRenderingState state)
    {
        switch (state)
        {
            case RemoteRenderingCoordinator.RemoteRenderingState.RuntimeConnected:
                if (AutomaticallyCreate)
                    CreateCutPlane();
                break;
            default:
                DestroyCutPlane();
                break;
        }
    }

    public override void CreateCutPlane()
    {
        //Implement me
    }

    public override void DestroyCutPlane()
    {
        //Implement me
    }
}
该代码扩展了 Tutorial Assets 中包含的 BaseRemoteCutPlane 类 。 与远程渲染的模型相似,此脚本附加并侦听远程协调器中的
RemoteRenderingState更改。 当协调器达到RuntimeConnected状态时,它将按预期自动尝试连接。 我们还将跟踪一个CutPlaneComponent变量。 这是与远程会话中的剪切平面同步的 Azure 远程渲染组件。 让我们看看需要执行哪些操作来创建剪切平面。将
CreateCutPlane()方法替换为下面的完整版本:public override void CreateCutPlane() { if (remoteCutPlaneComponent != null) return; //Nothing to do! //Create a root object for the cut plane var cutEntity = RemoteRenderingCoordinator.CurrentSession.Connection.CreateEntity(); //Bind the remote entity to this game object cutEntity.BindToUnityGameObject(this.gameObject); //Sync the transform of this object so we can move the cut plane var syncComponent = this.gameObject.GetComponent<RemoteEntitySyncObject>(); syncComponent.SyncEveryFrame = true; //Add a cut plane to the entity remoteCutPlaneComponent = RemoteRenderingCoordinator.CurrentSession.Connection.CreateComponent(ObjectType.CutPlaneComponent, cutEntity) as CutPlaneComponent; //Configure the cut plane remoteCutPlaneComponent.Normal = SliceNormal; remoteCutPlaneComponent.FadeColor = SliceColor.toRemote(); remoteCutPlaneComponent.FadeLength = FadeLength; CutPlaneReady = true; }此处我们将创建一个远程实体,并将其绑定到本地 GameObject。 我们通过将
SyncEveryFrame设置为true,确保远程实体将其“转换”同步到本地转换。 然后,使用CreateComponent调用将CutPlaneComponent添加到远程对象。 最后,我们使用在 MonoBehaviour 顶部定义的设置来配置剪切平面。 让我们看看通过实现DestroyCutPlane()方法来清理剪切平面需要执行哪些操作。将
DestroyCutPlane()方法替换为下面的完整版本:public override void DestroyCutPlane() { if (remoteCutPlaneComponent == null) return; //Nothing to do! remoteCutPlaneComponent.Owner.Destroy(); remoteCutPlaneComponent = null; CutPlaneReady = false; }
由于远程对象非常简单,并且我们只清理远程端(并保留本地对象),因此,只需在远程对象上调用 Destroy 并清除对其的引用即可。
AppMenu 包含一个视图控制器,该控制器自动附加到剪切平面,并可与之进行交互。 不需要使用 AppMenu 或任何视图控制器,但是它们可以带来更好的体验。 现在,测试剪切平面及其视图控制器。
在场景中创建新的空 GameObject 并将其命名为 CutPlane。
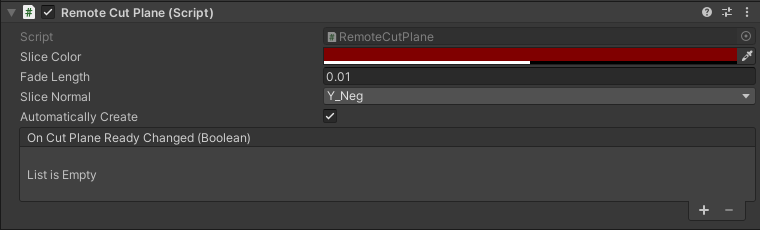
将 RemoteCutPlane 组件添加到 CutPlane GameObject 。
在 Unity 编辑器中按“播放”以加载并连接到远程会话。
使用 MRTK 的手势模拟,抓取并旋转(按 Ctrl 旋转)CutPlane,使其在场景中移动。 观察它切分至 TestModel 内部并显示内部组件。

配置远程照明
远程渲染会话支持丰富完善的照明选项。 我们将为天空纹理创建脚本,并为两种 Unity 光线类型创建一个简单贴图,以用于远程渲染。
天空纹理
更改天空纹理时,有许多内置的立体贴图可供选择。 这些贴图加载到会话中,并应用于天空纹理。 也可以加载自己的纹理,作为天空光线使用。
我们将创建一个 RemoteSky 脚本,该脚本含有一系列内置的、“加载参数”形式的可用立体贴图。 然后,我们将允许用户选择并加载其中一个。
创建名为 RemoteSky 的新脚本,并将其全部内容替换为以下代码:
// Copyright (c) Microsoft Corporation. All rights reserved.
// Licensed under the MIT License. See LICENSE in the project root for license information.

using Microsoft.Azure.RemoteRendering;
using System;
using System.Collections.Generic;
using UnityEngine;

public class RemoteSky : BaseRemoteSky
{
    public override Dictionary<string, LoadTextureFromSasOptions> AvailableCubemaps => builtInTextures;

    private bool canSetSky;
    public override bool CanSetSky
    {
        get => canSetSky;
        set
        {
            canSetSky = value;
            CanSetSkyChanged?.Invoke(canSetSky);
        }
    }

    private string currentSky = "DefaultSky";
    public override string CurrentSky
    {
        get => currentSky;
        protected set
        {
            currentSky = value;
            SkyChanged?.Invoke(value);
        }
    }

    private Dictionary<string, LoadTextureFromSasOptions> builtInTextures = new Dictionary<string, LoadTextureFromSasOptions>()
    {
        {"Autoshop",new LoadTextureFromSasOptions("builtin://Autoshop", TextureType.CubeMap)},
        {"BoilerRoom",new LoadTextureFromSasOptions("builtin://BoilerRoom", TextureType.CubeMap)},
        {"ColorfulStudio",new LoadTextureFromSasOptions("builtin://ColorfulStudio", TextureType.CubeMap)},
        {"Hangar",new LoadTextureFromSasOptions("builtin://Hangar", TextureType.CubeMap)},
        {"IndustrialPipeAndValve",new LoadTextureFromSasOptions("builtin://IndustrialPipeAndValve", TextureType.CubeMap)},
        {"Lebombo",new LoadTextureFromSasOptions("builtin://Lebombo", TextureType.CubeMap)},
        {"SataraNight",new LoadTextureFromSasOptions("builtin://SataraNight", TextureType.CubeMap)},
        {"SunnyVondelpark",new LoadTextureFromSasOptions("builtin://SunnyVondelpark", TextureType.CubeMap)},
        {"Syferfontein",new LoadTextureFromSasOptions("builtin://Syferfontein", TextureType.CubeMap)},
        {"TearsOfSteelBridge",new LoadTextureFromSasOptions("builtin://TearsOfSteelBridge", TextureType.CubeMap)},
        {"VeniceSunset",new LoadTextureFromSasOptions("builtin://VeniceSunset", TextureType.CubeMap)},
        {"WhippleCreekRegionalPark",new LoadTextureFromSasOptions("builtin://WhippleCreekRegionalPark", TextureType.CubeMap)},
        {"WinterRiver",new LoadTextureFromSasOptions("builtin://WinterRiver", TextureType.CubeMap)},
        {"DefaultSky",new LoadTextureFromSasOptions("builtin://DefaultSky", TextureType.CubeMap)}
    };

    public UnityBoolEvent OnCanSetSkyChanged;
    public override event Action<bool> CanSetSkyChanged;

    public UnityStringEvent OnSkyChanged;
    public override event Action<string> SkyChanged;

    public void Start()
    {
        // Hook up the event to the Unity event
        CanSetSkyChanged += (canSet) => OnCanSetSkyChanged?.Invoke(canSet);
        SkyChanged += (key) => OnSkyChanged?.Invoke(key);

        RemoteRenderingCoordinator.CoordinatorStateChange += ApplyStateToView;
        ApplyStateToView(RemoteRenderingCoordinator.instance.CurrentCoordinatorState);
    }

    private void ApplyStateToView(RemoteRenderingCoordinator.RemoteRenderingState state)
    {
        switch (state)
        {
            case RemoteRenderingCoordinator.RemoteRenderingState.RuntimeConnected:
                CanSetSky = true;
                break;
            default:
                CanSetSky = false;
                break;
        }
    }

    public override async void SetSky(string skyKey)
    {
        if (!CanSetSky)
        {
            Debug.Log("Unable to set sky right now");
            return;
        }

        if (AvailableCubemaps.ContainsKey(skyKey))
        {
            Debug.Log("Setting sky to " + skyKey);
            //Load the texture into the session
            var texture = await RemoteRenderingCoordinator.CurrentSession.Connection.LoadTextureFromSasAsync(AvailableCubemaps[skyKey]);

            //Apply the texture to the SkyReflectionSettings
            RemoteRenderingCoordinator.CurrentSession.Connection.SkyReflectionSettings.SkyReflectionTexture = texture;
            SkyChanged?.Invoke(skyKey);
        }
        else
        {
            Debug.Log("Invalid sky key");
        }
    }
}
这段代码最重要的部分只有几行:
//Load the texture into the session
var texture = await RemoteRenderingCoordinator.CurrentSession.Connection.LoadTextureFromSasAsync(AvailableCubemaps[skyKey]);

//Apply the texture to the SkyReflectionSettings
RemoteRenderingCoordinator.CurrentSession.Connection.SkyReflectionSettings.SkyReflectionTexture = texture;
此处我们通过将要使用的纹理从内置 Blob 存储加载到会话中来获取对它的引用。 然后,我们只需要将该纹理分配给会话的
SkyReflectionTexture即可应用它。在场景中创建空 GameObject 并将其命名为 SkyLight。
将 RemoteSky 脚本添加到 SkyLight GameObject 。
可以通过使用
AvailableCubemaps中定义的字符串键之一调用SetSky来切换天空光线。 AppMenu 中内置的视图控制器将自动创建按钮并挂钩其事件,以使用各自的键调用SetSky。在 Unity 编辑器中按“播放”并授权连接。
将本地运行时连接到远程会话后,请导航至“AppMenu”->“会话工具”->“远程天空”,以浏览不同的天空选项,看看它们可以对 TestModel 提供什么效果。
场景光线
远程光线包括:点光、投射光和定向光。 与上面创建的“剪切平面”相似,这些场景光是具有附加组件的远程实体。 为远程场景提供照明时的一个重要注意事项是,应尝试匹配本地场景中的照明。 此策略并非总是可行的,因为 HoloLens 2 的许多 Unity 应用程序都不对本地渲染的对象使用基于物理的渲染。 但在某种程度上,我们可以模拟 Unity 的较简单的默认照明。
创建一个名为 RemoteLight 的新脚本,并将其代码替换为以下内容:
// Copyright (c) Microsoft Corporation. All rights reserved.
// Licensed under the MIT License. See LICENSE in the project root for license information.

using Microsoft.Azure.RemoteRendering;
using Microsoft.Azure.RemoteRendering.Unity;
using System;
using UnityEngine;

[RequireComponent(typeof(Light))]
public class RemoteLight : BaseRemoteLight
{
    public bool AutomaticallyCreate = true;

    private bool lightReady = false;
    public override bool LightReady
    {
        get => lightReady;
        set
        {
            lightReady = value;
            LightReadyChanged?.Invoke(lightReady);
        }
    }

    private ObjectType remoteLightType = ObjectType.Invalid;
    public override ObjectType RemoteLightType => remoteLightType;

    public UnityBoolEvent OnLightReadyChanged;

    public override event Action<bool> LightReadyChanged;

    private Light localLight; //Unity Light

    private Entity lightEntity;
    private LightComponentBase remoteLightComponent; //Remote Rendering Light

    private void Awake()
    {
        localLight = GetComponent<Light>();
        switch (localLight.type)
        {
            case LightType.Directional:
                remoteLightType = ObjectType.DirectionalLightComponent;
                break;
            case LightType.Point:
                remoteLightType = ObjectType.PointLightComponent;
                break;
            case LightType.Spot:
            case LightType.Area:
                //Not supported in tutorial
            case LightType.Disc:
                // No direct analog in remote rendering
                remoteLightType = ObjectType.Invalid;
                break;
        }
    }

    public void Start()
    {
        // Hook up the event to the Unity event
        LightReadyChanged += (ready) => OnLightReadyChanged?.Invoke(ready);

        RemoteRenderingCoordinator.CoordinatorStateChange += RemoteRenderingCoordinator_CoordinatorStateChange;
        RemoteRenderingCoordinator_CoordinatorStateChange(RemoteRenderingCoordinator.instance.CurrentCoordinatorState);
    }

    public void OnDestroy()
    {
        lightEntity?.Destroy();
    }

    private void RemoteRenderingCoordinator_CoordinatorStateChange(RemoteRenderingCoordinator.RemoteRenderingState state)
    {
        switch (state)
        {
            case RemoteRenderingCoordinator.RemoteRenderingState.RuntimeConnected:
                if (AutomaticallyCreate)
                    CreateLight();
                break;
            default:
                DestroyLight();
                break;
        }
    }

    public override void CreateLight()
    {
        if (remoteLightComponent != null)
            return; //Nothing to do!

        //Create a root object for the light
        if(lightEntity == null)
            lightEntity = RemoteRenderingCoordinator.CurrentSession.Connection.CreateEntity();

        //Bind the remote entity to this game object
        lightEntity.BindToUnityGameObject(this.gameObject);

        //Sync the transform of this object so we can move the light
        var syncComponent = this.gameObject.GetComponent<RemoteEntitySyncObject>();
        syncComponent.SyncEveryFrame = true;

        //Add a light to the entity
        switch (RemoteLightType)
        {
            case ObjectType.DirectionalLightComponent:
                var remoteDirectional = RemoteRenderingCoordinator.CurrentSession.Connection.CreateComponent(ObjectType.DirectionalLightComponent, lightEntity) as DirectionalLightComponent;
                //No additional properties
                remoteLightComponent = remoteDirectional;
                break;

            case ObjectType.PointLightComponent:
                var remotePoint = RemoteRenderingCoordinator.CurrentSession.Connection.CreateComponent(ObjectType.PointLightComponent, lightEntity) as PointLightComponent;
                remotePoint.Radius = 0;
                remotePoint.Length = localLight.range;
                //remotePoint.AttenuationCutoff = //No direct analog in Unity legacy lights
                //remotePoint.ProjectedCubeMap = //No direct analog in Unity legacy lights

                remoteLightComponent = remotePoint;
                break;
            default:
                LightReady = false;
                return;
        }

        // Set the common values for all light types
        UpdateRemoteLightSettings();

        LightReady = true;
    }

    public override void UpdateRemoteLightSettings()
    {
        remoteLightComponent.Color = localLight.color.toRemote();
        remoteLightComponent.Intensity = localLight.intensity;
    }

    public override void DestroyLight()
    {
        if (remoteLightComponent == null)
            return; //Nothing to do!

        remoteLightComponent.Destroy();
        remoteLightComponent = null;
        LightReady = false;
    }

    [ContextMenu("Sync Remote Light Configuration")]
    public override void RecreateLight()
    {
        DestroyLight();
        CreateLight();
    }

    public override void SetIntensity(float intensity)
    {
        localLight.intensity = Mathf.Clamp(intensity, 0, 1);
        UpdateRemoteLightSettings();
    }

    public override void SetColor(Color color)
    {
        localLight.color = color;
        UpdateRemoteLightSettings();
    }
}
此脚本创建不同类型的远程光,具体取决于脚本附加到的本地 Unity 光线的类型。 远程光线将复制本地光线的位置、旋转、颜色和强度。 如果可能,远程光线还设置其他配置。 这并不是精确匹配,因为 Unity 光线并非 PBR 光线。
在场景中查找 DirectionalLight GameObject。 如果已从场景中删除默认的 DirectionalLight:请从顶部菜单栏中选择“GameObject”->“Light”->“DirectionalLight”以在场景中创建新的光线。
选择 DirectionalLight GameObject,然后使用“添加组件”按钮添加 RemoteLight 脚本 。
由于此脚本实现了基类
BaseRemoteLight,因此可以使用提供的 AppMenu 视图控制器与远程光线进行交互。 导航到“AppMenu”->“会话工具”->“定向光”。注意
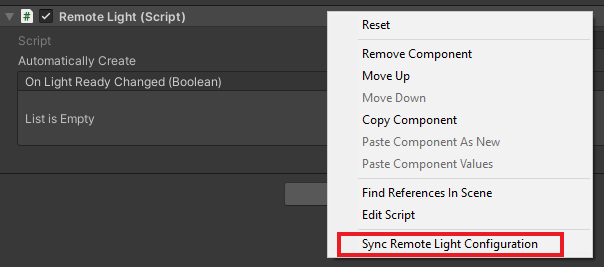
为简单起见,AppMenu 中的 UI 仅限于单个定向光。 然而,我们依然建议添加点光,并将 RemoteLight 脚本附加到其上。 可以通过在编辑器中编辑 Unity 光线的属性来修改这些附加光线。 将需要使用检查器中的 RemoteLight 上下文菜单手动同步对远程光线的本地更改:
在 Unity 编辑器中按“播放”并授权连接。
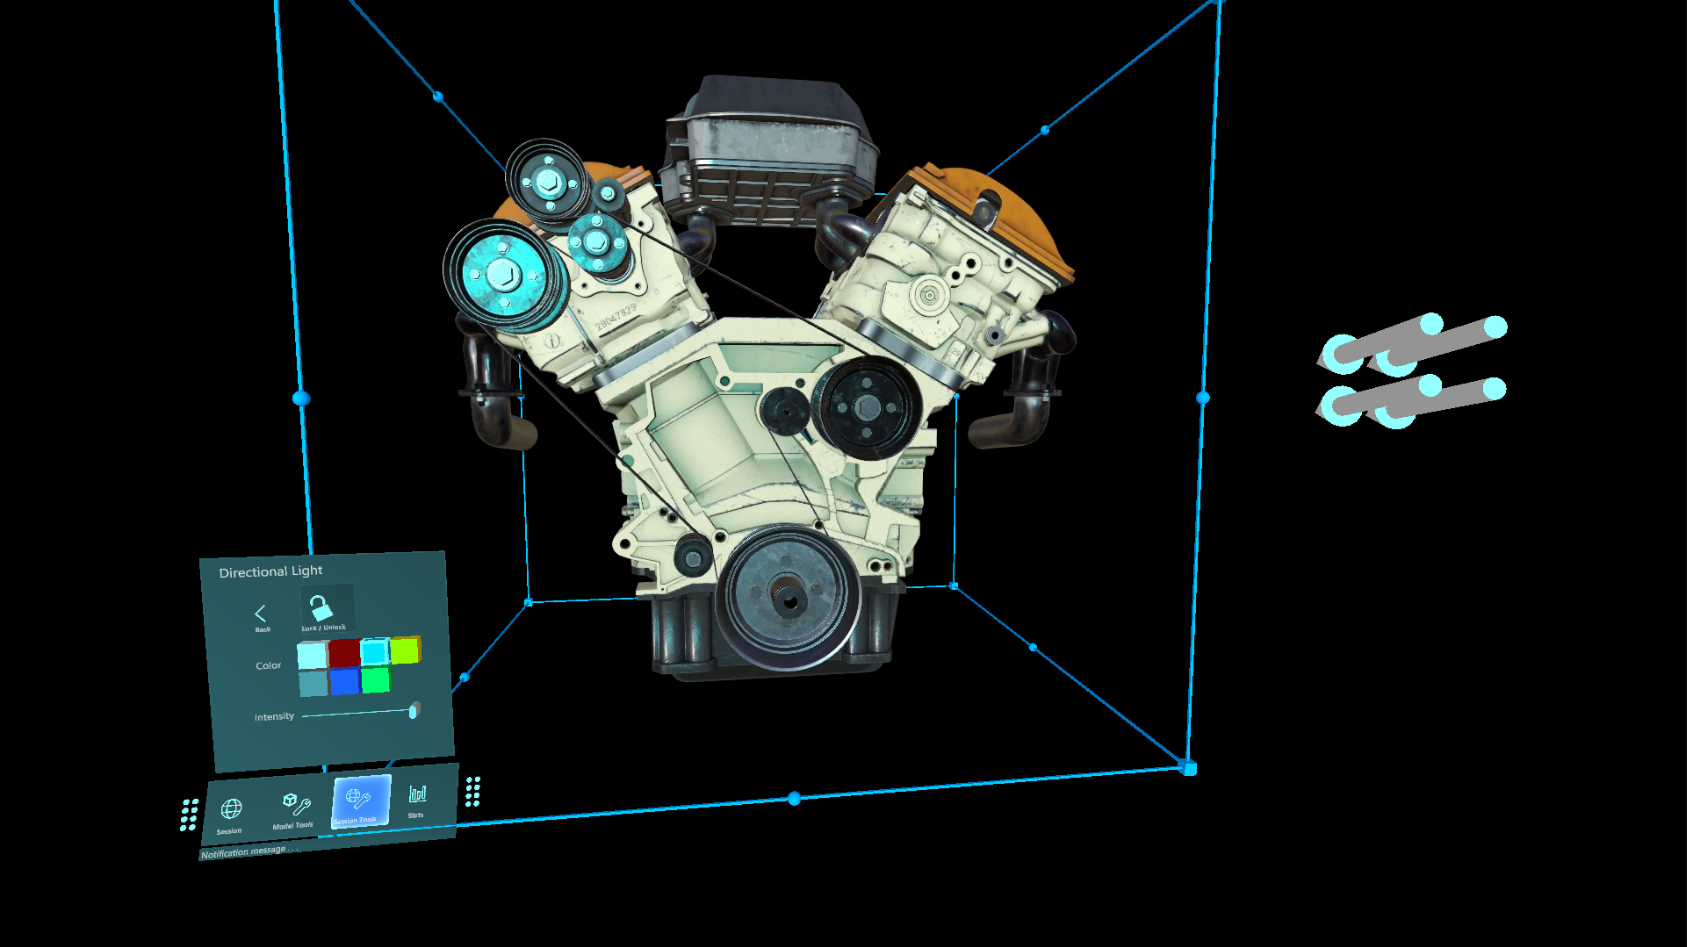
将运行时连接到远程会话后,请定位并对准照相机(使用 WASD 并右键单击 + 移动鼠标)以确保视野中出现定向光视图控制器。
使用远程光视图控制器修改光线的属性。 使用 MRTK 的手势模拟,抓取并旋转(按 Ctrl 旋转)定向光,查看该操作对场景光线的影响。
编辑材料
可以修改远程渲染的材料以提供其他视觉效果,可以微调渲染模型的视觉对象或向用户提供其他反馈。 修改材料有多种方式和原因。 此处,我们将向你展示如何更改材料的反照率颜色以及如何更改 PBR 材料的粗糙度和金属性。
注意
在许多情况下,如果可以使用 HierarchicalStateOverrideComponent 来实现功能或效果,则最好使用它而不是修改材料。
我们将创建一个脚本,该脚本接受目标实体并配置一些 OverrideMaterialProperty 对象以更改目标实体材料的属性。 我们首先获取目标实体的 MeshComponent,其中包含一系列网格上使用的材料。 为简单起见,我们只使用找到的第一个材料。 这一简单的策略可能会因内容的创作方式而非常容易失败,因此你可能需要采用更复杂的方法来选择合适的材料。
在材料中,可以访问反照率等常用值。 首先,需要将材料强制转换为适当的类型(PbrMaterial 或 ColorMaterial),以检索其值,如 GetMaterialColor 方法所示。 只要引用了所需的材料,只需设置这些值,ARR 就会执行本地材料属性与远程材料之间的同步。
创建名为 EntityMaterialController 的脚本,并将其内容替换为以下代码:
// Copyright (c) Microsoft Corporation. All rights reserved.
// Licensed under the MIT License. See LICENSE in the project root for license information.

using Microsoft.Azure.RemoteRendering;
using Microsoft.Azure.RemoteRendering.Unity;
using System;
using System.Linq;
using UnityEngine;
// to prevent namespace conflicts
using ARRMaterial = Microsoft.Azure.RemoteRendering.Material;

public class EntityMaterialController : BaseEntityMaterialController
{
    public override bool RevertOnEntityChange { get; set; } = true;

    public override OverrideMaterialProperty<Color> ColorOverride { get; set; }
    public override OverrideMaterialProperty<float> RoughnessOverride { get; set; }
    public override OverrideMaterialProperty<float> MetalnessOverride { get; set; }

    private Entity targetEntity;
    public override Entity TargetEntity
    {
        get => targetEntity;
        set
        {
            if (targetEntity != value)
            {
                if (targetEntity != null && RevertOnEntityChange)
                {
                    Revert();
                }

                targetEntity = value;
                ConfigureTargetEntity();
                TargetEntityChanged?.Invoke(value);
            }
        }
    }

    private ARRMaterial targetMaterial;
    private ARRMeshComponent meshComponent;

    public override event Action<Entity> TargetEntityChanged;
    public UnityRemoteEntityEvent OnTargetEntityChanged;

    public void Start()
    {
        // Forward events to Unity events
        TargetEntityChanged += (entity) => OnTargetEntityChanged?.Invoke(entity);

        // If there happens to be a remote RayCaster on this object, assume we should listen for events from it
        if (GetComponent<BaseRemoteRayCastPointerHandler>() != null)
            GetComponent<BaseRemoteRayCastPointerHandler>().RemoteEntityClicked += (entity) => TargetEntity = entity;
    }

    protected override void ConfigureTargetEntity()
    {
        //Get the Unity object, to get the sync object, to get the mesh component, to get the material.
        var targetEntityGameObject = TargetEntity.GetOrCreateGameObject(UnityCreationMode.DoNotCreateUnityComponents);

        var localSyncObject = targetEntityGameObject.GetComponent<RemoteEntitySyncObject>();
        meshComponent = targetEntityGameObject.GetComponent<ARRMeshComponent>();
        if (meshComponent == null)
        {
            var mesh = localSyncObject.Entity.FindComponentOfType<MeshComponent>();
            if (mesh != null)
            {
                targetEntityGameObject.BindArrComponent<ARRMeshComponent>(mesh);
                meshComponent = targetEntityGameObject.GetComponent<ARRMeshComponent>();
            }
        }

        meshComponent.enabled = true;

        targetMaterial = meshComponent.RemoteComponent.Mesh.Materials.FirstOrDefault();
        if (targetMaterial == default)
        {
            return;
        }

        ColorOverride = new OverrideMaterialProperty<Color>(
            GetMaterialColor(targetMaterial), //The original value
            targetMaterial, //The target material
            ApplyMaterialColor); //The action to take to apply the override

        //If the material is a PBR material, we can override some additional values
        if (targetMaterial.MaterialSubType == MaterialType.Pbr)
        {
            var firstPBRMaterial = (PbrMaterial)targetMaterial;

            RoughnessOverride = new OverrideMaterialProperty<float>(
                firstPBRMaterial.Roughness, //The original value
                targetMaterial, //The target material
                ApplyRoughnessValue); //The action to take to apply the override

            MetalnessOverride = new OverrideMaterialProperty<float>(
                firstPBRMaterial.Metalness, //The original value
                targetMaterial, //The target material
                ApplyMetalnessValue); //The action to take to apply the override
        }
        else //otherwise, ensure the overrides are cleared out from any previous entity
        {
            RoughnessOverride = null;
            MetalnessOverride = null;
        }
    }

    public override void Revert()
    {
        if (ColorOverride != null)
            ColorOverride.OverrideActive = false;

        if (RoughnessOverride != null)
            RoughnessOverride.OverrideActive = false;

        if (MetalnessOverride != null)
            MetalnessOverride.OverrideActive = false;
    }

    private Color GetMaterialColor(ARRMaterial material)
    {
        if (material == null)
            return default;

        if (material.MaterialSubType == MaterialType.Color)
            return ((ColorMaterial)material).AlbedoColor.toUnity();
        else
            return ((PbrMaterial)material).AlbedoColor.toUnity();
    }

    private void ApplyMaterialColor(ARRMaterial material, Color color)
    {
        if (material == null)
            return;

        if (material.MaterialSubType == MaterialType.Color)
            ((ColorMaterial)material).AlbedoColor = color.toRemoteColor4();
        else
            ((PbrMaterial)material).AlbedoColor = color.toRemoteColor4();
    }

    private void ApplyRoughnessValue(ARRMaterial material, float value)
    {
        if (material == null)
            return;

        if (material.MaterialSubType == MaterialType.Pbr) //Only PBR has Roughness
            ((PbrMaterial)material).Roughness = value;
    }

    private void ApplyMetalnessValue(ARRMaterial material, float value)
    {
        if (material == null)
            return;

        if (material.MaterialSubType == MaterialType.Pbr) //Only PBR has Metalness
            ((PbrMaterial)material).Metalness = value;
    }
}
OverrideMaterialProperty 类型应具有足够的灵活性,以允许根据需要更改其他一些材料值。 OverrideMaterialProperty 类型跟踪某个替代的状态,维护新旧值,并使用委托来设置替代。 以 ColorOverride 为例:
ColorOverride = new OverrideMaterialProperty<Color>(
    GetMaterialColor(targetMaterial), //The original value
    targetMaterial, //The target material
    ApplyMaterialColor); //The action to take to apply the override
这将创建一个新的 OverrideMaterialProperty,其中替代将包装类型 Color。 在创建替代时,提供当前或原始颜色。 并为它指定要操作的 ARR 材料。 最后,提供一个将应用替代的委托。 委托是一种接受 ARR 材料和替代包装的类型的方法。 此方法是了解 ARR 如何调整材料值的最重要的部分。
ColorOverride 使用 ApplyMaterialColor 方法来完成其工作:
private void ApplyMaterialColor(ARRMaterial material, Color color)
{
    if (material.MaterialSubType == MaterialType.Color)
        ((ColorMaterial)material).AlbedoColor = color.toRemoteColor4();
    else
        ((PbrMaterial)material).AlbedoColor = color.toRemoteColor4();
}
此代码接受材料和颜色。 它会检查材料的类型,然后对材料进行强制转换以应用颜色。
RoughnessOverride 和 MetalnessOverride 的工作方式相似,即使用 ApplyRoughnessValue 和 ApplyMetalnessValue 方法进行工作。
接下来,让我们测试材料控制器。
- 将 EntityMaterialController 脚本添加到 TestModel GameObject 。
- 在 Unity 中按下“播放”以启动场景并连接到 ARR。
- 将运行时连接到远程会话并加载模型后,导航到“AppMenu”->“模型工具”->“编辑材料”
- 使用模拟手势单击“TestModel”,从模型中选择一个实体。
- 确认材料视图控制器(“AppMenu”->“模型工具”->“编辑材料”)已更新到目标实体。
- 使用材料视图控制器调整目标实体上的材料。
由于我们只修改了网格的第一种材料,因此你可能看不出材料的变化。 使用分层替代 SeeThrough 来查看要更改的材料是否在网格内。

后续步骤
祝贺你! 现在,你已经实现了 Azure 远程渲染的所有核心功能。 下一章将介绍如何保护 Azure 远程渲染和 Blob 存储。 这将是发布使用 Azure 远程渲染的商业应用程序的第一步。