AI + Machine Learning, Azure Machine Learning
What’s new in Azure Machine Learning service
Posted on
12 min read
Today we are very happy to release the new capabilities for the Azure Machine Learning service. Since our initial public preview launch in September 2017, we have received an incredible amount of valuable and constructive feedback. Over the last 12 months, the team has been very busy enhancing the product, addressing feedbacks, and adding new capabilities. It is extremely exciting to share these new improvements with you. We are confident that they will dramatically boost productivity for data scientists and machine learning practitioners in building and deploying machine learning solutions at cloud scale.
In this post, I want to highlight some of the core capabilities of the release with a bit more technical details.
Python SDK & Machine Learning workspace
Most of the recent machine learning innovations are happening in the Python language space, which is why we chose to expose the core features of the service through a Python SDK. You can install it with a simple pip install command, preferably in an isolated conda virtual environment.
# install just the base package
$ pip install azureml-sdk

# or install additional capabilities such as automated machine learning
$ pip install azureml-sdk[automl]
You will need access to an Azure subscription in order to fully leverage the SDK. First think you need to do is to create an Azure Machine Learning workspace. You can do that with the Python SDK or through the Azure portal. A workspace is the logical container of all your assets, and also the security and sharing boundary.
workspace = Workspace.create(name='my-workspace',
                             subscription_id='',
                             resource_group='my-resource-group')
Once you create a workspace, you can access a rich set of Azure services through the SDK and start rocking data science. For more details on how to get started, please visit the Get started article.
Data preparation
Data preparation is an important part of a machine learning workflow. Your models will be more accurate and efficient if they have access to clean data in a format that is easier to consume. You can use the SDK to load data of various formats, transform it to be more usable, and write that data to a location for your models to access. Here is a cool example of transforming a column into 2 new columns by supplying a few examples:
df2 = df1.derive_column_by_example(source_columns='start_time',
                                   new_column_name='date',
                                   example_data=[
                                   ('2017-12-31 16:57:39.6540', '2017-12-31'),
                                   ('2017-12-31 16:57:39', '2017-12-31')])
df3 = df2.derive_column_by_example(source_columns='start_time',
                                   new_column_name='wday',
                                   example_data=[('2017-12-31 16:57:39.6540', 'Sunday')])
For more details, please visit this article.
Experiment tracking
Modeling training is an iterative process. The Azure Machine Learning service can track all your experiment runs in the cloud. You can run an experiment locally or remotely, and use the logging APIs to record any metric, or upload any file.
exp = Experiment(workspace, "fraud detection")
with exp.start_logging() as run:
      # your code to train the model omitted
      ... ...

      run.log("overall accuracy", acc) # log a single value
      run.log_list("errors", error_list) # log a list of values
      run.log_row("boundaries", xmin=0, xmax=1, ymin=-1, ymax=1) # log arbitrary key/value pairs
      run.log_image("AUC plot", plt) # log a matplotlib plot
      run.upload("model", "./model.pkl") # upload a file
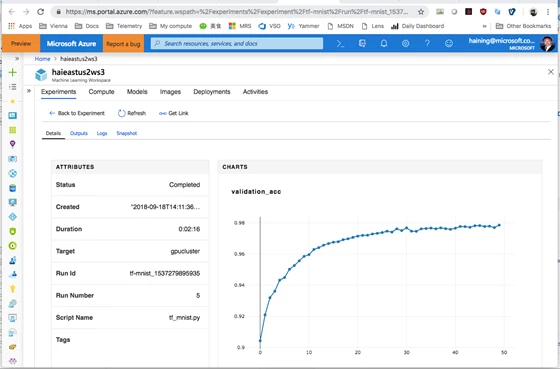
Once the run is complete (or even while the run is being executed), you can see the tracked information in the Azure portal.

You can also query the experiment runs to find the one that recorded the best metric as defined by you such as highest accuracy, lowest mean squared error, and more. You can then register the model produced by that run in the model registry under the workspace. You can also take that model and deploy it.
# Find the run that has the highest accuracy metric recorded.
best_run_id = max(run_metrics, key=lambda k: run_metrics[k]['accuracy'])

# reconstruct the run object based on run id
best_run = Run(experiment, best_run_id)

# register the model produced by that run
best_run.register_model('best model', 'outputs/model.pkl')
Find more detailed examples of how to use experiment logging APIs.
Scale your training with GPU clusters
It is OK to tinker with small data sets locally on a laptop, but training a sophisticated model might require large-scale compute resources in the cloud. With the Python SDK, you can simply attach existing Azure Linux VMs, or attach an Azure HDInsight for Spark clusters to execute your training jobs. You can also easily create a managed compute cluster, also known as Azure Batch AI cluster, to run your scripts.
pc = BatchAiCompute.provisioning_configuration(vm_size="STANDARD_NC6",
                                               autoscale_enabled=True,
                                               cluster_min_nodes=0,
                                               cluster_max_nodes=4)
cluster = compute_target = ComputeTarget.create(workspace, pc)
The code above creates a managed compute cluster equipped with GPUs (“STANDARD_NC6” Azure VM type). It can automatically scale up to 4 nodes when jobs are submitted to it, or scale back down to 0 nodes when jobs are finished to save cost. It is perfect for running many jobs in parallel, supporting features like intelligent hyperparameter tuning or batch scoring, or training large deep learning model in a distributed fashion.
Find a more detailed example of how to create a managed computer cluster.
Flexible execution environments
Azure Machine Learning service supports executing your scripts in various compute targets, including on local computer, aforementioned remote VM, Spark cluster, or managed computer cluster. For each compute target, it also supports various execution environments through a flexible run configuration object. You can ask the system to simply run your script in a Python environment you have already configured in the compute target, or ask the system to build a new conda environment based on dependencies specified to run your job. You can even ask the system to download a Docker image to run your job. We supply a few base Docker images you can choose from, but you can also bring your own Docker image if you’d like.
Here is an example of a run configuration object that specifies a Docker image with system managed conda environment:
# Create run configuration object
rc = RunConfiguration()
rc.target = "my-vm-target"
rc.environment.docker.enabled = True
rc.environment.python.user_managed_dependencies = False
rc.environment.docker.base_image = azureml.core.runconfig.DEFAULT_CPU_IMAGE

# Specify conda dependencies with scikit-learn
cd = CondaDependencies.create(conda_packages=['scikit-learn'])
rc.environment.python.conda_dependencies = cd

# Submit experiment
src = ScriptRunConfig(source_directory="./", script='train.py', run_config=rc)
run = experiment.submit(config=src)
The SDK also includes a high-level estimator pattern to wrap some of these configurations for TensorFlow and PyTorch-based execution to make it even easier to define the environments. These environment configurations allow maximum flexibility, so you can strike a balance between reproducibility and control. For more details, check out how to configure local execution, remote VM execution, and Spark job exeuction in HDInsight.
Datastore
With the multitude of compute targets and execution environments support, it is critical to have a consistent way to access data files from your scripts. Every workspace comes with a default datastore which is based on Azure blob storage account. You can use it to store and retrieve data files. And you can also configure additional datastores under the workspace. Here is a simple example of using datastore:
# upload files from local computer into default datastore
ds = workspace.get_default_datastore()
ds.upload(src_dir='./data', target_path='mnist', overwrite=True)

# pass in datastore's mounting point as an argument when submitting an experiment.
scr = ScriptRunConfig(source_directory="./",
                      script="train.py",
                      run_config=rc,
                      arguments={'--data_folder': ds.as_mount()})
run = experiment.submit(src)
Meanwhile, in the training script which is executed in the compute cluster, the datastore is automatically mounted. All you have to do is to get hold of the mounting path.
args = parser.parse_args()
# access data from the datastore mounting point
training_data = os.path.join(args.data_folder, 'mnist', 'train-images.gz')
For more detailed information on datastore.
automated machine learning
Given a training data set, choosing the right data preprocessing mechanisms and the right algorithms can be a challenging task even for the experts. Azure Machine Learning service includes advanced capabilities to automatically recommend machine learning pipeline that is composed of the best featurization steps and best algorithm, and the best hyperparameters, based on the target metric you set. Here is an example of automatically finding the pipeline that produces the highest AUC_Weighted value for classifying the given training data set:
# automatically find the best pipeline that gives the highest AUC_weighted value.
cfg = AutoMLConfig(task='classification',
                   primary_metric="AUC_weighted",
                   X = X_train,
                   y = y_train,
                   max_time_sec=3600,
                   iterations=10,
                   n_cross_validations=5)
run = experiment.submit(cfg)

# return the best model
best_run, fitted_model = run.get_output()
Here is a printout of the run. Notice iteration #6 represents the best pipeline which includes a scikit-learn StandardScaler and a LightGBM classifier.
| ITERATION | PIPELINE | DURATION | METRIC | BEST |
| 0 | SparseNormalizer LogisticRegression | 0:00:46.451353 | 0.998 | 0.998 |
| 1 | StandardScalerWrapper KNeighborsClassi | 0:00:31.184009 | 0.998 | 0.998 |
| 2 | MaxAbsScaler LightGBMClassifier | 0:00:16.193463 | 0.998 | 0.998 |
| 3 | MaxAbsScaler DecisionTreeClassifier | 0:00:12.379544 | 0.828 | 0.998 |
| 4 | SparseNormalizer LightGBMClassifier | 0:00:21.779849 | 0.998 | 0.998 |
| 5 | StandardScalerWrapper KNeighborsClassi | 0:00:11.910200 | 0.998 | 0.998 |
| 6 | StandardScalerWrapper LightGBMClassifi | 0:00:33.010702 | 0.999 | 0.999 |
| 7 | StandardScalerWrapper SGDClassifierWra | 0:00:18.195307 | 0.994 | 0.999 |
| 8 | MaxAbsScaler LightGBMClassifier | 0:00:16.271614 | 0.997 | 0.999 |
| 9 | StandardScalerWrapper KNeighborsClassi | 0:00:15.860538 | 0.999 | 0.999 |
automated machine learning supports both classification and regression, and it includes features such as handling missing values, early termination by a stopping metric, blacklisting algorithms you don’t want to explore, and many more. To learn more explore the automated machine learning article.
Intelligent hyperparameter tuning
Hyperparameter tuning (aka parameter sweep) is a general machine learning technique for finding the optimal hyperparameter values for a given algorithm. An indiscriminate and/or exhaustive hyperparameter search can be computationally expensive and time-consuming. The Azure Machine Learning service delivers intelligent hyperparameter tuning capabilities that can save user significant time and resources. It can search parameter space either randomly or with Bayesian optimization, automatically schedules parameter search jobs on the managed compute clusters in parallel, and accelerates the search process through user-defined early termination policies. Both traditional machine learning algorithms and iterative deep learning algorithm can benefit from it. Here is an example of using hyperparameter tuning with an estimator object.
# parameter grid to search
parameter_samples = RandomParameterSampling{
       "--learning_rate": loguniform(-10, -3),
       "--batch_size": uniform(50,300),
       "--first_layer_neurons": choice(100, 300, 500),
       "--second_layer_neurons": choice(10, 20, 50, 100)
}

# early termination policy
policy = BanditPolicy(slack_factor=0.1, evaluation_interval=2)

# hyperparameter tuning configuration
htc = HyperDriveRunConfig(estimator=my_estimator,
                          hyperparameter_sampling=parameter_samples,
                          policy=policy,
                          primary_metric_name='accuracy',
                          primary_metric_goal=PrimaryMetricGoal.MAXIMIZE,
                          max_total_runs=200,
                          max_concurrent_runs=10,
)
run = experiment.submit(htc)
The above code will randomly search through the given parameter space, and launch up to 200 jobs on the computer target configured on the estimator object, and look for the one that returns the highest accuracy. The BanditPolicy checks the accuracy produced by each job every two iterations, and terminates the job if the “accuracy” value is not with the 10 percent slack of the highest “accuracy” reported so far from other runs. Find a more detailed description of intelligent hyperparameter tuning.
Distributed training
When training a deep neural network, it can be more efficient to parallelize the computation over a cluster of GPU-equipped computers. Configuring such a cluster, and parallelizing your training script can be a tedious and error-prone task. Azure Machine Learning service provisions managed compute clusters with distributed training capabilities already enabled. Whether you are using the native parameter server option that ships with TensorFlow, or an MPI-based approach leveraged by Hovorod framework combined with TensorFlow, or Horovod with PyTorch, or CNTK with MPI, you can train the network in parallel with ease.
Here is an example of configuring an TensorFlow training run with MPI support with the distributed_backend flag set to mpi. In the word2vec.py file you can leverage Horovod that is automatically installed for you.
tf_estimator = TensorFlow(source_directory="./",
                          compute_target=my_cluster,
                          entry_script='word2vec.py',
                          script_params=script_params,
                          node_count=4,
                          process_count_per_node=1,
                          distributed_backend="mpi",
                          use_gpu=True)
Find more details on distributed training in Azure Machine Learning service.
Pipeline
Azure Machine Learning pipeline enables data scientists to create and manage multiple simple and complex workflows concurrently. A typical pipeline would have multiple tasks to prepare data, train, deploy and evaluate models. Individual steps can make use of diverse compute options (for e.g.: CPU for data preparation and GPU for training) and languages. User can also use published pipelines for scenarios like batch-scoring and retraining.
Here is a simple example showing a sequential pipeline for data preparation, training and batch scoring:
# Uses default values for PythonScriptStep construct.
s1 = PythonScriptStep(script_name="prep.py", target='my-spark-cluster', source_directory="./")
s2 = PythonScriptStep(script_name="train.py", target='my-gpu-cluster', source_directory="./")
s3 = PythonScriptStep(script_name="batch_score.py", target='my-cpu-cluster', source_directory="./")

# Run the steps as a pipeline
pipeline = Pipeline(workspace=ws, steps=[s1, s2, s3])
pipeline.validate()
pipeline_run = experiment.submit(pipeline)
Using a pipeline can drastically reduce complexity by organizing multi-step workflows, improve manageability by tracking the entire workflow as a single experiment run, and increase usability by recording all intermediary tasks and data. For more details, please visit this documentation.
Model management
A model can be produced out of a training run from an Azure Machine Learning experiment. You can use a simple API to register it under your workspace. You can also bring a model generated outside of Azure Machine Learning and register it too.
# register a model that's generated from a run and stored in the experiment history
model = best_run.register_model(model_name='best_model', model_path='outputs/model.pkl')

# or, register a model from local file
model = Model.register(model_name="best_model", model_path="./model.pkl", workspace=workspace)
Once registered, you can tag it, version it, search for it, and of course deploy it. For more details on model management capabilities, review this notebook.
Containerized deployment
Once you have a registered model, you can easily create a Docker image by using the model management APIs from the SDK. Simply supply the model file from your local computer or using a registered model in your workspace, add a training script and a package dependencies file. The system uploads everything into the cloud and creates a Docker image, then registers it with your workspace.
img_conf = ContainerImage.image_configuration(runtime="python",
                                                execution_script="score.py",
                                                conda_file="dependencies.yml")
# create a Docker image with model and scoring file
image = Image.create(name="my-image",
                     models=[model_obj],
                     image_config=image_config,
                     workspace=workspace)
You can choose to deploy the image to Azure Container Instance (ACI) service, a computing fabric to run a Docker container for dev/test scenarios, or deploy to Azure Kubernetes Cluster (AKS) service for scale-out and secure production environment. Find more deployment options.
Using notebooks
The Azure Machine Learning Python SDK can be used in any Python development environment that you choose. In addition, we have enabled tighter integration with the following notebook surface areas.
Juypter notebook
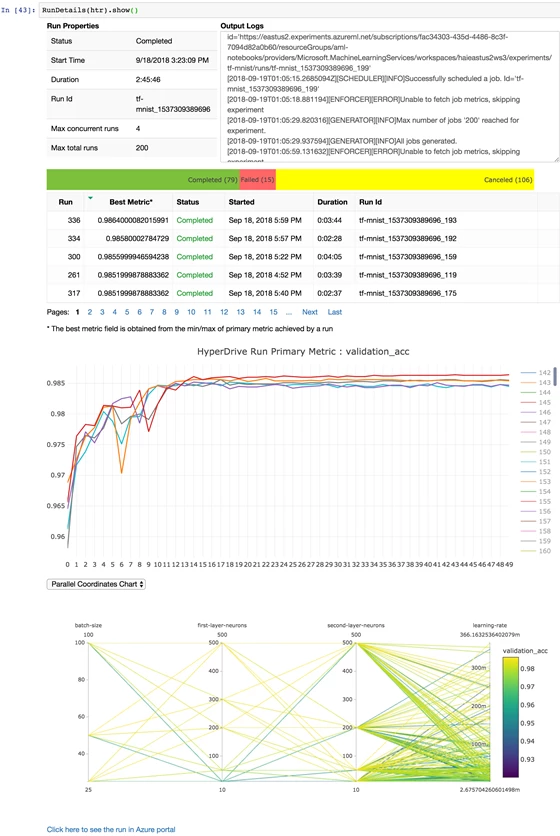
You may have noticed that nearly all the samples I am citing are in the form of Jupyter notebooks published in GitHub. Jupyter has become one of the most popular tools for data science due to its interactivity and self-documenting nature. To facilitate Juypter users interacting with experiment run history, we have created a run history widget to monitor any run object. Below is an example of a hyperparameter tuning run.

run history widget
To see the run history widget in action, follow this notebook.
Azure Notebooks
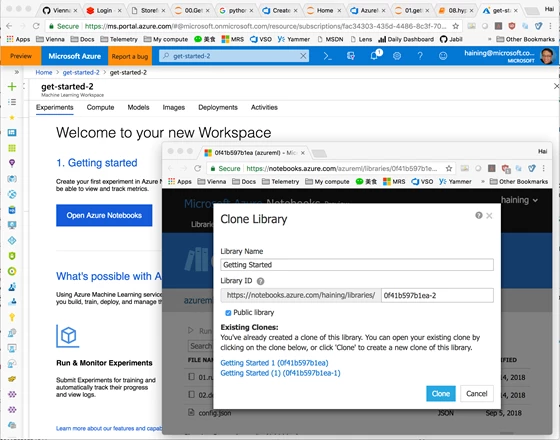
Azure Notebooks is a free service that can be used to develop and run code in a browser using Jupyter. We have preinstalled the SDK in the Python 3.6 kernel of the Azure Notebooks container, and made it very easy to clone all the sample notebooks into your own library. In addition, you can click on the Get Started in Azure Notebooks button from a workspace in Azure portal. The workspace configuration is automatically copied into your cloned library as well so you can access it from the SDK right away.

Integration with Azure Databricks
Azure Databricks is an Apache Spark–based analytics service to perform big data analytics. You can easily install the SDK in the Azure Databricks clusters and use it for logging training run metrics, as well as containerize Spark ML models and deploy them into ACI or AKS, just like any other models. To get started on Azure Databricks with Azure Machine Learning Python SDK, please review this notebook.
Visual Studio Code Tools for AI
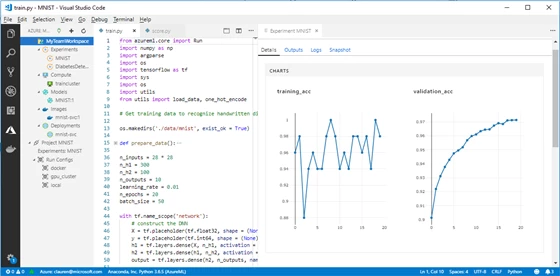
Visual Studio Code is a very popular code editing tool, and its Python extension is widely adopted among Python developers. Visual Studio Code Tool for AI seamlessly integrates with Azure Machine Learning for robust experimentation capabilities. With this extension, you can access all the cool features from experiment run submission to run tracking, from compute target provisioning to model management and deployment, all within a friendly user interface. Here is a screenshot of the Visual Studio Code Tool for AI extension in action.

Please download the Visual Studio Code Tool for AI extension and give it a try.
Get started, now!
This has been a very long post so thank you for your patience to read through it. However, I have barely scratched the surface of Azure Machine Learning service. There are so many other exciting features that I am not able to get to. You will have to explore them on your own:
- TensorBoard integration – Monitor your experiment runs in TensorBoard, even if you are not using TensorFlow!
- ONNX runtime support – Deploy models created in the open ONNX format.
- Model telemetry collection – Collect telemetry from live running models.
- Field programmable gated-array (FPGA) inferencing – Score or featurize image data using pre-trained deep neural networks with blazing fast speed and low cost.
- IoT deployment – Deploy model to IoT devices.
And many more to come. Please visit the Getting started guide to start the exciting journey with us!