엔터프라이즈 푸시 아키텍처 지침
오늘날 기업에서는 최종 사용자(외부)를 위해 또는 직원(내부)을 위해 모바일 애플리케이션을 만드는 일이 점점 많아지고 있습니다. 기업은 가동 중인 기존 백 엔드 시스템이 모바일 애플리케이션 아키텍처에 통합되어야 하는 메인프레임 또는 일부 LoB 애플리케이션이 되도록 합니다. 이 가이드에서는 일반적인 시나리오에 사용 가능한 솔루션을 권장하는 이 통합을 가장 잘 수행할 수 있는 방법에 대해 설명합니다.
백엔드 시스템에서 관심 이벤트가 발생하는 경우 해당 모바일 애플리케이션을 통해 사용자에게 푸시 알림을 보내기 위한 일반적인 요구 사항입니다. 예를 들어 iPhone에 해당 은행의 뱅킹 앱을 가지고 있는 은행 고객은 계정에서 일정 금액 이상이 인출되었을 때 알림을 받고 싶어 합니다. 또한 재무부서에서 일하며 Windows Phone에 예산 승인 앱을 가지고 있는 직원은 요청이 승인되었을 때 알림을 받고 싶어 하는 인트라넷 시나리오입니다.
은행 계좌 또는 승인 처리는 사용자에게 푸시를 초기화해야 하는 일부 백 엔드 시스템에서 수행될 수 있습니다. 이벤트가 알림을 트리거할 때 같은 종류의 논리를 모두 동일하게 빌드하여 푸시해야 하는 여러 백 엔드 시스템이 있을 수 있습니다. 여기에서는 여러 백 엔드 시스템을 단일 푸시 시스템에 함께 통합할 때의 복잡성을 설명합니다. 최종 사용자는 다양한 알림을 구독했을 수 있고 여기에는 여러 모바일 애플리케이션이 있을 수도 있습니다. 예를 들어 인트라넷 모바일 앱의 경우 특정 모바일 애플리케이션이 그러한 여러 백 엔드 시스템에서 알림을 받기를 원할 수 있습니다. 백 엔드 시스템은 푸시 의미론/기술을 모르거나 알고 있어야 합니다. 그래서 일반적인 솔루션은 전통적으로 모든 관심 이벤트의 백 엔드 시스템을 폴링한 구성 요소를 소개했으며 클라이언트에 푸시 메시지를 전송하는 역할을 담당합니다.
보다 나은 솔루션은 확장 가능한 솔루션을 만드는 동안 복잡성을 줄일 수 있는 Azure Service Bus - 항목/구독 모델을 사용하는 것입니다.
이는 일반 솔루션 아키텍처입니다(여러 모바일 앱으로 일반화되었지만 모바일 앱이 하나뿐일 경우 동일하게 적용할 수 있음).
아키텍처
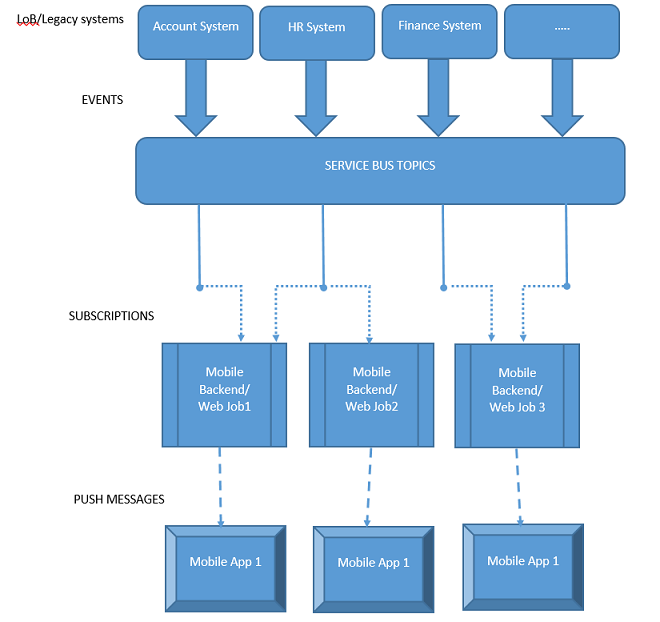
이 아키텍처 다이어그램의 핵심 부분은 항목/구독 프로그래밍 모델(자세한 내용은 Service Bus Pub/Sub 프로그래밍참조)을 제공하는 Azure Service Bus입니다. 이 경우에 받는 사람인 모바일 백 엔드(일반적으로 모바일 앱에 푸시를 시작하는 Azure 모바일 서비스)는 백 엔드 시스템에서 직접 메시지를 수신하지 않지만 대신 Azure Service Bus에서 제공하는 중간 추상화 계층을 가지고 있기 때문에 모바일 백 엔드가 하나 이상의 백 엔드 시스템에서 메시지를 받을 수 있습니다. 각각의 백 엔드 시스템(예: 계정, HR, 재정)에 대해 Service Bus 항목을 만들어야 하며 기본적으로 메시지를 푸시 알림으로 보내기 시작할 관심 "항목"입니다. 백 엔드 시스템은 이러한 항목에 메시지를 보냅니다. 모바일 백엔드는 Service Bus 구독을 만들어 이러한 항목을 하나 이상 구독할 수 있습니다. 이를 통해 모바일 백 엔드가 해당 백 엔드 시스템에서 알림을 받도록 할 수 있습니다. 모바일 백엔드는 계속 해당 구독에서 메시지를 수신하고 메시지가 도착하는 즉시 다시 해당 알림 허브에 알림을 보냅니다. 그런 다음 알림 허브는 마침내 메시지를 모바일 앱으로 전달합니다. 주요 구성 요소 목록은 다음과 같습니다.
- 백엔드 시스템(LoB/레거시 시스템)
- Service Bus 항목 만들기
- 메시지 보내기
- 모바일 백엔드
- 서비스 구독 만들기
- 메시지 받기(백엔드 시스템에서)
- 클라이언트에 알림 보내기(Azure 알림 허브를 통해)
- 모바일 애플리케이션
- 알림 수신 및 표시
이점
- 수신자(알림 허브를 통한 모바일 앱/서비스)와 발신자(백엔드 시스템) 사이를 분리하면 최소한의 변경 내용을 가진 추가 백엔드 시스템을 통합할 수 있습니다.
- 이렇게 하면 하나 이상의 백 엔드 시스템에서 이벤트를 받을 수 있는 여러 모바일 앱 시나리오를 만들 수도 있습니다.
예제
필수 조건
개념뿐만 아니라 일반적인 만들기 및 구성 단계에 익숙해지려면 다음 자습서를 완료합니다.
- Service Bus Pub/Sub 프로그래밍 - 이 자습서는 Service Bus 항목/구독으로 작업하는 세부 사항, 항목/구독을 포함하는 네임스페이스를 만드는 방법 및 메시지를 송신 및 수신하는 방법에 대해 설명합니다.
- Notification Hubs - Windows 범용 자습서 - 이 자습서는 Windows 스토어 앱을 설정하고 Notification Hubs를 사용하여 등록한 다음 알림을 수신하는 방법에 대해 설명합니다.
샘플 코드
전체 샘플 코드는 알림 허브 샘플에서 사용 가능합니다. 세 가지 구성 요소로 구성되어 있습니다.
EnterprisePushBackendSystem
a. 이 프로젝트는 Azure.Messaging.ServiceBus NuGet 패키지를 사용하며 Service Bus Pub/Sub 프로그래밍을 기반으로 합니다.
b. 이 애플리케이션은 모바일 앱으로 메시지를 전달하기 시작하는 LoB 시스템을 시뮬레이션하기 위한 간단한 C# 콘솔 앱입니다.
static async Task Main(string[] args)
{
    string connectionString =
        ConfigurationManager.AppSettings.Get("Azure.ServiceBus.ConnectionString");

    // Create the topic
    await CreateTopicAsync(connectionString);

    // Send message
    await SendMessageAsync(connectionString);
}
c.
CreateTopicAsync은 Service Bus 항목을 만드는 데 사용됩니다.public static async Task CreateTopicAsync(string connectionString) { // Create the topic if it does not exist already ServiceBusAdministrationClient client = new ServiceBusAdministrationClient(connectionString); if (!await client.TopicExistsAsync(topicName)) { await client.CreateTopicAsync(topicName); } }d.
SendMessageAsync는 이 Service Bus 항목으로 메시지를 보내는 데 사용됩니다. 이 코드는 단순히 샘플 목적으로 항목에 임의 메시지 집합을 정기적으로 보냅니다. 일반적으로 이벤트가 발생하면 메시지를 보내는 백 엔드 시스템이 됩니다.public static sync Task SendMessageAsync(string connectionString) { await using var client = new ServiceBusClient(connectionString); ServiceBusSender sender = client.CreateSender(topicName); // Sends random messages every 10 seconds to the topic string[] messages = { "Employee Id '{0}' has joined.", "Employee Id '{0}' has left.", "Employee Id '{0}' has switched to a different team." }; while (true) { Random rnd = new Random(); string employeeId = rnd.Next(10000, 99999).ToString(); string notification = String.Format(messages[rnd.Next(0,messages.Length)], employeeId); // Send Notification ServiceBusMessage message = new ServiceBusMessage(notification); await sender.SendMessageAsync(message); Console.WriteLine("{0} Message sent - '{1}'", DateTime.Now, notification); System.Threading.Thread.Sleep(new TimeSpan(0, 0, 10)); } }ReceiveAndSendNotification
a. 이 프로젝트는 Azure.Messaging.ServiceBus 및 Microsoft.Web.WebJobs.Publish NuGet 패키지를 사용하며 Service Bus Pub/Sub 프로그래밍을 기반으로 합니다.
b. LoB/백 엔드 시스템에서 메시지를 지속적으로 수신하려면 이를 실행해야 하므로 다음 콘솔 앱은 Azure WebJob으로 실행합니다. 이 애플리케이션은 모바일 백 엔드의 일부입니다.
static async Task Main(string[] args)
{
    string connectionString =
             ConfigurationManager.AppSettings.Get("Azure.ServiceBus.ConnectionString");

    // Create the subscription that receives messages
    await CreateSubscriptionAsync(connectionString);

    // Receive message
    await ReceiveMessageAndSendNotificationAsync(connectionString);
}
c.
CreateSubscriptionAsync은 백 엔드 시스템이 메시지를 보내는 항목에 대한 Service Bus 구독을 만드는 데 사용됩니다. 비즈니스 시나리오에 따라 이 구성 요소는 해당 항목에 대한 하나 이상의 구독을 만듭니다(예: 일부는 HR 시스템에서, 일부는 재무 시스템 등에서 메시지를 수신할 수 있음).static async Task CreateSubscriptionAsync(string connectionString) { // Create the subscription if it does not exist already ServiceBusAdministrationClient client = new ServiceBusAdministrationClient(connectionString); if (!await client.SubscriptionExistsAsync(topicName, subscriptionName)) { await client.CreateSubscriptionAsync(topicName, subscriptionName); } }d.
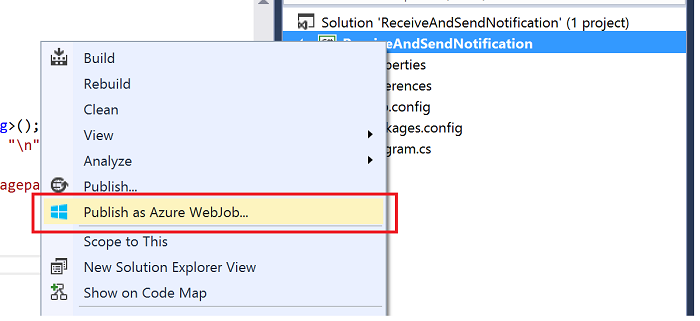
ReceiveMessageAndSendNotificationAsync은 해당 구독을 사용하여 항목에서 메시지를 보내는 데 사용되며 읽기에 성공한 경우 Azure Notification Hubs를 사용하여 모바일 애플리케이션으로 보낼 알림(샘플 시나리오의 경우 Windows 네이티브 토스트 알림)을 만듭니다.static async Task ReceiveMessageAndSendNotificationAsync(string connectionString) { // Initialize the Notification Hub string hubConnectionString = ConfigurationManager.AppSettings.Get ("Microsoft.NotificationHub.ConnectionString"); hub = NotificationHubClient.CreateClientFromConnectionString (hubConnectionString, "enterprisepushservicehub"); ServiceBusClient Client = new ServiceBusClient(connectionString); ServiceBusReceiver receiver = Client.CreateReceiver(topicName, subscriptionName); // Continuously process messages received from the subscription while (true) { ServiceBusReceivedMessage message = await receiver.ReceiveMessageAsync(); var toastMessage = @"<toast><visual><binding template=""ToastText01""><text id=""1"">{messagepayload}</text></binding></visual></toast>"; if (message != null) { try { Console.WriteLine(message.MessageId); Console.WriteLine(message.SequenceNumber); string messageBody = message.Body.ToString(); Console.WriteLine("Body: " + messageBody + "\n"); toastMessage = toastMessage.Replace("{messagepayload}", messageBody); SendNotificationAsync(toastMessage); // Remove message from subscription await receiver.CompleteMessageAsync(message); } catch (Exception) { // Indicate a problem, unlock message in subscription await receiver.AbandonMessageAsync(message); } } } } static async void SendNotificationAsync(string message) { await hub.SendWindowsNativeNotificationAsync(message); }e. 이 앱을 WebJob으로 게시하려면 Visual Studio에서 솔루션을 마우스 오른쪽 단추로 클릭하고 WebJob으로 게시를 선택합니다.
f. 게시 프로필을 선택한 후 Azure 웹 사이트가 없는 경우 이 WebJob을 호스트할 새 Azure 웹 사이트를 만들고, 웹 사이트가 있는 경우 게시합니다.
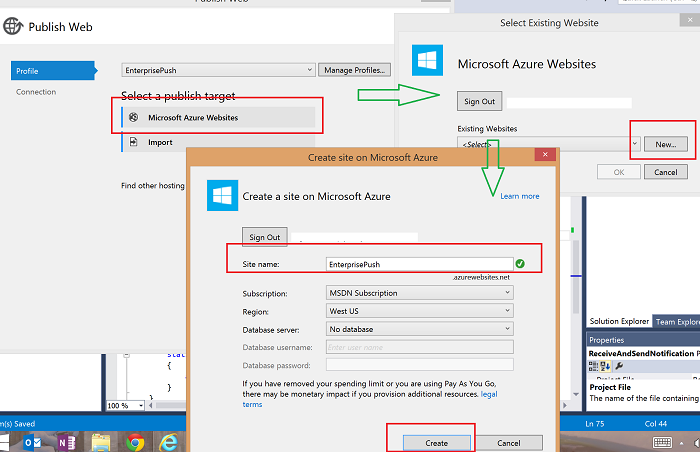
Microsoft Azure Website 옵션이 선택된 웹 게시 대화 상자의 스크린샷으로 빨간색으로 표시된 새 옵션과 기존 웹 사이트 선택 대화 상자를 가리키는 녹색 화살표 및 빨간색으로 표시된 만들기 옵션과 Microsoft Azure 사이트 만들기 대화 상자를 가리키는 녹색 화살표가 표시됩니다.
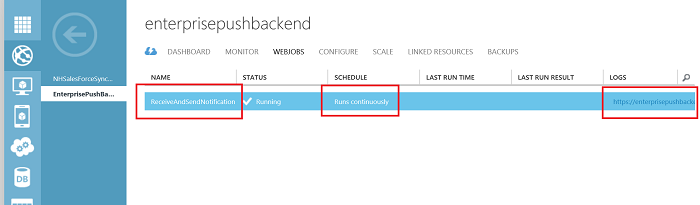
g. Azure Portal에 로그인할 때 다음과 같이 표시되어야 하므로 작업이 “계속 실행”되도록 구성합니다.
EnterprisePushMobileApp
a. 이 애플리케이션은 모바일 백 엔드의 일부로 실행 중인 WebJob에서 토스트 알림을 수신하여 이를 표시하는 Windows 스토어 애플리케이션입니다. 이 코드는 Notification Hubs - Windows 유니버설 자습서를 기반으로 합니다.
b. 애플리케이션이 토스트 알림을 받을 수 있는지 확인합니다.
c. 앱 시작 시 다음 Notification Hubs 등록 코드가 호출되었는지 확인합니다(
HubName및DefaultListenSharedAccessSignature값 교체 후).private async void InitNotificationsAsync() { var channel = await PushNotificationChannelManager.CreatePushNotificationChannelForApplicationAsync(); var hub = new NotificationHub("[HubName]", "[DefaultListenSharedAccessSignature]"); var result = await hub.RegisterNativeAsync(channel.Uri); // Displays the registration ID so you know it was successful if (result.RegistrationId != null) { var dialog = new MessageDialog("Registration successful: " + result.RegistrationId); dialog.Commands.Add(new UICommand("OK")); await dialog.ShowAsync(); } }
샘플 실행
WebJob이 성공적으로 실행 중이고 계속 실행되도록 예약되었는지 확인합니다.
EnterprisePushMobileApp을 실행하면 Windows 스토어 앱을 시작합니다.
EnterprisePushBackendSystem 콘솔 애플리케이션을 실행하면 LoB 백 엔드를 시뮬레이션 하고 메시지를 보내기 시작하기 때문에 다음 이미지와 같이 나타나는 토스트 알림이 보여야 합니다.
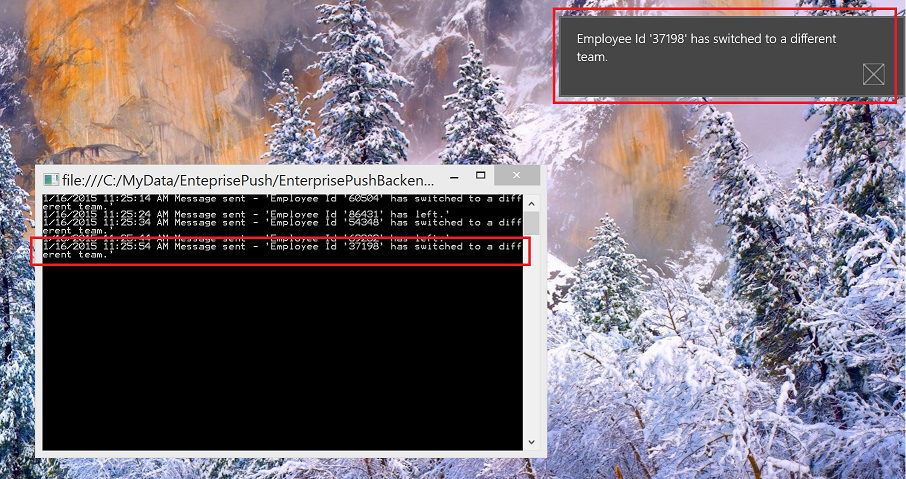
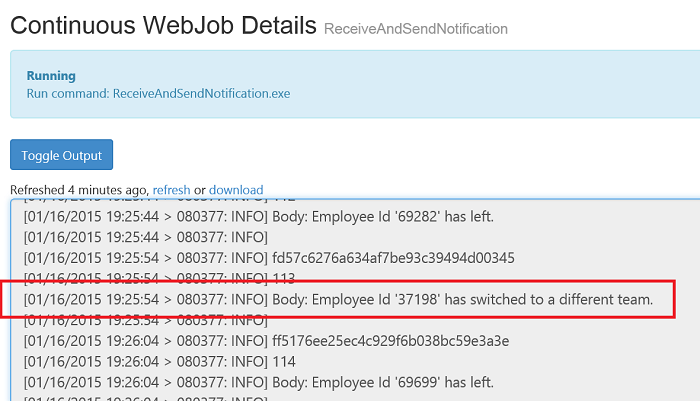
원래 메시지는 웹 작업의 Service Bus 구독에서 모니터링하는 Service Bus 항목으로 전송되었습니다. 메시지가 수신되면 알림이 생성되어 모바일 앱으로 전송됩니다. 사용자의 웹 작업에 대한 Azure Portal의 로그 링크로 이동하면 WebJob 로그를 통해 처리 상태를 확인할 수 있습니다.