자습서: Azure Notification Hubs에서 푸시 알림을 수신하기 위한 초기 구성
이 자습서에서는 Apple용 Azure Notification Hubs SDK를 사용하여 Azure Notification Hubs를 통해 iOS 애플리케이션에 푸시 알림을 보내는 방법을 보여줍니다.
이 자습서에서 다루는 단계는 다음과 같습니다.
- iOS 앱 샘플을 만듭니다.
- iOS 앱을 Azure Notification Hubs에 연결합니다.
- 테스트 푸시 알림을 보냅니다.
- 앱이 알림을 수신하는지 확인합니다.
GitHub에서 이 자습서의 전체 코드를 다운로드할 수 있습니다.
필수 조건
이 자습서를 완료하려면 다음 필수 구성 요소가 필요합니다.
- 키 집합에 설치된 유효한 개발자 인증서와 함께 Xcode를 실행하는 Mac
- iOS 버전 10 이상을 실행하는 iPhone 또는 iPad
- Apple Portal에 등록되고 인증서와 연결된 물리적 디바이스입니다.
계속 진행하기 전에 알림 허브에서 푸시 자격 증명을 설정 및 구성하기 위한 iOS 앱용 Azure Notification Hubs 시작에 대한 이전 자습서를 참조하세요. iOS 개발에 대한 사전 경험이 없더라도 이러한 단계를 수행할 수 있습니다.
참고 항목
푸시 알림에 대한 구성 요구 사항으로 인해 iOS 시뮬레이터 대신 실제 iOS 디바이스(iPhone 또는 iPad)에서 푸시 알림을 배포하고 테스트해야 합니다.
Notification Hubs에 iOS 앱 연결
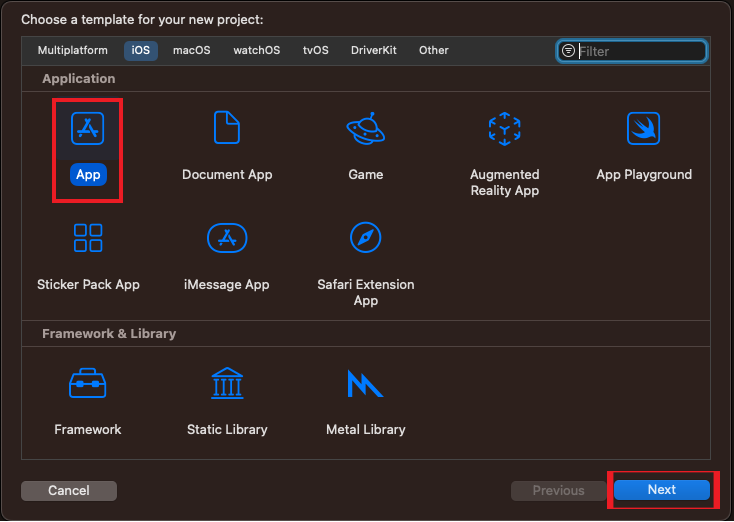
Xcode에서 새 Xcode 프로젝트를 만들고 iOS 탭 및 앱 템플릿을 선택합니다.
새 프로젝트에 대한 옵션을 설정하는 경우 Apple Developer 포털에서 번들 식별자를 설정할 때 사용한 것과 동일한 제품 이름 및 조직 식별자를 사용해야 합니다. 새 프로젝트 창에서 식별된 번들은 Apple 개발자 포털에서 확인된 번들에 맞게 채워집니다. 대/소문자가 구분됩니다.
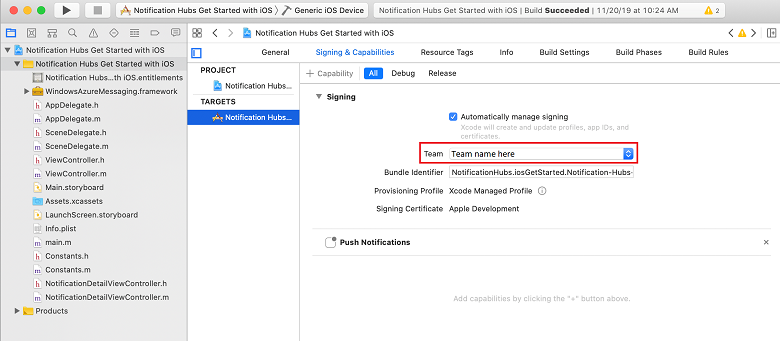
프로젝트 탐색기의 대상에서 프로젝트 이름을 선택한 다음, 서명 및 기능 탭을 선택합니다. Apple Developer 계정에 적합한 팀을 선택합니다. XCode는 번들 식별자에 따라 이전에 만든 프로비전 프로필을 자동으로 끌어옵니다.
Xcode에서 만든 새 프로비전 프로필이 보이지 않으면 서명 ID에 대한 프로필을 새로 고칩니다. 메뉴 모음에서 Xcode, 기본 설정, 계정 탭, 세부 정보 보기 단추, 서명 ID를 차례로 클릭한 다음 오른쪽 아래 모서리에 있는 새로 고침 단추를 클릭합니다.
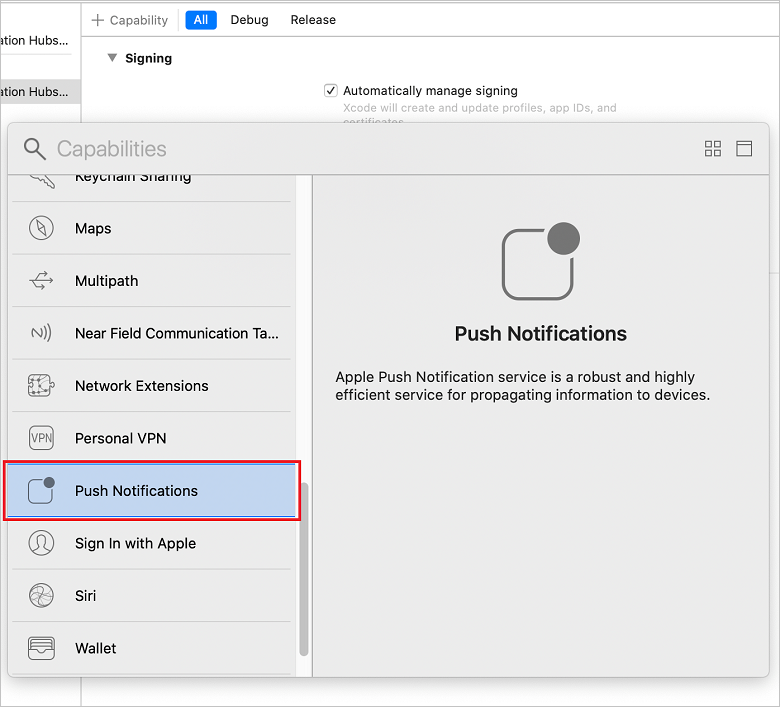
서명 및 기능 탭에서 + 기능을 선택합니다. 푸시 알림을 두 번 클릭하여 사용하도록 설정합니다.
Azure Notification Hubs SDK 모듈을 추가합니다.
Cocoapods를 사용하거나 프로젝트에 이진 파일을 수동으로 추가하여 앱에 Azure Notification Hubs SDK를 통합할 수 있습니다.
Cocoapods를 통한 통합: podfile에 다음 종속성을 추가하여 Azure Notification Hubs SDK를 앱에 포함합니다.
pod 'AzureNotificationHubs-iOS'pod install을 실행하여 새로 정의된 Pod를 설치하고 .xcworkspace를 엽니다.
pod 설치를 실행하는 동안 AzureNotificationHubs-iOS에 대한 사양을 찾을 수 없음과 같은 오류가 표시되면
pod repo update를 실행하여 Cocoapods 리포지토리에서 최신 pod를 가져온 다음, pod 설치를 실행하세요.
Carthage를 통한 통합: Cartfile에 다음 종속성을 추가하여 Azure Notification Hubs SDK를 앱에 포함합니다.
github "Azure/azure-notificationhubs-ios"- 다음으로, 빌드 종속성을 업데이트합니다.
$ carthage updateCarthage를 사용하는 방법에 대한 자세한 내용은 Carthage GitHub 리포지토리를 참조하세요.
프로젝트에 이진 파일을 복사하여 통합:
다음과 같이 프로젝트에 이진 파일을 복사하여 통합할 수 있습니다.
zip 파일로 제공된 Azure Notification Hubs SDK 프레임워크를 다운로드하고 압축을 풉니다.
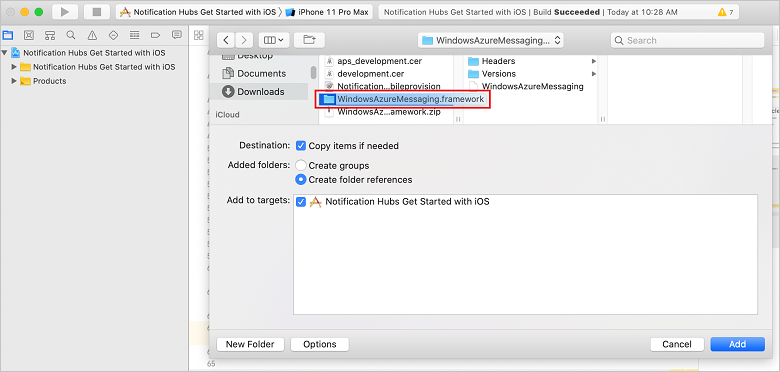
Xcode에서 프로젝트를 마우스 오른쪽 단추로 클릭하고 파일 추가 옵션을 클릭하여 WindowsAzureMessaging.framework 폴더를 Xcode 프로젝트에 추가합니다. 옵션을 선택하고, 필요한 경우 항목 복사가 선택되었는지 확인한 다음, 추가를 클릭합니다.
Azure Notification Hub에 대한 연결 문자열
CONNECTION_STRING과 Azure Notification Hub 이름HUB_NAME의 두 가지 속성이 포함된 DevSettings.plist라는 파일을 추가하거나 편집합니다.해당
<string></string>섹션에서 Azure Notification Hubs에 연결하기 위한 정보를 추가합니다. 문자열 리터럴 자리 표시자--HUB-NAME--및--CONNECTION-STRING--을 각각 이전에 포털에서 가져온 허브 이름과 DefaultListenSharedAccessSignature로 바꿉니다.<?xml version="1.0" encoding="UTF-8"?> <!DOCTYPE plist PUBLIC "-//Apple//DTD PLIST 1.0//EN" "http://www.apple.com/DTDs/PropertyList-1.0.dtd"> <plist version="1.0"> <dict> <key>HUB_NAME</key> <string>--HUB-NAME--</string> <key>CONNECTION_STRING</key> <string>--CONNECTION-STRING--</string> </dict> </plist>동일한 AppDelegate.m 파일에서
didFinishLaunchingWithOptions뒤의 모든 코드를 다음 코드로 바꿉니다.#import <WindowsAzureMessaging/WindowsAzureMessaging.h> #import <UserNotifications/UserNotifications.h> // Extend the AppDelegate to listen for messages using MSNotificationHubDelegate and User Notification Center @interface AppDelegate () <MSNotificationHubDelegate> @end @implementation AppDelegate @synthesize notificationPresentationCompletionHandler; @synthesize notificationResponseCompletionHandler; - (BOOL)application:(UIApplication *)application didFinishLaunchingWithOptions:(NSDictionary *)launchOptions { NSString *path = [[NSBundle mainBundle] pathForResource:@"DevSettings" ofType:@"plist"]; NSDictionary *configValues = [NSDictionary dictionaryWithContentsOfFile:path]; NSString *connectionString = [configValues objectForKey:@"CONNECTION_STRING"]; NSString *hubName = [configValues objectForKey:@"HUB_NAME"]; if([connectionString length] != 0 && [hubName length] != 0) { [[UNUserNotificationCenter currentNotificationCenter] setDelegate:self]; [MSNotificationHub setDelegate:self]; [MSNotificationHub initWithConnectionString:connectionString withHubName:hubName]; return YES; } NSLog(@"Please setup CONNECTION_STRING and HUB_NAME in DevSettings.plist and restart application"); exit(-1); } - (void)notificationHub:(MSNotificationHub *)notificationHub didReceivePushNotification:(MSNotificationHubMessage *)message { // Send message using NSNotificationCenter with the message NSDictionary *userInfo = [NSDictionary dictionaryWithObject:message forKey:@"message"]; [[NSNotificationCenter defaultCenter] postNotificationName:@"MessageReceived" object:nil userInfo:userInfo]; } @end이 코드는 DevSettings.plist에서 지정한 연결 정보를 사용하여 알림 허브에 연결합니다. 그런 다음, 허브에서 알림을 보낼 수 있도록 해당 알림 허브에 디바이스 토큰을 제공합니다.
NotificationDetailViewController 헤더 파일 만들기
이전 지침과 마찬가지로, SetupViewController.h라는 또 다른 헤더 파일을 추가합니다. 새 헤더 파일의 콘텐츠를 다음 코드로 바꿉니다.
#import <UIKit/UIKit.h>

NS_ASSUME_NONNULL_BEGIN

@interface SetupViewController : UIViewController

@end

NS_ASSUME_NONNULL_END
SetupViewController.m 구현 파일을 추가합니다. 파일의 콘텐츠를 UIViewController 메서드를 구현하는 다음 코드로 바꿉니다.
#import "SetupViewController.h"

 static NSString *const kNHMessageReceived = @"MessageReceived";

 @interface SetupViewController ()

 @end

 @implementation SetupViewController

 - (void)viewDidLoad {
     [super viewDidLoad];

     // Listen for messages using NSNotificationCenter
     [[NSNotificationCenter defaultCenter] addObserver:self selector:@selector(didReceivePushNotification:) name:kNHMessageReceived object:nil];
 }

 - (void)dealloc {
     // Clean up subscription to NSNotificationCenter
     [[NSNotificationCenter defaultCenter] removeObserver:self name:kNHMessageReceived object:nil];
 }

 - (void)didReceivePushNotification:(NSNotification *)notification {
     MSNotificationHubMessage *message = [notification.userInfo objectForKey:@"message"];

     // Create UI Alert controller with message title and body
     UIAlertController *alertController = [UIAlertController alertControllerWithTitle:message.title
                          message:message.body
                   preferredStyle:UIAlertControllerStyleAlert];
     [alertController addAction:[UIAlertAction actionWithTitle:@"OK" style:UIAlertActionStyleCancel handler:nil]];
     [self presentViewController:alertController animated:YES completion:nil];

     // Dismiss after 2 seconds
     dispatch_after(dispatch_time(DISPATCH_TIME_NOW, (int64_t)(2.0 * NSEC_PER_SEC)), dispatch_get_main_queue(), ^{
         [alertController dismissViewControllerAnimated:YES completion: nil];
     });

 }

 @end
오류가 없는지 확인하려면 디바이스에서 앱을 빌드하고 실행합니다.
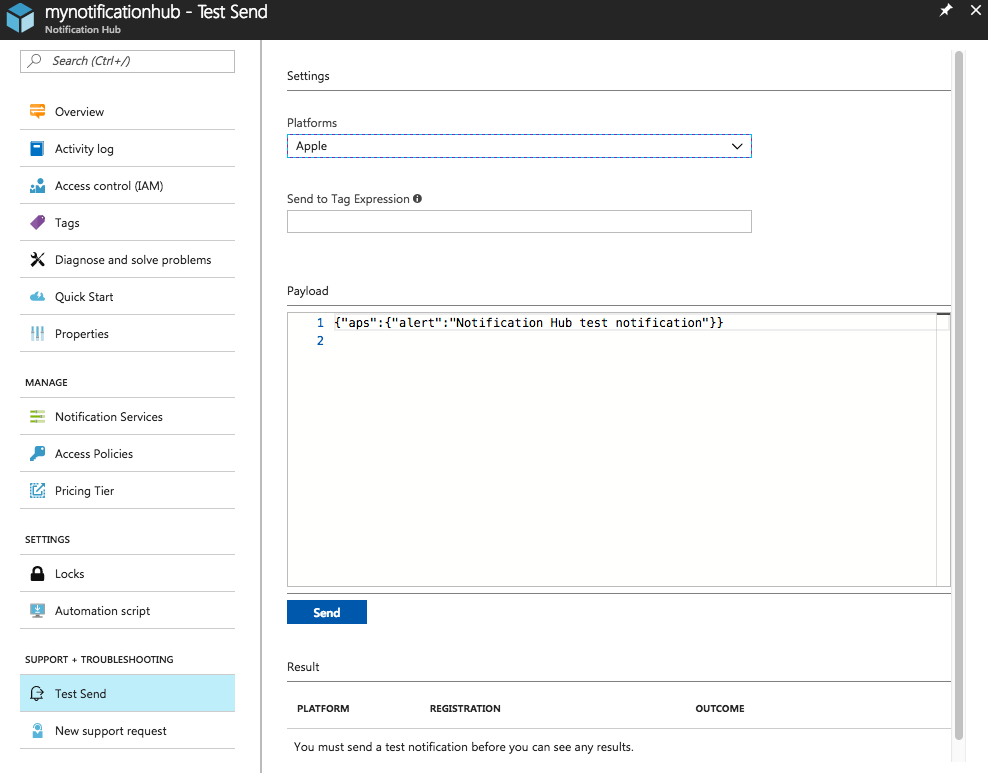
테스트 푸시 알림 보내기
Azure Portal에서 테스트 보내기 옵션을 사용하여 앱에서 알림 수신을 테스트할 수 있습니다. 이렇게 하면 테스트 푸시 알림이 디바이스로 전송됩니다.
푸시 알림은 일반적으로 호환 라이브러리를 사용하는 Mobile Apps 또는 ASP.NET과 같은 백 엔드 서비스에서 전송됩니다. 백 엔드에서 라이브러리를 사용할 수 없는 경우 REST API를 직접 사용하여 알림 메시지를 보낼 수도 있습니다.
알림을 보내기 위해 검토할 수 있는 다른 자습서 목록은 다음과 같습니다.
- Azure Mobile Apps: Notification Hubs와 통합된 Mobile Apps 백 엔드에서 알림을 보내는 방법에 대한 예제는 iOS 앱에 푸시 알림 추가를 참조하세요.
- ASP.NET: Notification Hubs를 사용하여 사용자에게 푸시 알림을 보냅니다.
- Azure Notification Hubs Java SDK: Java에서 알림을 보내는 방법은 Java에서 Notification Hubs를 사용하는 방법 을 참조하세요. 이는 Eclipse for Android Development에서 테스트되었습니다.
- PHP: PHP에서 Notification Hubs를 사용하는 방법을 참조하세요.
앱에 푸시 알림이 수신되는지 확인
iOS에서 푸시 알림을 테스트하려면 실제 iOS 디바이스에 앱을 배포해야 합니다. iOS 시뮬레이터를 사용하여 Apple 푸시 알림을 보낼 수 없습니다.
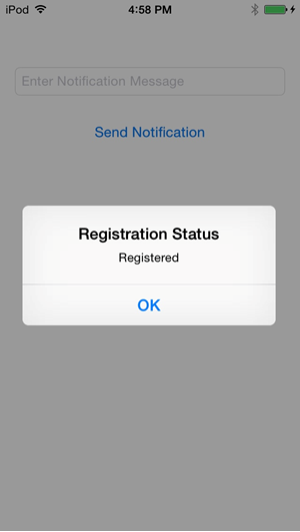
앱을 실행하고 등록이 성공했는지 확인한 다음 확인을 누릅니다.
다음으로, 이전 섹션에 설명한 대로 Azure Portal에서 테스트 푸시 알림을 보냅니다.
지정된 알림 허브에서 보내는 알림을 수신하도록 등록된 모든 디바이스에 푸시 알림이 전송됩니다.

다음 단계
이 간단한 예제에서는 등록된 모든 iOS 디바이스에 푸시 알림을 브로드캐스트합니다. 특정 iOS 디바이스로 푸시 알림을 보내는 방법을 알아보려면 다음 자습서를 계속 진행합니다.
자세한 내용은 다음 문서를 참조하세요.