Previously known as Azure Resource Manager Tooling Preview
The Azure Resource Manager Tools in Azure SDK 2.7 for .NET enables you to:
- Create an application using the Azure Gallery templates.
- Create and edit Azure Resource Manager deployment templates to provision resource including websites, database, virtual machines and more using the JSON Outline and Editor.
- Create and edit Azure Resource Manager deployment templates and parameter files to customize deployments for different environments, such as development, staging and production.
- Create resource groups and deploy templates into these to simplify the creation of resources.
The Azure Resource Manager enables you to create reusable deployment templates that declaratively describe the resources that make up your application such as an Azure Website and a SQL Azure database. This simplifies the process of creating complex environments for development, testing and production in a repeatable manner. It also provides a unified way to manage and monitor the resources that make up an application from the Azure Preview Portal.
You are able to create an application using the Azure Gallery Templates and define and manage your Azure resources using JSON templates. This makes it easier for you to quickly setup the environment you need to Dev/Test your application in Azure. The two key features are the Visual Studio integration with the Azure Gallery and the ability to create and edit Azure Resource Manager deployment templates.
We will get started using this tooling by walking through a scenario. First, we will create a web site based on a Cloud Deployment project and we will look at what artifacts are added to your solution when you create your project. Then we are going to create and deploy the Azure resource group and resources we need for our application, which will include publishing of our application.
This tooling is available in the Azure SDK 2.7 for .NET [download for VS 2015 | VS 2013
Create an Azure Resource Group project
This walkthrough will cover how to deploy a website to a resource group. If you don’t have an ASP.NET 4.5.2 website already, create one now, by choose File -> Project and selecting Visual C#/Visual Basic -> Cloud -> ASP.NET Web Application.
With the Azure Resource Manager Tooling, we have made it possible to create Visual Studio applications using the Azure Gallery templates. As mentioned previously, the Azure SDK 2.7 must be installed to see the cloud deployment project templates. You can find these templates by selecting File->New Project. Select Templates -> Visual C#/Visual Basic -> Cloud-> “Azure Resource Group”.

Once you create a Cloud Deployment Project, you will find a list of the available templates. We’ve made a couple of the more popular Azure Gallery templates available.

Templates include ability to create web apps, SQL databases and virtual machines (both Windows and Linux). A blank template is available for developers that want to build their template from the ground up using either the JSON Outline and editor or their own custom editor.
For this walkthrough, we will select the Web app + SQL template. The template will create the Azure Resource Group project to create a sql server, create a website, but not deploy the website package. In earlier versions (Cloud Deployment project) the web site project was included with the deployment project. This was removed to more easily allow the deployment project to be added to an existing web project. So let’s add the standard ASP .NET web application project to the solution, you do not need to check the “Host in the cloud” option as the deployment project will handle this.
Once you have added the web application project to the solution, add the web application project reference to the deployment project references.

Adding the reference does a couple of things in the background, it lets the deployment project know the web project that is linked to it and enables the web project to build a web deployment package (package.zip). The location of this package is needed later for the deployment parameters.
Let’s add the JSON necessary to deploy the website itself. Open the WebSiteSQLDatabase.json file to add a WebDeploy resource. The easiest way to do that is right click the Website resource in the JSON Outline tool window and choose Add New Resource. Notice when you select the Website resource the appropriate JSON has been highlighted.
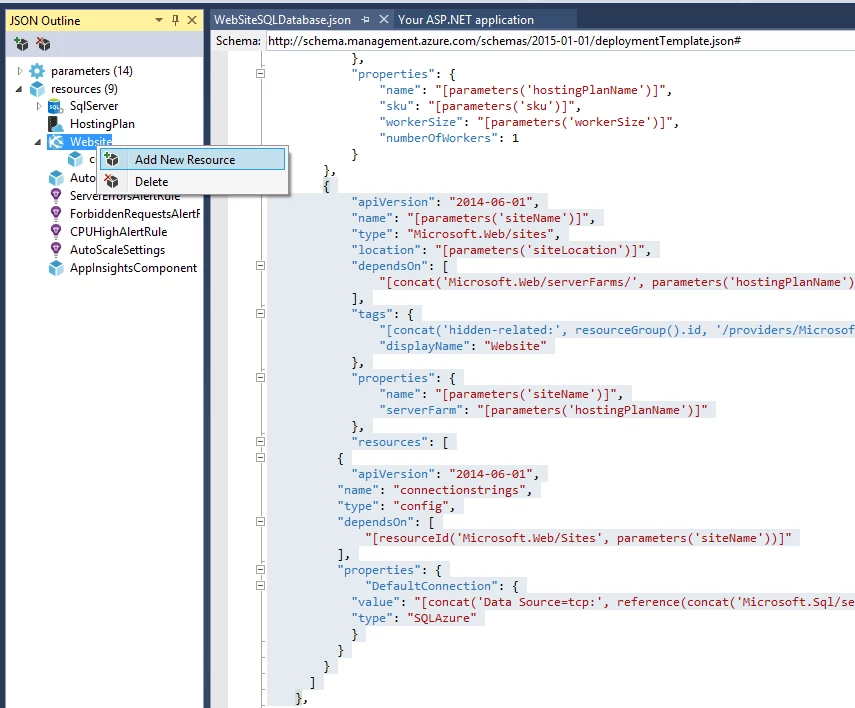
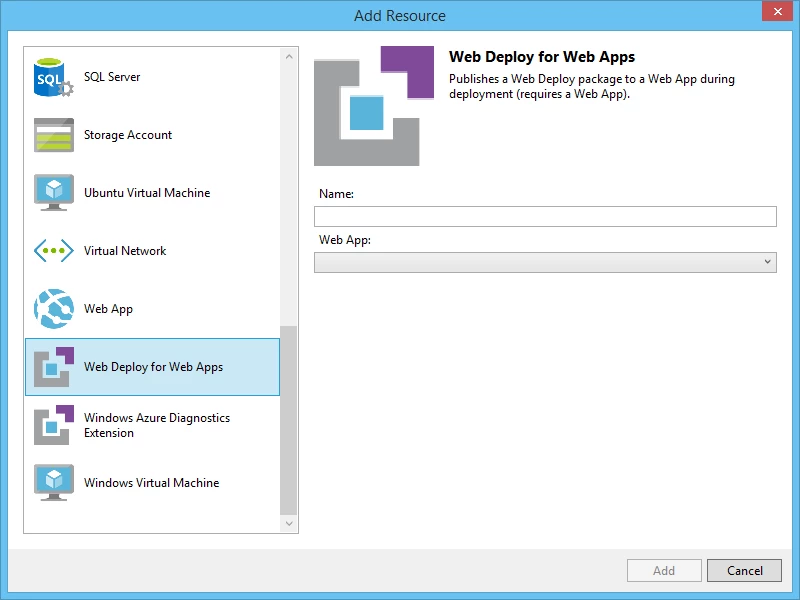
Choosing Add New Resource will bring up the Add Resource dialog which will show not only some of the same resource templates as shown earlier in this article but also other resource snippets to allow customizations. This time choose Web Deploy for Web Apps. Notice that you must choose web app that is being deployed. This is the website being created by the Azure Resource Group project, which in this case is Website.
Your Cloud App Solution
The Deployment project includes a deployment template file (WebSite.json), a template parameter definition (WebSite.param.dev.json), and a PowerShell script (Publish-AzureResourceGroup.ps1) that can be used to deploy your resources to Azure..

Let’s take a look at each of these artifacts in your solution: In the Reference section, we have a reference to the MyWebsite project which we added to the Resource Group project. This is required to more easily use the MSDeploy extension.
The Deploy-AzureResourceGroup.ps1 is the main script used for the deployment. It handles uploading deployment artifacts and calling New-AzureResourceGroup to provision the resources in Azure. The “New Deployment” menu in the Visual Studio IDE uses this script for deployment, allowing the user to customize the deployment.
The WebSiteSQLDatabase.json file is the deployment template file where your resources are defined. This file contains all the resources that we are going to provision later. As you might imagine, since we selected the Website + SQL template, this file contains the definitions needed to create a website and a SQL Azure database as well as deploy the website package. We’ll take a closer look at this later.
The WebSiteSQLDatabase.param.dev.json contains the values for the non-default parameters needed by the deployment template file. For example, the name of the website is a parameter and that value would go in this file.
Create My Azure Resources – Using the Dialog
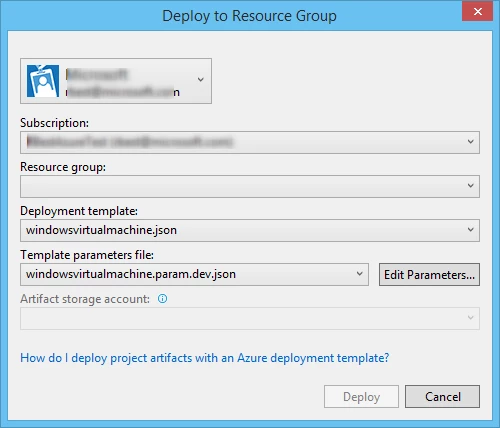
There are a couple of ways to deploy your resources and resource group to Azure. The simplest method is to right click on the Deployment Project and select Deploy / New Deployment…

Choose the account to use as well as the subscription.
We need to create an Azure Resource Group which will contain the logical grouping of all of the resources we need for our web application. To do that click on the Resource group combo box and select “Create New”.

Name your Azure Resource Group whatever you want (I’ve used the default which is based on the solution name “MyAzureCloudApp”) and give it a location. Click the Create button when you are ready and your Azure Resource Group will automatically be provisioned for you (but with no resources yet).
Make sure you’ve selected a Deployment template (WebSiteDeploySQL.json), Template Parameter file (WebSiteDeploySQL.param.dev.json), and a storage account as I’ve done above. If you don’t already have a storage account, you will need to create a storage account before continuing.
Next click the “Edit Parameters” button. We are going to define our website name, web hosting plan name and website location so that it looks something like I’ve done here:

The red exclamation marks are required parameters that we’ll have to add. Below is a table with information on each parameter.
| siteName | This parameter is the name of your website. |
| hostingPlanName | This is the Web Hosting Plan name. A hosting plan represents features and capacity settings that you can share out across more than one website. |
| siteLocation | The region where our website will reside, and will be something like “West US” or “Central US” or any of the valid website regions. |
| sku | Default to “Free”, and this is the website’s pricing tier (other options are Shared, Basic, and Standard). |
| workerSize | Default to zero. This setting is used to describe the size of the virtual machine that runs your website (0=small, 1= medium, and 2=large). In this example, workerSize has no effect, since we choose a sku size of “Free”. For it to be applicable we would have to pick the sku size to be Basic or Standard and then you would need to select the appropriate workerSize. |
| serverName | The name of the Azure SQL Server. |
| serverLocation | The location of the Azure SQL Server. |
| administratorLogin | The administrator name for the SQL server. |
| administratorLoginPassword | The password for the administrator. |
| databaseName | The name of the database created in the server. |
| collation | SQL Server Collation Support |
| edition | Azure SQL Database Service Tiers |
| maxSizeBytes | Database Size Limits |
| requestedServiceObjectiveId | Edition Performance Levels |
| webSitePackage | Name and parent folder of deployment package |
| _artifactsLocation | An auto-generated location for the web deployment package. The _artifactsLocation is a folder in the Azure storage that was entered in the “Deploy to Resource Group” dialog where the webSitePackage will be copied to. |
| _artifactsLocationSASToken | An auto-generated security key. |
The “Save Passwords” check box will store the password into the JSON file, but it will be stored as plain text so you need to be extra diligent with this option.
After you fill out these parameters click the “Deploy” button or if you have edited the parameters, as in this example, the “Save” and then “Deploy” and you’ll have your resource group and resources deployed to Azure! In this case we have deployed a website with your custom web application inside of an Azure resource group (check it out on the new and enhanced Azure Portal):

After you have deployed your resources, you’ll see that it has written the parameter values back to the WebSiteDeploySQL.param.dev.json file like so:

Save the JSON file so that the changes are persisted. The WebSiteDeploySQL.param.dev.json will have “null” for the parameter values if you haven’t deployed the resource group or edited the parameters.

The deployment output is sent to the Azure Provisioning windows.

So now that we’ve published, let’s take a look at another way that you can create an Azure Resource Group and deploy Azure resources.
Deploy My Azure Resources – Using PowerShell
The second way to create a resource group in Azure is to run the PowerShell script provided as part of the Deployment project (Publish-AzureResourceGroup.ps1). The script leverages the latest Azure PowerShell (at least version 0.8.3 or later).
The script we give you uses the Azure PowerShell cmdlets to create an Azure Resource Group if one does not exist (which is specified by the –Name parameter in the script). The script passes along the WebSiteDeploySQL.json and WebSiteDeploySQL.param.dev.json files to the Azure Resource Manager service which figures out exactly what Azure resources need to be deployed.
Before running, you’ll need to ensure that the WebsiteDeploySQL.param.dev.json file contains the correct name of your website, hosting plan, web site location, and SQL parameters. Make sure you save your changes.
Notice below I’ve changed the website name to “mattsAwesomeSite”. You’ll want to change your website name as well. I did this so to make sure that it creates a new website for me.
Just to show something off here, go ahead and double click on the Publish-AzureResourceGroup.ps1 file to bring it up in the document window in Visual Studio (in case you haven’t seen yet, we’ve added coloring for PowerShell scripts). After that, you can right click on the Publish-AzureResourceGroup.ps1 file, select “Open with PowerShell ISE”.

This will launch the PowerShell ISE. You can run the PowerShell script at this point. But just to make sure you have an error free experience, double check a few things:
- Have you installed Azure PowerShell yet (at least version 0.8.3)?
- You can install using Web Platform Installer. Just select “Microsoft Azure PowerShell”.
![]()
- If you haven’t done much with PowerShell before, then you probably need to set the execution policy to allow PowerShell scripts to run. To do this you need to run “Set-ExecutionPolicy RemoteSigned” from the PowerShell ISE to allow remote signed scripts like ours to execute (note: you must run this command as an administrator). You’ll be prompted with a dialog to confirm that you want to change your policy settings.
- Make sure you’ve run the Azure PowerShell command “Add-AzureAccount” to login your Azure account to the current PowerShell session. A dialog will display and you’ll be prompted to enter in your Azure credentials.
Go ahead and run the PowerShell Script now: “> .Deploy-AzureResourceGroup.ps1 -ResourceGroupLocation ‘West US’ -TemplateFile ..TemplatesWebSiteSQLDatabase.json -TemplateParametersFile ..TemplatesWebSiteSQLDatabase.param.dev.json -StorageAccountName myStorageAccount -UploadArtifacts true”
You will be prompted for the storage location and the location of the resource group, which is any valid region (I’ve picked “West US”).
After a few seconds, the PowerShell script should complete. The script also provides some great verbose output, so you can clearly see what resources were made, and what errors (if any) were encountered:
When the script is complete, you’ll find that your Azure resource group and the Azure resources you specified have been created for you (just as we did in the previous example) and you can view these in the Azure Portal.
Wrapping it up
After all this we’ve now introduced you to the Azure Resource Group Project. We’ve shown you how you can create projects in Visual Studio based off of the Azure Gallery Templates. How you can define and deploy your Azure resource groups and resources using our tooling. Azure Resource Groups really are a great way to setup the environment you need to host your application.