If you’re working on an LAMP or WAMP application and want to host it on Azure , Azure websites is the fastest and most reliable way to host your application on Azure. Azure Websites support PHP stacks and provides you with two great options for MySQL server :
- Use ClearDB MySQL Service from Azure Store
- Use Azure Virtual Machine to set up your own MySQL Server
There are a couple of scenarios when you would want to use MySQL server Virtual machine running on Azure :
- You have special requirements for MySQL configuration and ClearDB service plans from the Store does not meet your needs
- You want a MySQL server for development/test purposes and reuse for multiple development/staging sites
The easiest way to spin up a MySQL server is by using Azure virtual machines. This will give you the flexibility to create your own scalable compute infrastructure when you need flexible resources. Azure management portal makes it easy to create a new Azure Virtual machine for both Windows and Linux distributions in just a few minutes. In this article I will show you how to perform the following:
- Create a MySQL server on a Windows Azure VM
- Create a MySQL server on Linux Azure VM
- Create an Azure Website that can connect to your MySQL server
Create a MySQL server on Windows Azure VM
- Login to the Azure Management Portal using your Azure account.
- In the Management Portal, at the bottom left of the web page, click +New, click Virtual Machine, and then click Quick Create.
- On the Virtual machine configuration page, provide the following information:
- Provide a Virtual Machine Name, such as windowsmyslsrv
- Specify a New User Name, such as azureuser
- In the New Password box, type a strong password.
- In the Confirm Password box, retype the password.
- Select the appropriate Size from the drop down list.
- In the Region/Affinity Group/Virtual Network box, select a region where this virtual image will be hosted.
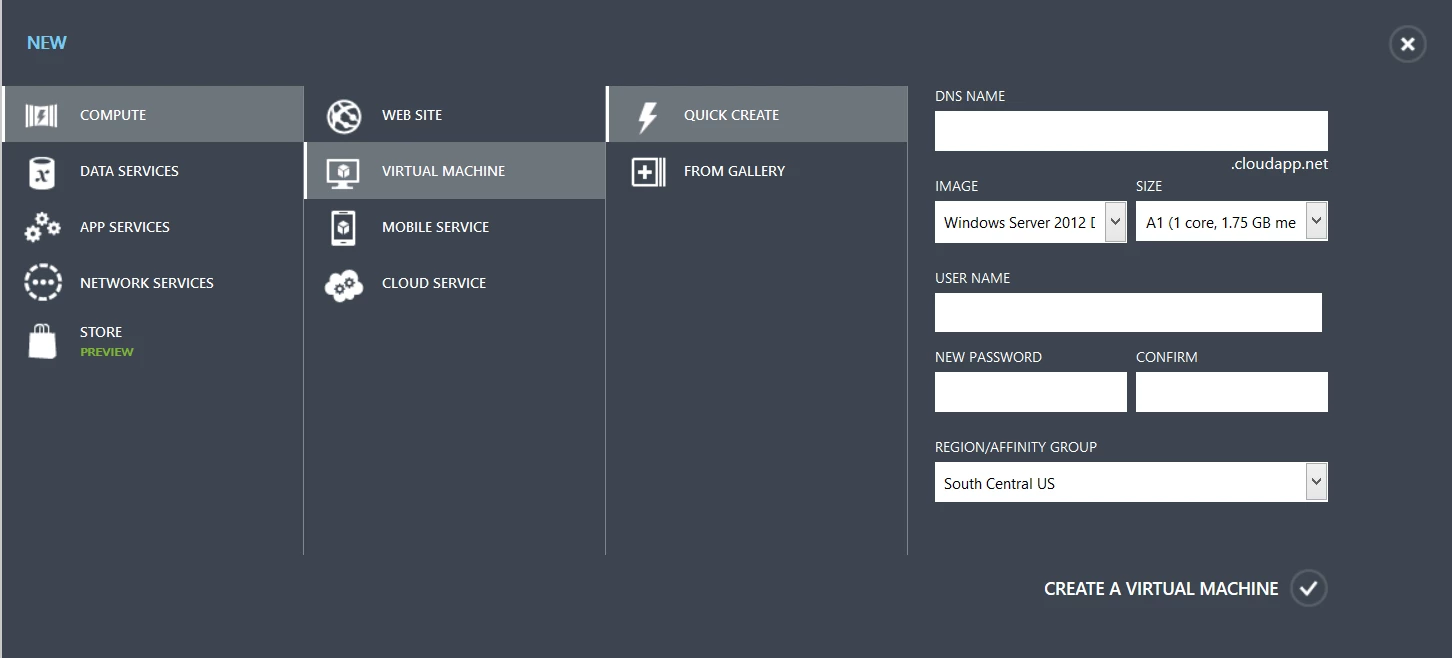
Now a Windows Server 2012 VM is created . To Install MySQL on your Windows VM, check out this article How to install MySQL on Windows Azure VM. The article focuses on Windows Server 2008 R2 however, the same process is applicable for any Windows Server VM from Azure Virtual machines.
Enable remote access
The MySQL server does not allow remote access by default to the “root” user. To enable this you need to create a new HOST for root and allow root to login from anywhere.
mysql> GRANT ALL PRIVILEGES ON *.* TO 'root'@'%'
> IDENTIFIED BY 'password' WITH GRANT OPTION;
mysql> FLUSH PRIVILEGES;
mysql> exit
Now that your MySQL server is configured, your Database host name for your Windows Azure VM is windowsmysqlsrv.cloudapp.net:3306.
Create a simple PHP application on Azure Web Sites as described in this article How to create a PHP website with an index.php file that tries to connect to a database on your MySQL server VM to test if your website can connect to your newly created MySQL server :
Note: If you see any error messages like “Access denied” or “Host ‘xxx.xx.xxx.xxx’ is not allowed to connect to this MySQL server” ; check the following:
- Firewall for port 3306 is open for both inbound and outbound connections
- MySQL server is configured to allow remote connections for the user you are using to connect . Check the mysql.host table to check if the user is associated with ‘%’ wildcard for the host column to allow any remote IP .
Create a MySQL server on Linux Azure VM
- Login to the Azure Management Portal using your Azure account.
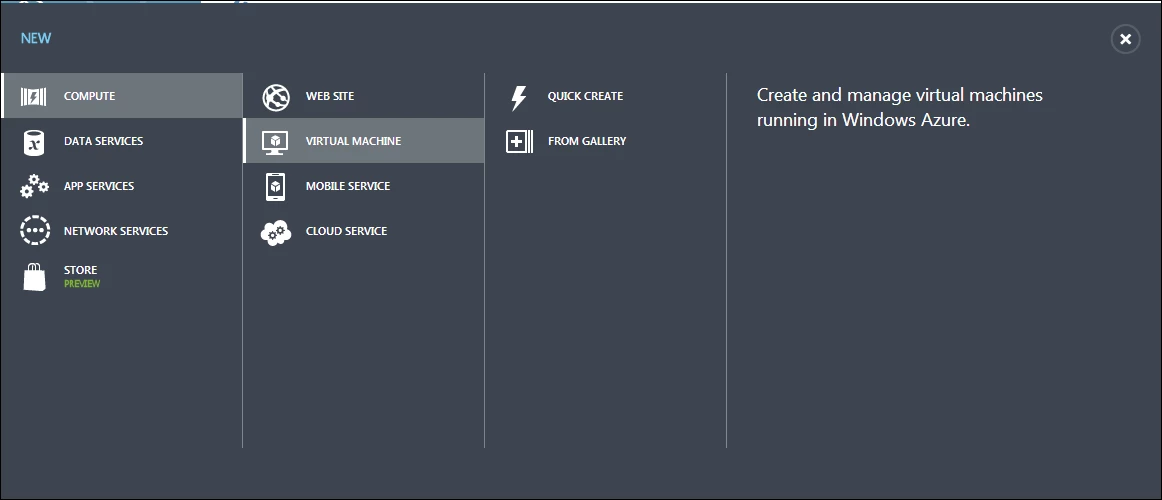
- In the Management Portal, at the bottom left of the web page, click +New, click Virtual Machine, and then click From Gallery.
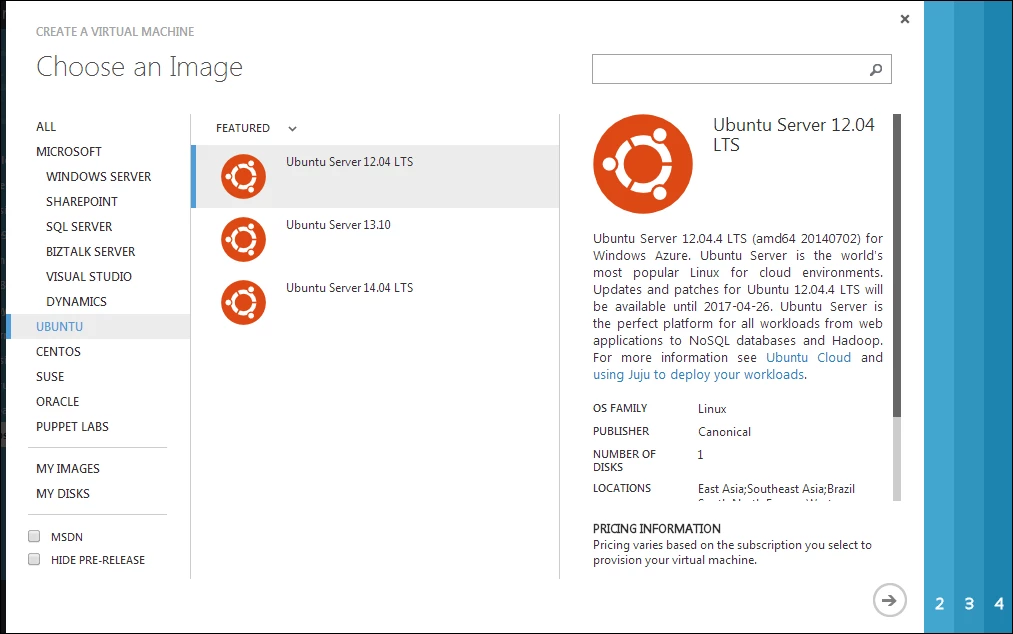
- Select an Ubuntu virtual machine image from Platform Images, and then click the next arrow at the bottom right of the page.
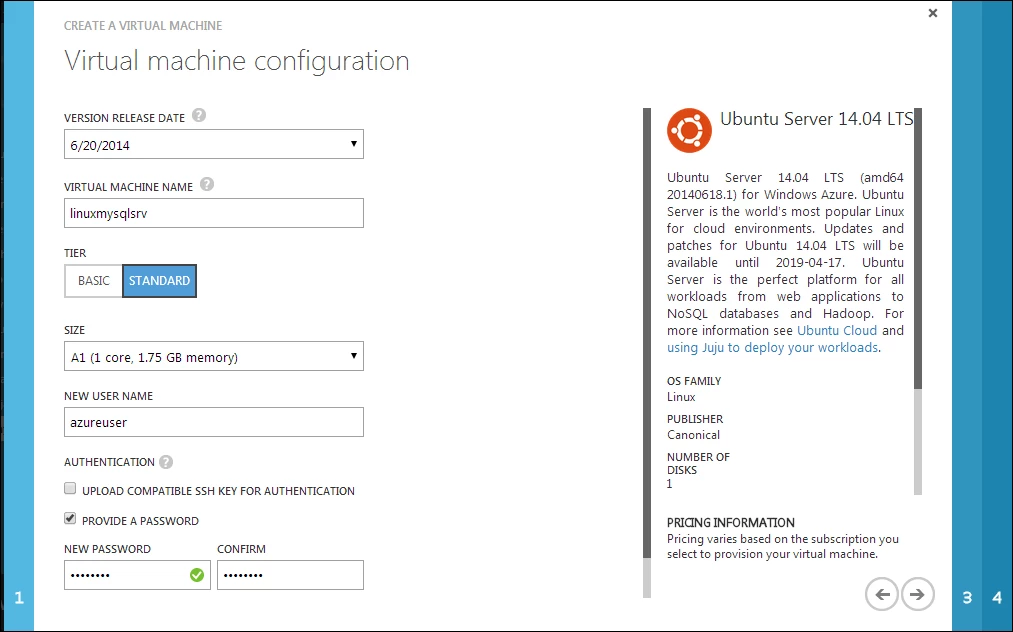
- On the Virtual machine configuration page, provide the following information:
- Provide a Virtual Machine Name, such as linuxmysqlsrv
- You may choose to use SSH key or Username/Password authentication for you virtual machine. For this tutorial I am going to use a Username/Password method. Specify a New User Name, such as azureuser, which will be added to the Sudoers list file.
- In the New Password box, type a strong password.
- In the Confirm Password box, retype the password.
- Select the appropriate Size from the drop down list.
- Click the next arrow to continue.
- On the Virtual machine mode page, provide the following information:
- Select Standalone Virtual Machine.
- In the DNS Name box, type a valid DNS address. For example, linuxmysqlsrv
- In the Region/Affinity Group/Virtual Network box, select a region where this virtual image will be hosted.Click the next arrow to continue.
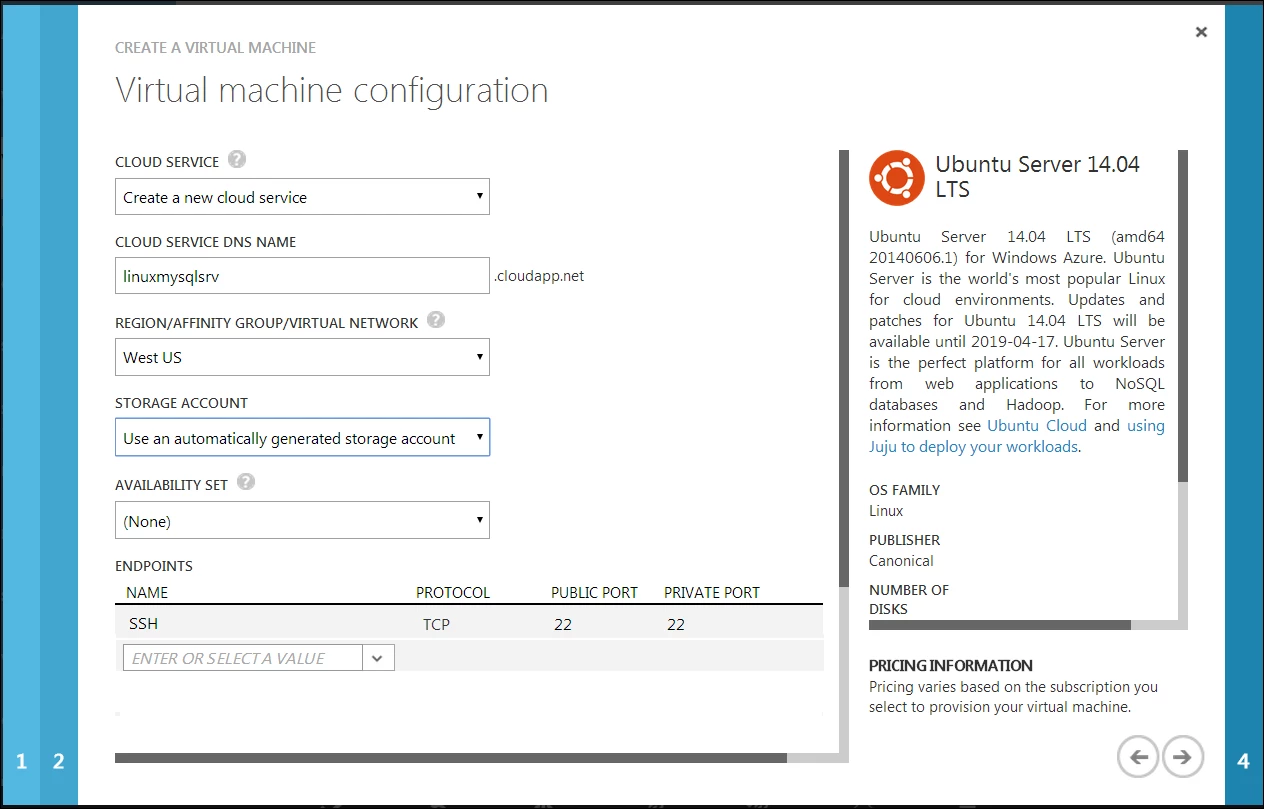
- Wait while Azure prepares your virtual machine.
Once the virtual machine is created, you must configure endpoints in order to remotely connect. By default, the Azure installer creates an SSH endpoint on the public port 22 so that you can connect to the machine.
Connect to the Virtual Machine
When the virtual machine has been provisioned and the endpoints configured, you can connect to it using SSH (Linux) or PuTTY (Windows).
Connecting Using SSH
If you are using a linux computer, connect to the VM using SSH. At the command prompt, run:
ssh newuser@testlinuxvm.cloudapp.net -o ServerAliveInterval=180
Enter the machine user’s password when prompted to gain access to your virtual machine.
Connecting using PuTTY
If you are using a Windows computer, connect to the VM using PuTTY. PuTTY can be downloaded from the PuTTY Download Page.
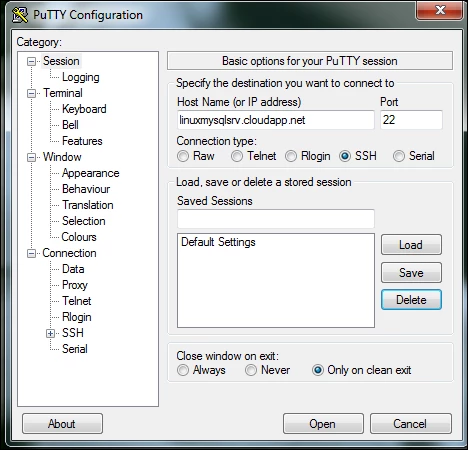
- Download and save putty.exe to a directory on your computer. Open a command prompt, navigate to that folder, and executeputty.exe.
- Enter “linuxmysqlsrv.cloudapp.net” for the Host Name and “22″ for the Port.
Update the Virtual Machine
Once you’ve connected to the virtual machine, you can optionally install system updates and patches. Run:
sudo apt-get update
Install MySQL Server 5 on Ubuntu
Installing MySQL 5 Server on Ubuntu is a quick and easy process. It almost feels like it should be more difficult.
Open a terminal window, and use the following command:
sudo apt-get install mysql-server
You would also need a MySQL client , so in a terminal window run the following command:
sudo apt-get install mysql-client
This will install MySQL server and to check the status of your server run the following command:
sudo service mysql status
Connecting to MySQL Using an SSH Tunnel
Secure Shell, or SSH, is used to create a secure channel between a local and remote computer. While SSH is commonly used for secure terminal access and file transfers, it can also be used to create a secure tunnel between computers for forwarding other network connections that are not normally encrypted. SSH tunnels are also useful for allowing outside access to internal network resources. SSH opens a local port and seamlessly transferring all of the communication over that port through to MySQL running on your server; making it look like MySQL server is running on local system.
To create an SSH tunnel on your Ubuntu VM, you can run the command line SSH command with the -L to enable local port forwarding.
- Open port 3306 port is not opened by default, hence you need to first open this port so a remote client can connect to your MySQL Server. Run the following command to open TCP port 3306
iptables -A INPUT -i eth0 -p tcp -m tcp --dport 3306 -j ACCEPT
Now let’s check if the port 3306 is open by running this command:
sudo netstat -anltp|grep :3306
- Create a SSH tunnel for port 3307
sudo ssh -fNg -L 3307:127.0.0.1:3306 azurevmuser@servername
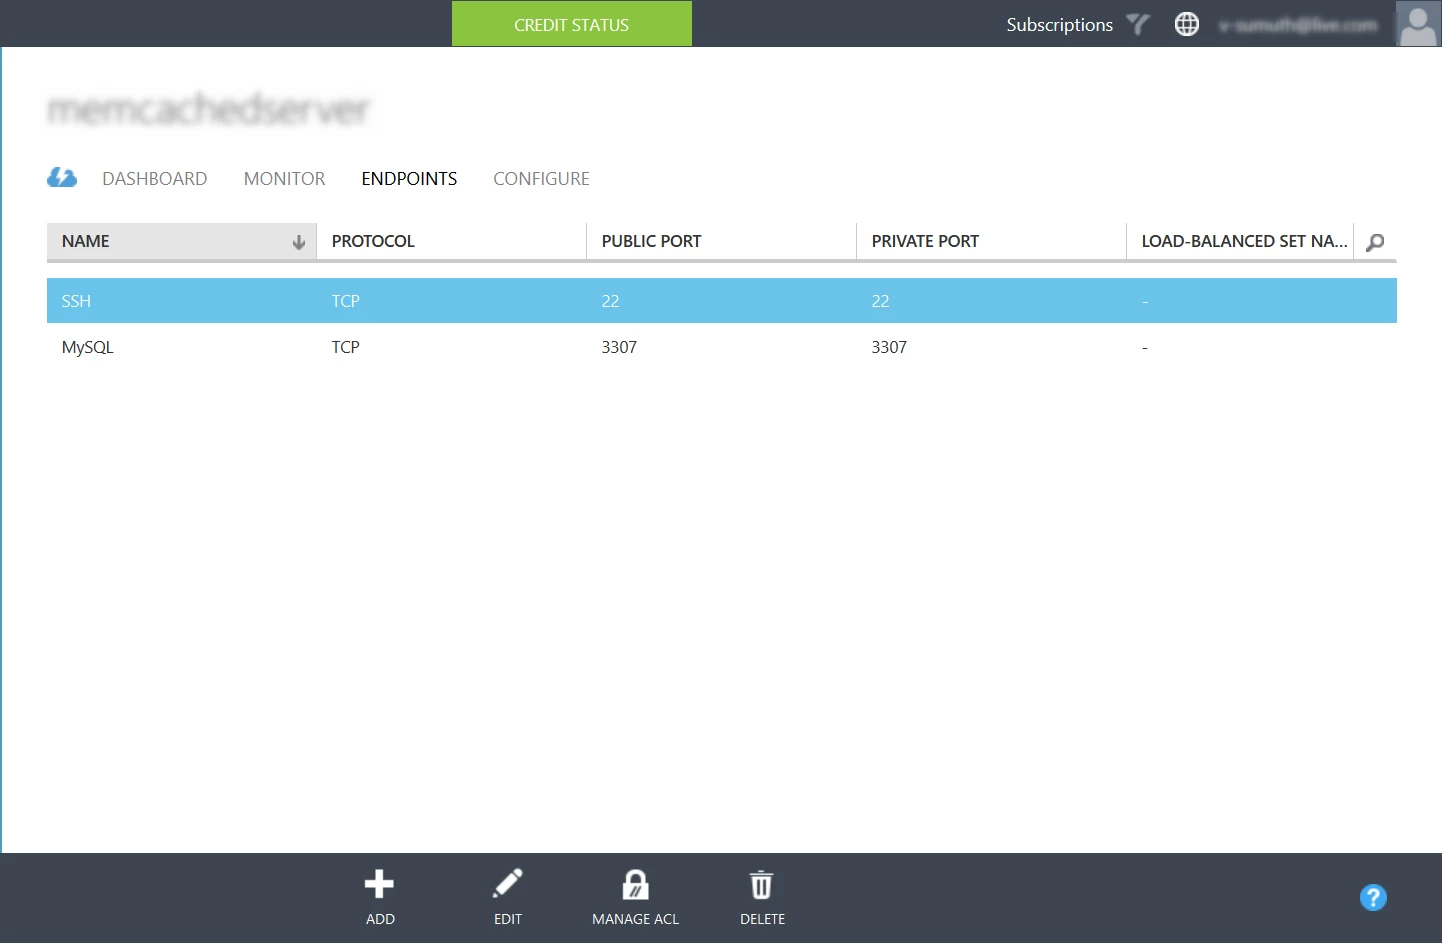
- Create an endpoint for the port 3307 in the dashboard of the VM in Azure management portal. For more details , See how to add endpoint to you Virtual machine .Now your Database host name is linuxmysqlsrv.cloudapp.net:3307
You can enable Direct Access to your MySQL from Remote Systems which I will not cover in this tutorial because this is NOT A RECOMMENDED solution to connect to your MySQL server since allowing direct access to MySQL increases the risk of your server being compromised by attackers. MySQL does not use secure connections by default, so please refer to SSL with MySQL.
Create a PHP Website that can connect to your MySQL server
When you create a website in the Azure Management Portal, you have three options: Quick Create, Create with Database, and From Gallery. The instructions below will cover the Quick Create option. For information about the other two options, see Create a PHP-MySQL Azure web site and deploy using Git and Create a WordPress web site from the gallery in Azure. Here I will show you to create a simple site and add a simple PHP script to connect to the database .
Create a simple PHP application on Azure Web Sites as described in this article How to create a PHP website with an index.php file that tries to connect to a database on you MySQL server Linux VM to test you website can connect with the newly created MySQL server :
Conclusion
Clear DB service or Azure Virtual machines can both provide you the benefit of using MySQL with Azure Websites. Understand your requirements for the Database and choose the best solution that fits your needs.
