In this blog post, I will talk about how to use Update Management solution to manage updates for your Azure VMs. Right from within your Azure VM you can quickly assess the status of available updates, initiate the process of installing required updates, and review deployment results to verify that updates were applied successfully to the VM.
This feature is currently in private preview. If you’re interested in giving it a try, please sign up!
Enabling Update Management
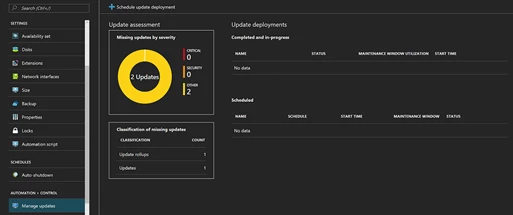
From your VM, you can select “Manage Updates” on the virtual machines blade, under Automation + Control. After selecting it, validation is performed to determine if the Update Management solution is enabled for this VM. If it is not enabled, you will have the option to enable the solution.
The solution enablement process can take up to 15 minutes, and during this time you should not close the browser window. Once the solution is enabled and log data starts to flow to the workspace, it can take more than 30 minutes for data to be available for analysis in the dashboard described in the next section. We expect this timing to significantly improve in the future.
Review update assessment
From the Manage Updates dashboard, you can review the update compliance state of the VM from the Missing updates by severity tile, which displays a count and graphical representation of the number of updates missing on the VM. The table below shows how the tile categorizes the updates missing by update classification.

To create an update deployment and bring the VM into compliance, you configure a deployment that follows your release schedule and service window. This entails what update types to include in the deployment, such as only critical or security updates, or if you want to exclude certain updates.
Create a new Update Deployment for the VM by clicking the “Schedule deployment for this VM” button at the top of the blade and specify the required values.
After you have completed configuring the schedule, click the “OK” button and you return to the status dashboard. You will notice that the Scheduled table shows the deployment schedule you just created.
View update deployment state
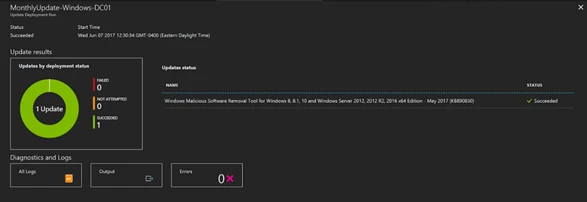
When the scheduled deployment executes, you see the status appear for that deployment under the Completed and in-progress table. Double-clicking the completed update deployment takes you to the detailed deployment status page.

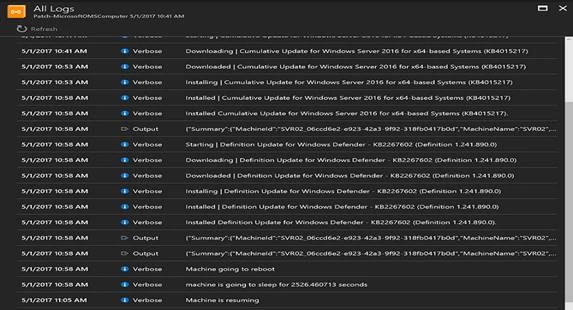
To review all detailed activities performed as part of the update deployment, select “All Logs and Output tiles”. This will show the job stream of the runbook responsible for managing the update deployment on the target VM.

OS support
- Windows: Windows 2012 and above
- Linux: RedHat Linux 6 & 7, Ubuntu Server 12.04 LTS, 14.04 LTS, 15.10, and 16.04
New to OMS Update Management
If you are new to OMS Update Management, you can view the current capabilities which include Update Insights across Windows and Linux, and the ability to deploy updates, as well as documentation.
In future posts, I’ll talk about how to manage updates for multiple VMs in your subscription and how to orchestrate the update deployments including running pre/post steps, sequencing, and much more!
