This article describes the steps to set up monetization of APIs hosted in Azure API Management. Code samples are provided to help you set up integration with your chosen payment provider.
One question we are consistently asked by customers, is “how can I set up billing for my APIs?” API Management has all the information you need to set up billing accessible through our Management APIs – we leave the choice of which payment provider to use up to you. However, if you would like a bit more guidance this blog post should help.
Two Ways to Directly Monetize Your APIs
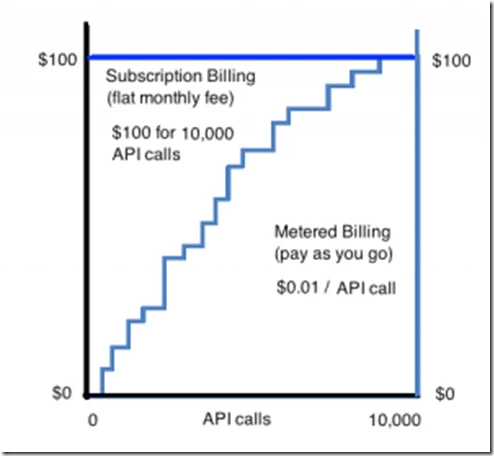
The two most common ways to directly monetize your APIs are: Subscription Billing, where you charge your customers a flat monthly fee to access your APIs; and Metered Billing, where you charge your customers based on the number of API calls they make.

Subscription Billing Model:
With a subscription model, your customers pay a flat monthly fee and are allowed to make a certain number of API calls per month. For example, a customer pays $100 to access up to 10,000 API calls per month. Whether they make 0 API calls or 10,000 API calls, the customer is charged $100 each month. If a customer subscribes to your API in the middle of a billing period, the customer would be charged a pro-rated amount for the number of days the subscription was active.
Metered Billing Model:
As the name implies, with a Metered Billing model you charge your customers a fee for each API call they make. Your customers are able to make as many calls as they want and are charged based on the total number of calls made. If the customer makes 7,000 API calls at $0.01 per call then the bill at the end of the month would be $70.
With the Metered Billing model you charge your customers once a month and all you need to know is how many calls they’ve made during that period.
Using a payment platform for Invoicing and Collecting Payments
Azure API Management tracks API usage in real time so you know how many API calls are made by each of your customers. This usage data can be used to bill each customer and send an invoice to collect monthly payments. To bill your users, you need a 3rd-party recurring billing solution, such as Stripe (which we will use as an example in this article). Stripe supports multiple billing models, currencies and payment methods, and its own API enables you to integrate with API Management seamlessly. Azure API Management does not recommend any particular payment service – you should select a payment provider that best meets your needs.
How API Management and a payment platform Works Together
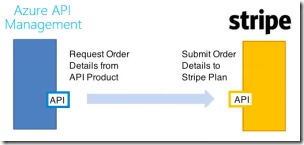
To set this up, we will need to integrate Azure API Management and Stripe; they both have APIs that you can use to create smooth customer experience. The API Management API exposes API usage and subscription details for each of your customers. The Stripe API enables you to send a monthly invoice to each of your customers which includes billing details for each product in their subscription.
Create Products in Azure API Management
To manage your API with Azure API Management you need to create a Product and then add one or more APIs to it. You add your APIs to Product bundles because this is how customers subscribe to your APIs. Once a product is published, developers can subscribe to the Product bundles and begin to use the product’s APIs.
Map API Management Products to Stripe Plans
Your API customer is mapped to a Stripe user account via the Azure API Management customer account (often referred to as a developer account). which might include multiple product subscriptions. So the primary integration task is to retrieve monthly customer usage details from API Management’s API and send these details to Stripe.
With API Management’s own API, you can determine the number of active users, list the subscriptions for each user, and get monthly usage for each active product subscription. This information will be retrieved by your custom code and then submitted to the Stripe API to create and send customer invoices by email.
Create Stripe Plans for each API Management Product
Stripe refers to Plans much in the same way Azure API Management refers to Products, so you should create a Stripe Plan for each Product you create in API Management. Each Stripe Plan has a unique id, which you will map to its API Management Product counterpart.

To connect a monthly subscription Product on API Management to a monthly subscription Plan on Stripe you will set a price for your Stripe plan as well as a billing frequency. For example, when you describe a $100 / month subscription product in API Management, you’d create a Stripe Plan and specify a price of $100 and a billing frequency of one month.
To connect a metered billing product on API Management to a metered billing Plan on Stripe, you’d create a plan with $0 per month price and add fees to the monthly bill based on usage. The amount of the additional fees would be calculated by your custom code and submitted as an API request. These metered billing fees are called Invoice items and are considered non-recurring charges because they can be different from month to month.
Sign customers up and register their product choices
When a customer signs up, or adds a new product, there will be additional information that you want to capture or present to the user (e.g. credit card information, payment terms) that will then allow you to register them with your payment provider.
The way API Management allows you to do this is with sign-in delegation. Each time a customer subscribes to one of your API Management Products, your code will redirect them to capture additional information using the unique Stripe Plan ID to create a subscription through the Stripe API. You can create a new Stripe customer at the same time that you sign them up for a subscription by including the Plan id in the API call to create a new customer Take a look at the delegation article for more information, as this step can be a little tricky. See the accompanying sample code also.
Cancelling a Subscription from Stripe
When a customer cancels a monthly subscription, you need to cancel the subscription on Stripe too. This can also be done through Stripe’s API. From then on the customer’s credit card will not be charged again.
For metered billing you don’t have to do anything, however you customers will continue getting a $0 invoice which may be avoided by cancelling the $0/month subscription through the Stripe API as well.
Setting Up a Monthly Subscription Product
Here are the basic steps to implement subscription billing:
- Package your APIs into tiered products e.g. Bronze, Silver, Gold. Offering various API call allowances, and/or maybe different call rates.
- Apply quota and rate limit policies to your products as appropriate
- Create corresponding Stripe Plans
- Write code to run a monthly billing job that pulls all subscribers of each product listed in API Management during a given billing period. Submit the usage details to the Stripe API to generate bills and invoices.
Calculating the Bill for Monthly Subscription Users
Calculating bills for monthly subscription users is very easy because you don’t need to know how many API calls were made. Instead, you charge each user a flat monthly fee. In fact, once a customer’s subscription is created in Stripe, it stores the price of the subscription and will take care of the billing the monthly subscriber until the subscription is canceled.
See the accompanying sample code for specific details.
Setting Up a Metered Billing
How to implement metered billing:
- Package APIs into tiered products e.g. Bronze, Silver, Gold
- Apply rate limit policies to products
- Create corresponding Stripe Plans
- Run a monthly billing job that pulls usage info from API Management for each subscriber during a given billing period, and feed that info into Stripe to generate your customer’s bill
Calculating the Bill for Metered Users
To calculate this, your custom code will query API Management to get the customer’s API usage for each metered product. Your custom code will multiply this number by the cost per API call to calculate the total fee for this product. See the accompanying sample code for more details.
See the accompanying sample code for specific details.
