Azure Security Center, Hybrid + Multicloud, Security, Thought leadership
How Azure Security Center detects DDoS attack using cyber threat intelligence
Posted on
7 min read
Azure Security Center automatically collects, analyzes, and integrates log data from a variety of Azure resources. A list of prioritized security alerts are shown in Security Center along with the information you need to quickly investigate the problem along with recommendations for how to remediate an attack. In addition, a team of security researchers and experts often work directly with customers to gain insight into security incidents affecting Microsoft Azure customers, with the goal of constantly improving Security Center detection and alerting capabilities.
In the previous blog post “Azure Security Center adds Context Alerts to aid threat investigation,” Ian Hellen described the context alerting feature that helps to automate security investigation and delivers relevant context about what else happened on the system during and immediately before an attack. In this blog post, we will focus on a real-world DDoS attack campaign and how it was detected using cyber threat intelligence.
Before we get into the details of our investigation, let’s quickly explain some terms that you’ll see throughout this blog. So, what is DDoS? DDoS (Distributed Denial of Service) is a collection of attack types aimed at disrupting the availability of a target. These attacks involve a coordinated effort that uses multiple Internet-connected systems to launch many network requests against targets such as DNS servers, web services, e-mail, and others. The attacker’s goal is to overwhelm system resources on the targeted servers so that they can no longer process legitimate traffic effectively, making the system inaccessible. Another term is “Brute Force” which is a type of attack that attempts to calculate or guess valid username/password combinations to gain unauthorized access to a computer host. Oftentimes, the sheer amount of Brute Force attempts can effectively result in DDoS of the targeted system.
Initial Azure Security Center alert details
We began our initial investigation when Azure Security Center alerted on a series of Failed RDP Brute Force Attacks followed by Successful RDP brute force Attack immediately afterward. Around the same time, we also observed consistent RDP Incoming BF Many to One & RDP Incoming BF One to One attack alerts in Azure Security Center. These attacks appear to originate from ~79-85 unique IP addresses trying to target the RDP service periodically.
Below we see this series of alerts in Azure Security Center:

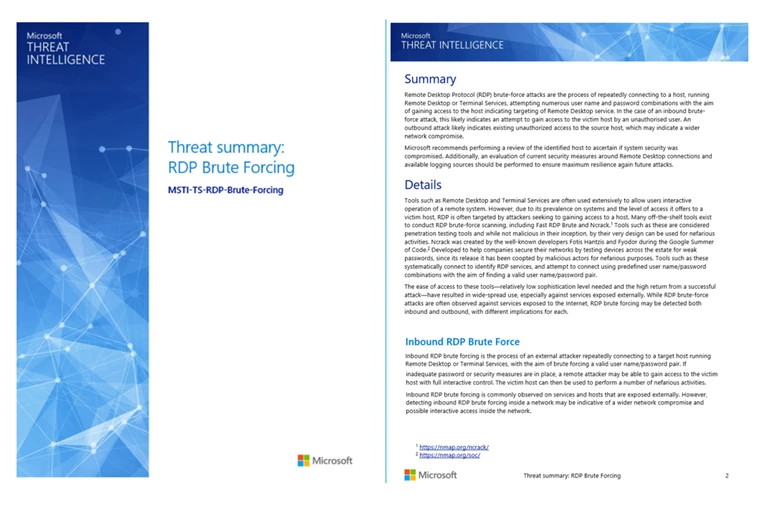
Azure Security Center also provides a threat intelligence report on alerts that provides detailed insight into the attack techniques being used like below:

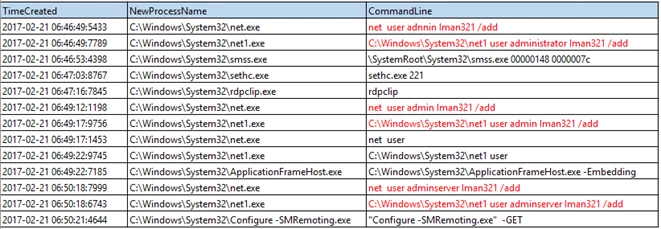
After the successful brute force attack, we began our deeper investigation that revealed the attackers first created three new user accounts, all with the same password:
- ‘administrator’,
- ‘admin’,
- ‘adminserver’
That password for each was ‘lman321’.

- Later, Azure Security Center detected that the attackers had executed processes associated with an unknown binary ‘wrsd.exe’ running from the user account’s %temp% directory.
- Once downloaded, we observed wrsd.exe, running the whoami command which displays the current logged domainuser account.
- Attackers then changed the below registry key to enable Network Level Authentication (NLA) on the Remote Desktop Services. This is done in order to prevent other attackers from successfully carrying out an RDP Brute Force attack.
- REG ADD “HKLMSYSTEMControlSet001ControlTerminal ServerWinStationsRDP-Tcp” /v UserAuthentication /t REG_DWORD /d 1 /f
- “reg add “HKEY_LOCAL_MACHINESYSTEMCurrentControlSetControlTerminal ServerWinStationsRDP-Tcp” /v UserAuthentication /t REG_DWORD /d 1 /f”

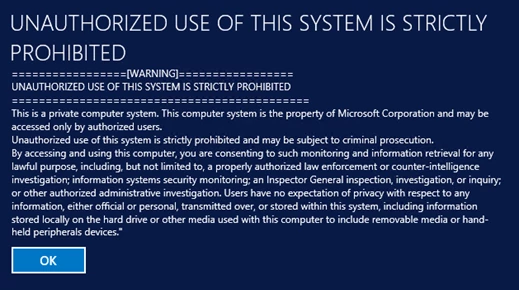
- Attackers then delete Terminal Services registry key entries related to the display of LegalNoticeCaption and LegalNoticeText. These registry keys are used to enable and configure custom legal notices and start up messages that Windows displays to all remote RDP users upon logon. Attackers will typically delete these LegalNotice keys as the UI can sometimes break or interrupt attacker’s automation.
reg delete
“HKEY_LOCAL_MACHINESOFTWAREMicrosoftWindowsCurrentVersionPoliciesSystem” /v legalnoticecaption /f
reg delete
“HKEY_LOCAL_MACHINESOFTWAREMicrosoftWindowsCurrentVersionPoliciesSystem” /v legalnoticetext /f

- The Parent process then launches commands to terminate any running Chrome or Firefox processes using Taskill.exe with the /f (force) option. Please note, task kill (Taskill.exe) is a program used to end one or more tasks or processes. Processes can be killed by process ID or image name. The ‘/f’ parameter represents that it’s trying to terminate the processes forcefully.
- After killing the processes, we see the following:
- Attackers first attempt to log off using the “Shutdown /l /f” command. The /l switch indicates a “logoff” while the /f switch forces running applications to close.
- This is followed by the “ping -n 3 127.0.0.1” command, pinging the localhost 3 times, which appears to be used to insert a delay of about 3 secs as each ping takes a second.
- Finally, we see the attacker logging off using the “logoff” command.
Within an hour of compromise, Azure Security Center used Microsoft’s threat intelligence to detect that the compromised subscription was likely being used as a shadow server to perform outgoing DNS amplification attacks.

DNS amplification attacks are a popular form of distributed DDoS attack that usually involves two sophisticated steps. Attackers first spoofs the victims address and then send a large number of DNS requests to a number of open resolvers by substituting the victims address as the source address. The result of this is that all DNS replies will be sent to the victim’s servers. In the second step, attackers discover an Internet domain that is possibly registered with many DNS records.
Attackers will then send DNS queries that request the entire set of DNS records for that domain. The DNS server’s response is usually so large that it floods the target with large quantities of packets.
Considering the high severity and priority of cases like these, our team of security researchers and experts immediately reached out to the customer and worked with their security team in identifying the threat, performing forensic investigative steps to ascertain what activities took place on the victim host, the scope of the intrusion, and the motives behind it. Further remediation steps were also taken to prevent continued exposure and the possibility of further compromise in the customer’s network. All the recommended action taken are explained in detail in the remediation and mitigation section below.
Recommended remediation and mitigation steps
The initial compromise was the result of a successful RDP Brute force attack that resulted in complete compromise of the machine and was further used for DDoS- DNS Amplification Attack. In this case, the host was being used for nefarious purposes. Microsoft recommends investigating the source of the initial compromise via a review of available log sources, host-based analysis, and if needed, forensic analysis to help build a picture of the compromise. In the case of Azure ‘Infrastructure as a Service’ (IaaS) virtual machines (VMs), several features are present to facilitate the collection of data including the ability to attach data drives to a running machine and disk imaging capabilities. Microsoft also recommends performing a scan using malware protection software to help identify and remove any malicious software running on the host. If lateral movement has been identified from the compromised host, remediation actions should extend to these hosts.
In cases where the victim host cannot be confirmed clean, or a root cause of the compromise cannot be identified, Microsoft recommends backing up critical data and migrating to a new virtual machine. Additionally, new or remediated hosts should be hardened prior to being placed back on the network to prevent reinfection. However, with the understanding that this sometimes cannot be done immediately, we recommend implementing the following remediation/preventative steps:
- Password Policy: Attackers usually launch brute-force attacks using widely available tools that utilize wordlists and smart rulesets to intelligently and automatically guess user passwords. So, the first step is to make sure to utilize complex passwords for all VMs. A complex password policy that enforces frequent password changes should be in place. Learn more about the best practices for enforcing password policies.
- Endpoints: Endpoints allows communication with your VM from the Internet. When creating a VM in the Azure environment, two endpoints get created by default to help manage the VM, Remote Desktop and PowerShell. It is recommended to remove any endpoints that are not needed and to only add them when required. Should you have an endpoint open, it is recommended to change the public port that is used whenever possible. When creating a new Windows VM, by default the public port for Remote Desktop is set to “Auto” which means a random public port will get automatically generated for you. Get more information on how to set up endpoints on a classic Windows virtual machine in Azure.
- Enable Network Security Group: Azure Security Center recommends that you enable a network security group (NSG) if it’s not already enabled. NSGs contain a list of Access Control List (ACL) rules that allow or deny network traffic to your VM instances in a Virtual Network. An endpoint ACL allows you to control which IP address, or CIDR subnet of addresses, you want to allow access over that management protocol. Learn more about how to filter network traffic with network security groups and enable Network Security Groups in Azure Security Center.
- Using VPN for management: A VPN gateway is a type of virtual network gateway that sends encrypted traffic across a public connection to an on-premises location. You can also use VPN gateways to send encrypted traffic between Azure virtual networks over the Microsoft network. To send encrypted network traffic between your Azure virtual network and on-premises site, you must create a VPN gateway for your virtual network. Both Site to Site and Point to Site gateway connections allows us to completely remove public endpoints and connect directly to the Virtual Machine over secure VPN connection.
To learn more about Azure Security Center, see the following:
- Azure Security Center’s detection capabilities
- Managing and responding to security alerts in Azure Security Center
- Managing security recommendations in Azure Security Center
- Security health monitoring in Azure Security Center
- Monitoring partner solutions with Azure Security Center
- Azure Security Center FAQ
- Get the latest Azure security news and information by reading the Azure Security blog.