Best Practices for Drupal CMS on Azure Websites
Posted on
13 min read
Drupal CMS is an Open source Content management system written in PHP and use MySQL. Drupal offers a refined programming interface for developers, no programming skills are required for a basic website and installation. You can use Drupal to build everything from personal blogs to enterprise applications. It is a popular framework among government organizations as well. The primary focus of this blog post is to articulate how to run Drupal CMS websites on Azure Websites platform and in this process you will learn:
- How to migrate existing Drupal site to Azure Websites
- How to setup Azure Storage Module for Media content
- How to improve with caching
- Use best practices for Drupal CMS
- Scale across regions
How to migrate existing Drupal site to Azure Web Apps
Migrating your Drupal website to Azure Web App is a fairly easy task. Just follow the steps below and you can move your entire Drupal site in an hour.
Create an Azure Web Site and MySQL database
First, go through the step-by-step tutorial to learn how to create a new Web Site with MySQL: Create a PHP-MySQL Azure web site and deploy using Git. Note that with this scenario, you are creating a FREE MySQL database. This is good for development purposes but for production level site you should purchase ClearDB database from Azure Store which provides you with various plans for a shared database cluster. For more details on, see ClearDB from Azure Store. If the Shared cluster plans do not meet your needs you can choose a dedicated MySQL database cluster. For more details, see ClearDB mission critical database plans. If you intend to use Git to publish your Drupal site, then follow the steps in the tutorial that explain how to configure a Git repository.
Make sure to follow the instructions in the Get remote MySQL connection information section as you will need that information later. You can ignore the remainder of the tutorial for the purposes of deploying your Drupal site, but if you are new to Azure Web Sites (and to Git), you might find the additional reading informative. After you setup a new Web Site with a MySQL database, you now have your MySQL database connection information and an (optional) Git repository. The next step is to copy your database to MySQL in Azure Web Sites.
Copy database to MySQL in Azure Web Apps
There are many ways to migrate a database into Azure. One way that works well with MySQL databases is to use the [MySqlDump] tool. The following command provides an example of how to copy from a local machine to Azure Web Sites:
mysqldump -u local_username --password=local_password drupal | mysql -h remote_host -u remote_username --password=remote_password remote_db_name
You do, of course, have to provide the username and password for your existing Drupal database. You also have to provide the hostname, username, password, and database name for the MySQL database you created in the first step. This information is available in the connection string information that you collected previously. The connection string should have a format similar to the following string:
Database=remote_db_name;Data Source=remote_host;User Id=remote_username;Password=remote_password
Depending on the size of your database, the copying process could take several minutes. Now your Drupal database is live in Azure Websites. Before you deploy your Drupal code, you need to modify it so it can connect to the new database.
Modify database connection info in settings.php
Here, you again need your new database connection information. Open the /sites/default/setting.php file in a text editor, and replace the values of 'database', 'username', 'password', and 'host' in the $databases array with the correct values for your new database. When you are finished, you should have something similar to this:
$databases = array ('default'=>array ('default'=>array ('database'=>'remote_db_name','username'=>'remote_username',
'password'=>'remote_password','host'=>'remote_host','port'=>'',
'driver'=>'mysql','prefix'=>'',),),);
Note: If you have a $base_url configuration parameter in your settings.php, comment it out since Drupal CMS will create the URLs from the value set for $base_url. You can use the $base_url parameter once you have your azure website configured to use the custom domain such as www.exmaple.com . Save the settings.php file. Now you are ready to deploy.
Deploy Drupal code using Git or FTP
The last step is to deploy your code to Azure Web Sites using Git or FTP.
- If you are using FTP, get the FTP hostname and username from you website's dashboard. Then, use any FTP client to upload the Drupal files to the /site/wwwroot folder of the remote site.
- If you are using Git, you should have set up a Git repository in the previous steps. You must install Git on your local machine. Then, follow the instructions provided after you created the repository. Review this article for configuring Git
How to setup Azure Storage Module
Once Drupal is installed, you need to enable and configure the blob storage module that uses Windows Azure blob storage for storing media files. Use following instructions to configure it correctly. Login as admin user and click on modules tab and enable Azure Storage module. If this module is not present, then install the module from here. ![image_thumb[15]](https://acom.azurecomcdn.net/80C57D/blogmedia/blogmedia/2014/05/image_thumb15.png "image_thumb[15]")
Click on Configuration tab and then click on Azure Storage in the Media section.
![image_thumb[13]](https://acom.azurecomcdn.net/80C57D/blogmedia/blogmedia/2014/05/image_thumb13.png "image_thumb[13]")
Click on Add button to add a new Storage account to be used by your Drupal website. Provide details as follows the dialog: name of the storage account, name of an existing container (this container must be public), blob storage URL, primary access key. Use the custom URL if you have the storage linked to a CDN and enter the CDN URL here. If you are not using a CDN then leave this empty.
![image_thumb[11]](https://acom.azurecomcdn.net/80C57D/blogmedia/blogmedia/2014/05/image_thumb11.png "image_thumb[11]")
Again click on Configuration tab and then click on File System in the Media section. Check the radio button Files stored on Azure Blob Storage and click on Save Configuration button.
![image_thumb[9]](https://acom.azurecomcdn.net/80C57D/blogmedia/blogmedia/2014/05/image_thumb9.png "image_thumb[9]")
Now click on Structure->Content Type. Then click on manager fields for “Article” type. In manage fields dialog , check if you already have Image label added which will display Image Upload option when you are creating a new article. If you wish to support file uploads ( not image specific formats ) , then include a label for File Upload as well ( Upload label as shown below) . ![image_thumb[7]](https://acom.azurecomcdn.net/80C57D/blogmedia/blogmedia/2014/05/image_thumb7.png "image_thumb[7]")
Now click on edit for Image and select Upload destination to be Azure Storage account. Please do the same if you have another label for File uploads (where the field type is FILE). ![image_thumb[6]](https://acom.azurecomcdn.net/80C57D/blogmedia/blogmedia/2014/05/image_thumb6.png "image_thumb[6]")
Similarly for any content type that supports Image or File uploads, make the same configuration as mentioned above.
How to improve performance with caching
Websites that receive massive large amounts of user traffic (hundreds of thousands to millions of page views and unique visitors) will benefit from the use of a distributed caching server such as Memcached or Redis cache. To learn more, see how to use Azure redis cache with memcache protocol and how to configure Redis cache for WordPressThe general approached for caching is having a mix of Content delivery network (CDN) and backend cache ( Redis ) service. Drupal uses the database to store cache. If any content is modified then Drupal detects this change and expires the cache hence maintaining content consistency. Memcached/redis replaces Drupal's internal caching system. You can also use Varnish as Front end cache instead of a CDN to significantly improve performance.
Use Best Practices for Drupal CMS
A common practice for any website on the cloud is to
- Plan for the future : You must track the performance and requirements of your website and user traffic patterns to be able to project when you need to scale up or scale down your infrastructure or modify your infrastructure to meet your latest requirements
- Backup your site: Backup both your website and the database. Test your backup and restore procedures.
Now let's focus on Drupal CMS and learn some of the best practices for building and managing Drupal CMS on Azure websites:
Security configuration:
- Remove sensitive temporary filesWhile you edit files, this may create temporary backup files such as file ending with .bak, ending with a ~ character, settings.php.orig . These files are viewable in a browser if you haven't restricted it in web.config using URL rewrite rules. This can lead to attackers gaining access to critical information. Remove any such files present in the website. This can be solved by adding the URL rewrite rules in web.config to deny access to any of these files or you can automate this by using a simple web job that looks for these files and deletes them automatically.
- Enable SSL for loginDrupal does not require the use of Secure sockets layer (SSL) , when users log in . Hence it makes it easier for attackers to gain administrative access to you website. Install and enable the Secure Pages module from drupal.org. This module can ensure that any/user URLs are served using SSL.
- Disallow unsafe file uploadsFile and image fields allow users to upload files. A malicious user can use this to gain control of your website by uploading a file that can cause havoc on your system. Restrict what file types are support for file and image uploads and remove any extensions like .exe, .swf,.flv,.htm,.php,.vb,.vbs
- Enable Security Kit module:The Security Kit module provides useful security enhancements to your website such as Clickjacking, Cross-Site Request Forgery (CSRF), and Cross-Site Scripting (XSS) protections among others. This module's default configuration is recommended but If your website has some special requirements that this module may block, review the configuration and update as desired. To learn more, see Security Kit module
- Do not use common admin usernamesYour admin username (User ID 1) should not be admin, administrator, and root which are commonly used and can represent a security vulnerability to your website. Use complex or unique usernames to avoid exploits.
- Hide Site errors from end-userThese error messages can reveal sensitive information about your website and its server to site visitors. To configure your website to not display error messages for users, on your website, open the Logging and errors page at /admin/config/development/logging, select None from the Error messages to display section, and then click Save configuration.
- Enable The Password Policy moduleContent editors for your websites may use simple passwords for their login credentials and which in turn can open doors to attackers to exploit. To reduce the vulnerability here, enable Password policy module to enforce strict password policies.
Performance configuration
- Minimum cache lifetime less than 5 minutesTo increase site responsiveness and performance, the minimum cache lifetime prevents Drupal from clearing its page and block cache after node or block changes for a set period of time. With a minimum cache lifetime set to less than 5 minutes, the server has to work harder to deliver recently changed content to site visitors. To set the minimum cache lifetime to 5 minutes or more, on your website, open the Performance page at /admin/config/development/performance, and then select a new value from the Minimum cache lifetime drop-down. Set the minimum cache lifetime as high as possible, with existing pages available in the cache, but with changed content available after a reasonable time.
- Page cache max age less than 5 minutesWith a page cache max age set to less than 5 minutes, the server has to frequently regenerate pages. This can decrease your site's performance. To set the page cache max age to 5 minutes or more, on your website, open the Performance page at /admin/config/development/performance, and then select a new value from the Page cache max age drop-down.
- Optimize CSS and JS scriptsWith CSS/JS optimization disabled, your website visitors are experiencing slower page performance and the server load is increased. To enable CSS optimization, on your website, open the Performance page at/admin/config/development/performance, and then select Aggregate and compress CSS files. To enable JavaScript optimization, on your website, open the Performance page at/admin/config/development/performance, and then select Aggregate JavaScript files.
- Enable Page compressionWith page compression disabled, your website visitors are experiencing longer page load and data retrieval times. Compressing pages before storing them in cache, so the TCP/IP overhead to your MySQL or Memcache backend will be reduced.
- To enable page compression, on your website, open the Performance page at/admin/settings/performance. Ensure that Cache pages for anonymous users is selected in the Caching section (if it isn't enabled, select it, and then click Save configuration), and then select Compress cached pages
Azure website configuration
- Enable Web server logging and use a Storage account to store the logs. You can reuse the same storage that you have setup for media content. For more information, see Azure website diagnostics.
- Setup auto-scale which will scale up or scale down your website based on the traffic and load on your website dynamically. For more information, see Auto-scale Configuration .
- Use Basic or Standard mode which will give you dedicated VM instances to run your website for better performance and SLA support from our service. For more information, see Features by tiers.
- Configure the site to use at-least 2 Medium or Large instances (instance refers to a VM that is abstracted for your website). If you use a single instance, if the instance goes into a bad state then you site will be down. Using 2 instances will avoid this single point of failure.
- Load test your website using tools like Visual Studio Load test tools to make sure your scale at which you configured your site actually handle your website traffic.
- Setup Auto-healing for your website which recycles your VM instances based on a condition. For more information, see How to Auto-heal your website
Coding practices
- Avoid changes to Drupal core if possibleMaking changes to the Drupal Core will make it harder to manage version updates for Drupal on your website and will be difficult to maintain as your website grows.
- Avoid using too many modulesDrupal gives you're the flexibility to add modules to extend the feature set of the CMS, but too many modules can impact the performance of your site and make it slow.
- Include a web.config to run on Azure websitesAzure websites uses IIS, and hence add a web.config with the configuration below to protect unauthorized access to files and manage clean URLs. Use the sample web.config for a Drupal website as shown here . You should disable Application Request Routing cookie which pins a user's subsequent requests to a specific instance if enabled. Disabling it will allow your website to use the normal load balancing behavior of the platform . To learn more , See Disable ARR Cookie. To do this in your web.config file add the following section under
Scale Drupal across multiple regions
By hosting Drupal website across multiple regions you mitigate the risk associated with single point of failure when you have a single website running in one datacenter. Key thing to remember with Cloud solutions is that you need to assume that every component (website, database, cache etc.) may fail and make your solution resilient. This will reduce any operational costs incurred due to service outages that form a part of your infrastructure. For this scenario, you need to host your Drupal website in at least two regions, say we choose East US and West US region. See the figure shows an Active-Active (Master-Master) website configuration for Drupal Website:
- Two Azure Websites linked to their respective MySQL databases
- Both MySQL databases are synchronized with database replication
- Azure traffic Manager to load balancing end user traffic based on Performance, Failover or Round robin method.
- Managed Memcached service with failover enabled
- Azure Storage ( Geo-redundant ) with Azure CDN
This architecture is fairly simple to create, but if your application has special requirements, then are you can tweak the above configuration to meet your needs. You can update this configuration:
- create a Master-Slave website configuration
- create one master and multiple-slaves website configuration
- use custom replication processes using Web Jobs
- automate management processes using Web Jobs
Scaling the Web Site
Scaling up on Azure Web Sites involves two related actions: changing your Web Hosting Plan mode to a higher level of service, and configuring certain settings after you have switched to the higher level of service. Both topics are covered in this article. Higher service tiers like Standard mode offer greater robustness and flexibility in determining how your resources on Azure are used.For more details, see How to scale Azure website.
Scaling the database
Your application depends on two components which is the Azure website and the database. To be able to scale your database for high availability and disaster recovery for your database there are many options depending on how to created your database. For example , here are two scenarios :
- If you are using Clear DB service, you need to configure ClearDB high availability routing (CDBR). Clear DB offers database replication across region pairs (example: East US and West US ) , but you can also create your own tools for replicating database using Azure Web Jobs.
- You may also setup a MySQL Cluster CGE which gives you all the tools to manage a MySQL Cluster on an Azure Virtual Machine. Note that in this case , you will be manually managing all the MySQL clusters, database replication and scale operations.
Scaling your redis cache
Azure redis cache scaling feature is currently in preview. Azure redis cache has different cache offering which provide flexibbility in choice of cache size and features. You can scale the size of the cache using Change pricing tier blade in Azure portal. To learn more on how to scale you cache , click here.
Setup Traffic Manager to route your user traffic
Azure traffic manager allows you to control the distribution of user traffic to your specified endpoints, which can include web sites. Traffic Manager works by applying an intelligent policy engine to Domain Name System (DNS) queries for the domain names of your Internet resources. Your cloud services or web sites can be running in the same datacenter or in different datacenters across the world. Traffic Manager provides you with three methods
- Failover: Select Failover when you have endpoints in the same or different Azure datacenters (known as regions in the Management Portal) and want to use a primary endpoint for all traffic, but provide backups in case the primary or the backup endpoints are unavailable. For more information, see Failover load balancing method.
- Round Robin: Select Round Robin when you want to distribute load equally across a set of endpoints in the same datacenter or across different datacenters. For more information, see Round Robin load balancing method.
- Performance: Select Performance when you have endpoints in different geographic locations and you want requesting clients to use the “closest” endpoint in terms of the lowest latency. For more information, see Performance load balancing method.
Create a new Azure Traffic Manager service endpoint from Azure Management portal ![image_thumb[31]](https://acom.azurecomcdn.net/80C57D/blogmedia/blogmedia/2014/05/image_thumb31.png "image_thumb[31]") Now access your dashboard of your traffic manager endpoint and click on ADD to configure it to use the websites you want to route the traffic to. This
Now access your dashboard of your traffic manager endpoint and click on ADD to configure it to use the websites you want to route the traffic to. This ![image_thumb[33]](https://acom.azurecomcdn.net/80C57D/blogmedia/blogmedia/2014/05/image_thumb33.png "image_thumb[33]") In the Add dialog box, select service type as Web Site and choose the websites you want to route the user traffic to
In the Add dialog box, select service type as Web Site and choose the websites you want to route the user traffic to 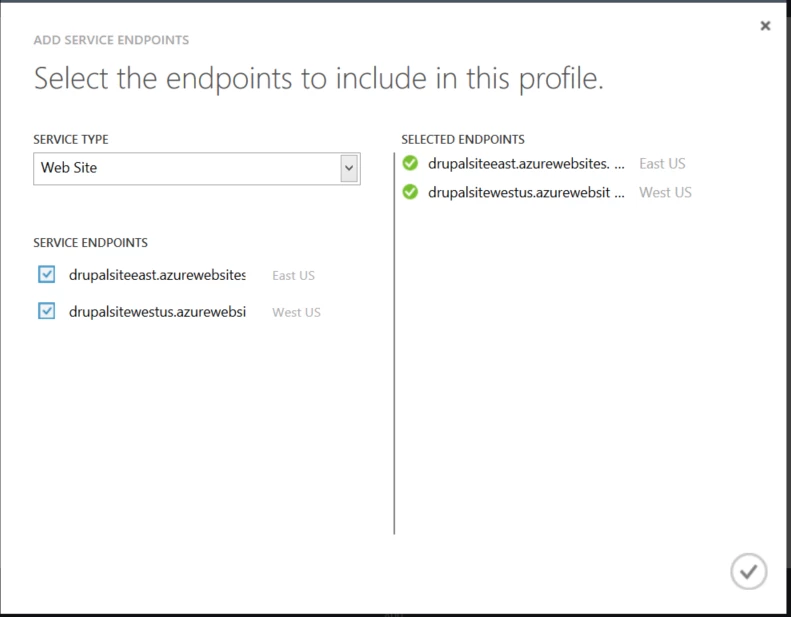 Now you can see that both endpoints were added to the traffic manager. You browse the traffic manager URL and you will see that the traffic is being routed as per your configuration
Wrapping it up!
We have covered the basic tasks and concerns involved with moving a Drupal website to Azure Websites. The solutions discussed above will make migration and configuration of your Drupal websites on Azure websites service easier irrespective of whether your Drupal site is small or large. Now let's start building and scaling your Drupal websites on Azure websites platform.