Announcing the StorSimple Virtual Array Preview
Posted on
3 min read
StorSimple solutions have been addressing some of the biggest problems faced by IT organizations – double digit data growth, storage capacity and the data protection complexities that come with it. One of the common requests from customers across different verticals is the ability to deploy the solution in branch or remote offices.
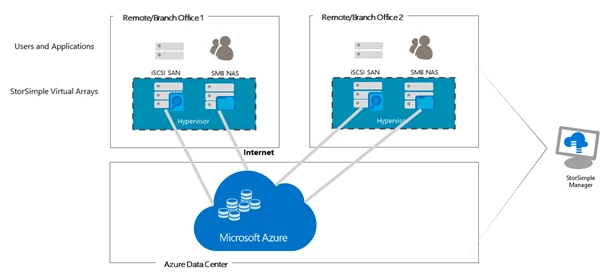
Today, I am pleased to announce the preview of the on-premises StorSimple Virtual Array, for all customers with an Enterprise Agreement for Microsoft Azure. The StorSimple Virtual Array is a version of the StorSimple solution in a virtual machine form installed on your existing hypervisors. The virtual array is built on the success of previous StorSimple technology using a hybrid cloud storage approach for on-demand capacity scaling in the cloud and cloud-based data protection and disaster recovery.
The virtual array can be run as a virtual machine on your Hyper-V or VMware ESXi hypervisors and can be configured as a File Server (NAS) or as an iSCSI server. The hybrid approach is to store the most used data (hottest) local on the virtual array and (optionally) tiering older stale data to Azure. The virtual array also provides the ability to back up the data to Azure in addition to having a quick disaster recovery (DR) capability.
Each virtual array can manage up to 64 TB of data in the cloud. Virtual arrays, in different branch and remote offices across geographies, can be managed from a central StorSimple management portal in Azure.

What’s new in this preview
Virtual array form factor
The StorSimple Virtual Array is a virtual machine which can be run on Hyper-V (2008 R2 and above) or VMware ESXi (5.5 and above) hypervisors. It provides the ability to configure the virtual array with data disks of different sizes to accommodate the working set of the data managed by the device. A web-based GUI that provides a fast and easy way for initial setup of the virtual array.
Multi-protocol
The virtual array can be configured as a File Server (NAS) which provides ability to create shares for users, departments and applications or as an iSCSI server (SAN) which provides ability to create volumes (LUNs) for mounting on host servers for applications and users.
Data pinning
Shares and volumes can be created as locally-pinned or tiered. Locally-pinned shares and volumes give quick access to data which will not be tiered, for example a small transactional database that requires predictable access to all data. These shares and volumes are backed up to the cloud along with tiered shares and volumes for data protection.
Data tiering
We introduced a new algorithm for calculating the most used data by defining a heat map which tracks the usage of files and blocks at a granular level. This assigns a heat value to the data based on read and write patterns. This heat map is used for tiering of data when the local tiers are full. Data with lowest heat value (coldest) tiers to the cloud first, while the data with higher heat value is retained in the local tiers of the virtual array. The data on the local tiers is the working set which is accessed frequently be the users. The heat map is backed up with every cloud snapshot to the cloud and in the event of a DR, the heat map will be used for restoring and rehydrating the data from the cloud.
Item level recovery
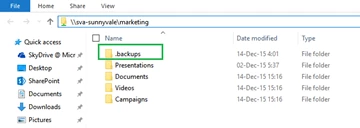
The virtual array, configured as a file server, provides ability for users to restore their files from recent backups using a self-service model. Every share will have a .backups folder which will contain the most recent backups. The user can navigate to the desired backup and copy the files and folders to restore them. This eliminates calls to administrators for restoring files from backups. The virtual array can restore the entire share or volume from a backup as a new share or a volume on the same virtual appliance.

Recommended workloads/scenarios
|
File Server |
iSCSI Server |
|
|
If you want to use features such as quota management, file screening etc. to manage home folders, you can connect a windows file server via iSCSI.
How to get started
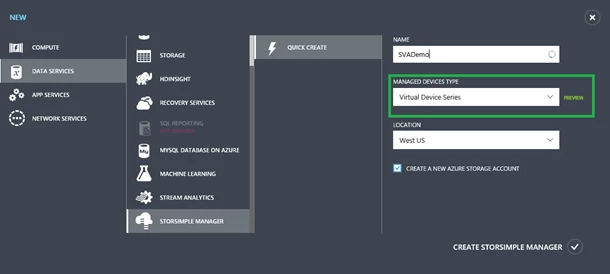
- From a web browser, navigate to the Azure portal.
- Click New.
- Select Data Services –> StorSimple Manager –> Quick Create.
- Provide a Name, then select Virtual Device Series under Managed Devices Type and Location for the StorSimple manager.
For details on getting started and using the virtual appliance, download the documentation.

Minimum configuration
|
CPU |
4 cores |
|
RAM |
8 GB |
|
Network |
1 Virtual NIC |
|
Virtual appliance OS disk |
80 GB |
|
Virtual appliance data disk |
500 GB |
To provide feedback or for support on this preview, please reach out on the StorSimple Community Forum.