Azure Automation 계정에 대해 사용자 할당 관리 ID 사용
이 문서에서는 Azure Automation 계정에 사용자 할당 관리 ID를 만드는 방법과 이를 사용하여 다른 리소스에 액세스하는 방법을 보여줍니다. 관리 ID가 Azure Automation에서 작동하는 방법에 대한 자세한 내용은 관리 ID를 참조하세요.
참고 항목
Automation 계정에 대해 관리 ID(시스템 또는 사용자 할당)를 만든 경우 Hybrid Runbook Worker에서 사용자 할당 관리 ID를 사용할 수 없습니다. 관리 ID가 Automation 계정에 할당되지 않은 경우 할당된 관리 ID가 있는 Azure VM인 Hybrid Runbook Worker에서 VM의 시스템 또는 사용자 할당 관리 ID를 사용할 수 있습니다.
Azure 구독이 아직 없는 경우 시작하기 전에 체험 계정을 만듭니다.
사전 요구 사항
Azure Automation 계정. 자세한 내용은 Azure Automation 계정 만들기를 참조하세요.
Runbook이 해당 ID를 사용하여 관리하는 사용자가 할당한 관리 ID 및 대상 Azure 리소스는 다른 Azure 구독에 있을 수 있습니다.
최신 버전의 Azure 계정 모듈. 현재 최신 버전은 2.2.8입니다. (이 버전에 대한 자세한 내용은 Az.Accounts를 참조하세요.)
Automation Runbook에서 액세스하려는 Azure 리소스. 이 리소스에는 Automation Runbook에서 리소스에 대한 액세스를 인증하는 데 도움이 되는 사용자가 할당한 관리 ID에 정의된 역할이 있어야 합니다. 역할을 추가하려면 해당 Microsoft Entra 테넌트에서 리소스의 소유자여야 합니다.
Azure 역할을 할당하려면 사용자 액세스 관리자 또는 소유자와 같은
Microsoft.Authorization/roleAssignments/write권한이 있어야 합니다.
Azure Automation 계정에 대해 사용자 할당 관리 ID 추가
Azure Portal, PowerShell, Azure REST API 또는 ARM 템플릿을 사용하여 Azure Automation 계정에 대해 사용자 할당 관리 ID를 추가할 수 있습니다. PowerShell과 관련된 예제의 경우 먼저 Connect-AzAccount cmdlet을 사용하여 대화형으로 Azure에 로그인하고 지침을 따릅니다.
# Sign in to your Azure subscription
$sub = Get-AzSubscription -ErrorAction SilentlyContinue
if(-not($sub))
{
    Connect-AzAccount
}

# If you have multiple subscriptions, set the one to use
# Select-AzSubscription -SubscriptionId "<SUBSCRIPTIONID>"
그런 다음, 예제 전체에서 사용할 변수 세트를 초기화합니다. 아래 값을 수정한 다음, 실행합니다.
$subscriptionID = "subscriptionID"
$resourceGroup = "resourceGroupName"
$automationAccount = "automationAccountName"
$userAssignedOne = "userAssignedIdentityOne"
$userAssignedTwo = "userAssignedIdentityTwo"
Azure Portal 사용 추가
다음 단계를 수행합니다.
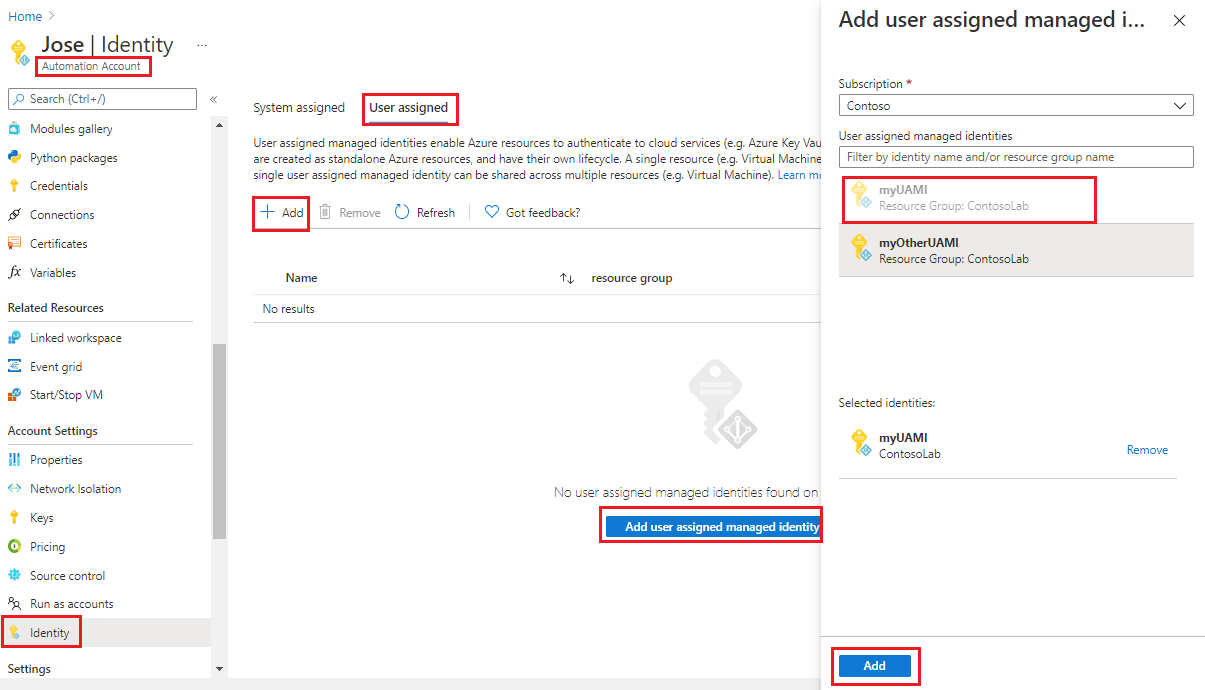
Azure Portal에 로그인합니다.
Azure Portal에서 Automation 계정으로 이동합니다.
계정 설정에서 ID를 선택합니다.
사용자 할당 탭을 선택한 다음, 추가를 선택합니다.
기존 사용자 할당 관리 ID를 선택한 다음, 추가를 선택합니다. 그러면 사용자 할당 탭으로 돌아갑니다.
PowerShell 사용 추가
PowerShell cmdlet Set-AzAutomationAccount를 사용하여 사용자 할당 관리 ID를 추가합니다. 먼저 기존의 시스템이 할당한 관리 ID가 있는지 여부를 고려해야 합니다. 아래 예제에서는 기존 Automation 계정에 기존의 사용자가 할당한 관리 ID 2개를 추가하고 하나의 사용자가 할당한 관리 ID가 있는 경우 사용하지 않도록 설정합니다.
$output = Set-AzAutomationAccount `
    -ResourceGroupName $resourceGroup `
    -Name $automationAccount `
    -AssignUserIdentity "/subscriptions/$subscriptionID/resourcegroups/$resourceGroup/providers/Microsoft.ManagedIdentity/userAssignedIdentities/$userAssignedOne", `
        "/subscriptions/$subscriptionID/resourcegroups/$resourceGroup/providers/Microsoft.ManagedIdentity/userAssignedIdentities/$userAssignedTwo"

$output
기존의 시스템이 할당한 관리 ID를 유지하려면 다음을 사용합니다.
$output = Set-AzAutomationAccount `
    -ResourceGroupName $resourceGroup `
    -Name $automationAccount `
    -AssignUserIdentity "/subscriptions/$subscriptionID/resourcegroups/$resourceGroup/providers/Microsoft.ManagedIdentity/userAssignedIdentities/$userAssignedOne", `
        "/subscriptions/$subscriptionID/resourcegroups/$resourceGroup/providers/Microsoft.ManagedIdentity/userAssignedIdentities/$userAssignedTwo" `
    -AssignSystemIdentity

$output
출력은 다음과 비슷해야 합니다.
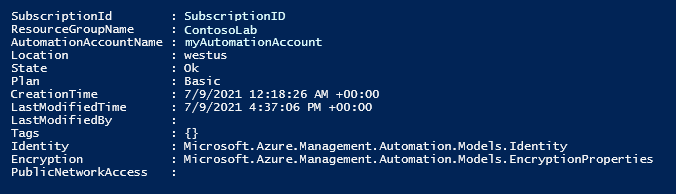
추가 출력의 경우 $output.identity | ConvertTo-Json을 실행합니다.
REST API 사용 추가
구문 및 예제 단계는 아래에 나와 있습니다.
구문
아래 샘플 본문 구문은 아직 사용하도록 설정되지 않은 경우 시스템 할당 관리 ID를 사용하도록 설정하고 기존 Automation 계정에 2개의 기존 사용자 할당 관리 ID를 할당합니다.
PATCH
{
  "identity": {
    "type": "SystemAssigned, UserAssigned",
    "userAssignedIdentities": {
      "/subscriptions/00000000-0000-0000-0000-000000000000/resourceGroups/resource-group-name/providers/Microsoft.ManagedIdentity/userAssignedIdentities/firstIdentity": {},
      "/subscriptions/00000000-0000-0000-0000-000000000000/resourceGroups/resource-group-name/providers/Microsoft.ManagedIdentity/userAssignedIdentities/secondIdentity": {}
    }
  }
}
API의 구문은 다음과 같습니다.
https://management.azure.com/subscriptions/00000000-0000-0000-0000-000000000000/resourceGroups/resource-group-name/providers/Microsoft.Automation/automationAccounts/automation-account-name?api-version=2020-01-13-preview
예시
다음 단계를 수행합니다.
위의 본문 구문을
body_ua.json파일로 수정합니다. 로컬 컴퓨터 또는 Azure 스토리지 계정에 파일을 저장합니다.아래의 변수 값을 수정한 다음, 실행합니다.
$file = "path\body_ua.json"이 예에서는 PowerShell cmdlet Invoke-RestMethod를 사용하여 Automation 계정에 PATCH 요청을 보냅니다.
# build URI
$URI = "https://management.azure.com/subscriptions/$subscriptionID/resourceGroups/$resourceGroup/providers/Microsoft.Automation/automationAccounts/$automationAccount`?api-version=2020-01-13-preview"

# build body
$body = Get-Content $file

# obtain access token
$azContext = Get-AzContext
$azProfile = [Microsoft.Azure.Commands.Common.Authentication.Abstractions.AzureRmProfileProvider]::Instance.Profile
$profileClient = New-Object -TypeName Microsoft.Azure.Commands.ResourceManager.Common.RMProfileClient -ArgumentList ($azProfile)
$token = $profileClient.AcquireAccessToken($azContext.Subscription.TenantId)
$authHeader = @{
    'Content-Type'='application/json'
    'Authorization'='Bearer ' + $token.AccessToken
}

# Invoke the REST API
$response = Invoke-RestMethod -Uri $URI -Method PATCH -Headers $authHeader -Body $body

# Review output
$response.identity | ConvertTo-Json
출력은 다음과 비슷해야 합니다.
{
"type": "SystemAssigned, UserAssigned",
"principalId": "00000000-0000-0000-0000-000000000000",
"tenantId": "00000000-0000-0000-0000-000000000000",
"userAssignedIdentities":  {
    "/subscriptions/ContosoID/resourcegroups/ContosoLab/providers/Microsoft.ManagedIdentity/userAssignedIdentities/ContosoUAMI1":  {
            "PrincipalId":  "00000000-0000-0000-0000-000000000000",
            "ClientId":  "00000000-0000-0000-0000-000000000000"
                },
    "/subscriptions/ContosoID/resourcegroups/ContosoLab/providers/Microsoft.ManagedIdentity/userAssignedIdentities/ContosoUAMI2":  {
            "PrincipalId":  "00000000-0000-0000-0000-000000000000",
            "ClientId":  "00000000-0000-0000-0000-000000000000"
                }
    }
}
ARM 템플릿 사용 추가
구문 및 예제 단계는 아래에 나와 있습니다.
템플릿 구문
아래 샘플 템플릿 구문은 아직 사용하도록 설정되지 않은 경우 시스템 할당 관리 ID를 사용하도록 설정하고 기존 Automation 계정에 2개의 기존 사용자 할당 관리 ID를 할당합니다.
{
  "$schema": "https://schema.management.azure.com/schemas/2019-04-01/deploymentTemplate.json#",
  "contentVersion": "1.0.0.0",
  "parameters": {
    "automationAccountName": {
     "defaultValue": "YourAutomationAccount",
      "type": "String",
      "metadata": {
        "description": "Automation account name"
      }
    },
    "userAssignedOne": {
     "defaultValue": "userAssignedOne",
      "type": "String",
      "metadata": {
        "description": "User-assigned managed identity"
      }
	  },
    "userAssignedTwo": {
     "defaultValue": "userAssignedTwo",
      "type": "String",
      "metadata": {
        "description": "User-assigned managed identity"
      }
	  }
   },
  "resources": [
    {
      "type": "Microsoft.Automation/automationAccounts",
      "apiVersion": "2020-01-13-preview",
      "name": "[parameters('automationAccountName')]",
      "location": "[resourceGroup().location]",
      "identity": {
        "type": "SystemAssigned, UserAssigned",
        "userAssignedIdentities": {
          "[resourceID('Microsoft.ManagedIdentity/userAssignedIdentities/',parameters('userAssignedOne'))]": {},
          "[resourceID('Microsoft.ManagedIdentity/userAssignedIdentities/',parameters('userAssignedTwo'))]": {}
        }
      },
      "properties": {
        "sku": {
          "name": "Basic"
        },
        "encryption": {
          "keySource": "Microsoft.Automation",
          "identity": {}
        }
      }
    }
  ]
}
예시
다음 단계를 수행합니다.
템플릿을 복사하여
template_ua.json파일에 붙여 넣습니다. 로컬 컴퓨터 또는 Azure 스토리지 계정에 파일을 저장합니다.아래의 변수 값을 수정한 다음, 실행합니다.
$templateFile = "path\template_ua.json"PowerShell cmdlet New-AzResourceGroupDeployment를 사용하여 템플릿을 배포합니다.
New-AzResourceGroupDeployment `
    -Name "UserAssignedDeployment" `
    -ResourceGroupName $resourceGroup `
    -TemplateFile $templateFile `
    -automationAccountName $automationAccount `
    -userAssignedOne $userAssignedOne `
    -userAssignedTwo $userAssignedTwo
명령이 출력을 생성하지 않습니다. 그러나 아래 코드를 사용하여 확인할 수 있습니다.
(Get-AzAutomationAccount `
-ResourceGroupName $resourceGroup `
-Name $automationAccount).Identity | ConvertTo-Json
출력은 위의 REST API 예제에 대해 표시되는 출력과 비슷합니다.
사용자 할당 관리 ID에 역할 할당
Automation 계정은 해당 사용자 할당 관리 ID를 사용하여 Azure Key Vault와 같이 Microsoft Entra ID로 보호되는 다른 리소스에 액세스할 수 있는 토큰을 가져올 수 있습니다. 이러한 토큰은 애플리케이션의 특정 사용자를 나타내지 않고 리소스에 액세스하는 애플리케이션을 나타냅니다. 예를 들어 이 경우 토큰은 Automation 계정을 나타냅니다.
사용자 할당 관리 ID를 인증에 사용하려면 먼저 ID를 사용하려는 Azure 리소스에서 해당 ID에 대한 액세스 권한을 설정합니다. 이 작업을 완료하려면 대상 Azure 리소스에서 해당 ID에 적절한 역할을 할당합니다.
최소 권한의 원칙을 따르고 Runbook을 실행하는 데 필요한 권한만 신중하게 할당합니다. 예를 들어 Automation 계정이 Azure VM을 시작하거나 중지하는 데만 필요한 경우 실행 계정 또는 관리 ID에 VM을 시작하거나 중지하는 권한만 할당해야 합니다. 마찬가지로, Runbook이 Blob Storage에서 읽는 경우 읽기 전용 권한을 할당합니다.
이 예에서는 Azure PowerShell을 사용하여 구독의 기여자 역할을 대상 Azure 리소스에 할당하는 방법을 보여줍니다. 참가자 역할이 예제로 사용되며 사용자의 경우 필요할 수도 있고 필요하지 않을 수도 있습니다. 또는 Azure Portal에서 대상 Azure 리소스에 역할을 할당할 수도 있습니다.
New-AzRoleAssignment `
    -ObjectId <automation-Identity-object-id> `
    -Scope "/subscriptions/<subscription-id>" `
    -RoleDefinitionName "Contributor"
사용자 관리 ID에 대한 역할 할당 확인
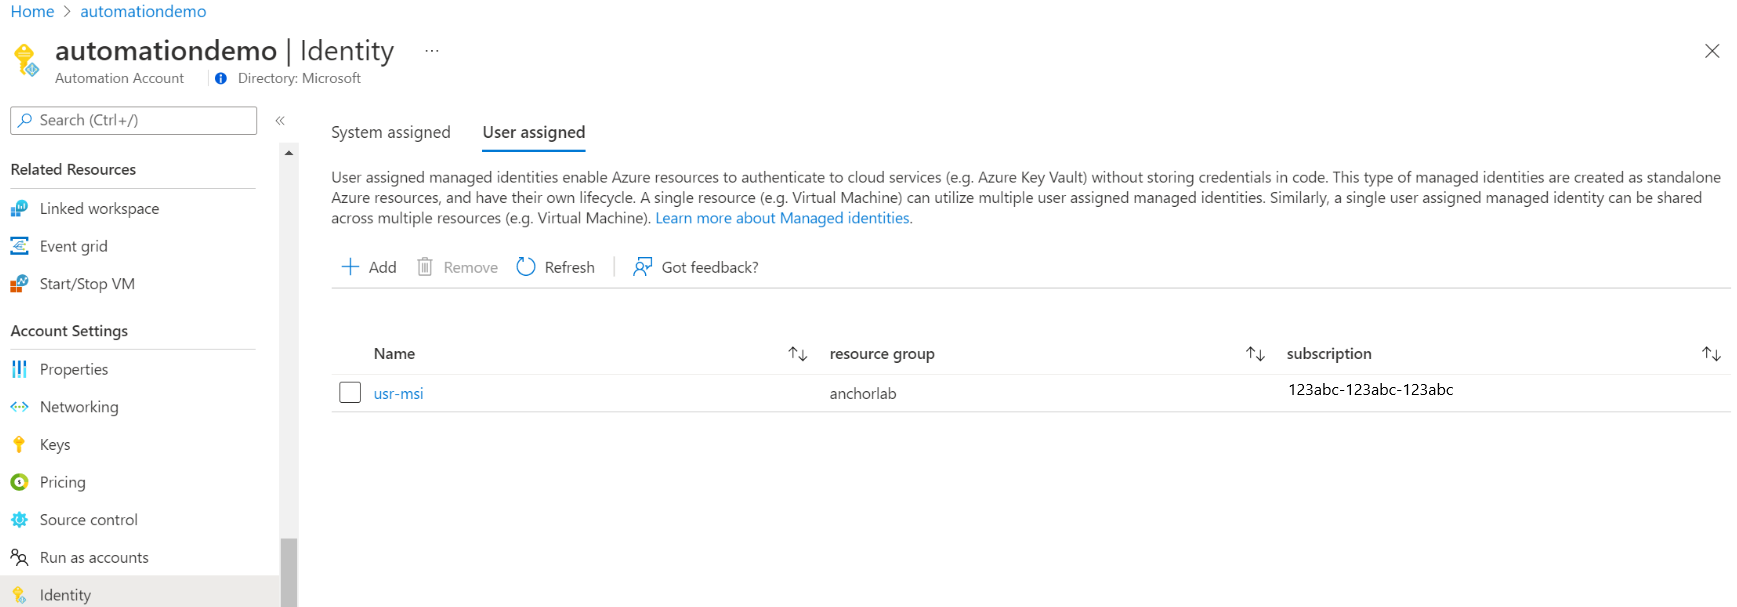
Automation 계정의 사용자 할당 관리 ID에 대한 역할을 확인하려면 다음 단계를 따릅니다.
Azure Portal에 로그인합니다.
Automation 계정으로 이동합니다.
계정 설정에서 ID, 사용자 할당을 선택합니다.
사용자 할당 ID 이름을 클릭합니다.
선택한 사용자 할당 관리 ID에 역할이 이미 할당된 경우 역할 할당 목록을 볼 수 있습니다. 이 목록에는 읽기 권한이 있는 모든 역할 할당이 포함됩니다.

구독을 변경하려면 구독 드롭다운 목록을 클릭하고 적절한 구독을 선택합니다.
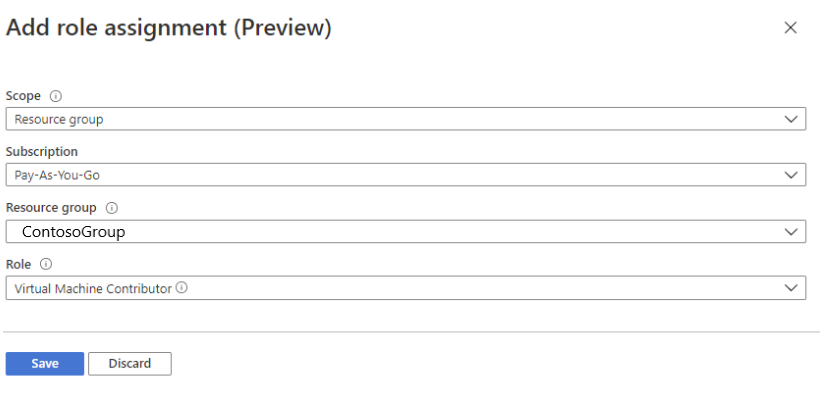
역할 할당 추가(미리 보기)를 클릭합니다.
드롭다운 목록에서 역할 할당이 적용되는 리소스 집합(구독, 리소스 그룹, 역할 및 범위)을 선택합니다.
역할 할당이 없는 경우 선택한 범위에 대한 쓰기 권한을 인라인 메시지로 볼 수 있습니다.역할 드롭다운 목록에서 역할을 가상 머신 기여자로 선택합니다.
저장을 클릭합니다.


몇 분 후 관리 ID에 선택한 범위의 역할이 할당됩니다.
사용자 할당 관리 ID로 액세스 인증
Automation 계정에 사용자 할당 관리 ID를 사용 설정하고 대상 리소스에 ID 액세스를 부여하면, 관리 ID를 지원하는 리소스를 대상으로 해당 ID를 Runbook에서 지정할 수 있습니다. ID를 지원하려면 Az cmdlet Connect-AzAccount를 사용합니다.
# Ensures you do not inherit an AzContext in your runbook
Disable-AzContextAutosave -Scope Process

# Connect to Azure with user-assigned managed identity
$AzureContext = (Connect-AzAccount -Identity -AccountId <user-assigned-identity-ClientId>).context

# set and store context
$AzureContext = Set-AzContext -SubscriptionName $AzureContext.Subscription -DefaultProfile $AzureContext
Azure cmdlet을 사용 하지 않고 액세스 토큰 생성
HTTP 엔드포인트의 경우에는 다음을 확인합니다.
- 메타데이터 헤더가 있고 ‘true’로 설정되어야 합니다.
- 리소스는 GET 요청에 대한 쿼리 매개 변수로서, 그리고 POST 요청에 대한 양식 데이터로서 요청과 함께 전달되어야 합니다.
- 환경 변수 IDENTITY_HEADER의 값을 X-IDENTITY-HEADER로 설정합니다.
- Post 요청에 대한 콘텐츠 형식은
application/x-www-form-urlencoded여야 합니다.
HTTP Get을 사용하여 사용자 할당 관리 ID에 대한 액세스 토큰 가져오기
$resource= "?resource=https://management.azure.com/"
$client_id="&client_id=<ClientId of USI>"
$url = $env:IDENTITY_ENDPOINT + $resource + $client_id
$Headers = New-Object "System.Collections.Generic.Dictionary[[String],[String]]"
$Headers.Add("Metadata", "True")
$headers.Add("X-IDENTITY-HEADER", $env:IDENTITY_HEADER)
$accessToken = Invoke-RestMethod -Uri $url -Method 'GET' -Headers $Headers
Write-Output $accessToken.access_token
HTTP Post를 사용하여 사용자 할당 관리 ID에 대한 액세스 토큰 가져오기
$url = $env:IDENTITY_ENDPOINT
$headers = New-Object "System.Collections.Generic.Dictionary[[String],[String]]"
$headers.Add("Metadata", "True")
$headers.Add("X-IDENTITY-HEADER", $env:IDENTITY_HEADER)
$body = @{'resource'='https://management.azure.com/'
'client_id'='<ClientId of USI>'}
$accessToken = Invoke-RestMethod $url -Method 'POST' -Headers $headers -ContentType 'application/x-www-form-urlencoded' -Body $body
Write-Output $accessToken.access_token
Azure PowerShell에서 사용자 할당 관리 ID 사용
Write-Output "Connecting to azure via  Connect-AzAccount -Identity -AccountId <ClientId of USI>"
Connect-AzAccount -Identity -AccountId <ClientId of USI>
Write-Output "Successfully connected with Automation account's Managed Identity"
Write-Output "Trying to fetch value from key vault using User Assigned Managed identity. Make sure you have given correct access to Managed Identity"
$secret = Get-AzKeyVaultSecret -VaultName '<KVname>' -Name '<KeyName>'
$ssPtr = [System.Runtime.InteropServices.Marshal]::SecureStringToBSTR($secret.SecretValue)
try {
  $secretValueText = [System.Runtime.InteropServices.Marshal]::PtrToStringBSTR($ssPtr)
    Write-Output $secretValueText
} finally {
    [System.Runtime.InteropServices.Marshal]::ZeroFreeBSTR($ssPtr)
}
Python Runbook에서 사용자 할당 관리 ID 사용
#!/usr/bin/env python3
import os
import requests

resource = "?resource=https://management.azure.com/"
client_id = "&client_id=<ClientId of USI>"
endPoint = os.getenv('IDENTITY_ENDPOINT')+ resource +client_id
identityHeader = os.getenv('IDENTITY_HEADER')
payload={}
headers = {
  'X-IDENTITY-HEADER': identityHeader,
  'Metadata': 'True'
}
response = requests.request("GET", endPoint, headers=headers, data=payload)
print(response.text)
다음 단계
Runbook이 성공적으로 완료되지 않으면 Azure Automation 관리 ID 문제 해결을 검토합니다.
관리 ID를 사용하지 않도록 설정해야 한다면, Azure Automation 계정 관리 ID 사용 안 함을 참조하세요.
Azure Automation 계정 보안에 대한 개요는 Automation 계정 인증 개요를 참조하세요.