Deploy a model as an online endpoint
APPLIES TO:  Python SDK azure-ai-ml v2 (current)
Learn to deploy a model to an online endpoint, using Azure Machine Learning Python SDK v2.
In this tutorial, you deploy and use a model that predicts the likelihood of a customer defaulting on a credit card payment.
The steps you take are:
- Register your model
- Create an endpoint and a first deployment
- Deploy a trial run
- Manually send test data to the deployment
- Get details of the deployment
- Create a second deployment
- Manually scale the second deployment
- Update allocation of production traffic between both deployments
- Get details of the second deployment
- Roll out the new deployment and delete the first one
This video shows how to get started in Azure Machine Learning studio so that you can follow the steps in the tutorial. The video shows how to create a notebook, create a compute instance, and clone the notebook. The steps are also described in the following sections.
Prerequisites
-
To use Azure Machine Learning, you'll first need a workspace. If you don't have one, complete Create resources you need to get started to create a workspace and learn more about using it.
-
Sign in to the studio and select your workspace if it's not already open.
-
Open or create a notebook in your workspace:
- Create a new notebook, if you want to copy/paste code into cells.
- Or, open tutorials/get-started-notebooks/deploy-model.ipynb from the Samples section of the studio. Then select Clone to add the notebook to your Files. (See where to find Samples.)
View your VM quota and ensure you have enough quota available to create online deployments. In this tutorial, you need at least 8 cores of
STANDARD_DS3_v2and 12 cores ofSTANDARD_F4s_v2. To view your VM quota usage and request quota increases, see Manage resource quotas.
Set your kernel
On the top bar above your opened notebook, create a compute instance if you don't already have one.

If the compute instance is stopped, select Start compute and wait until it is running.

Make sure that the kernel, found on the top right, is
Python 3.10 - SDK v2. If not, use the dropdown to select this kernel.
If you see a banner that says you need to be authenticated, select Authenticate.


Important
The rest of this tutorial contains cells of the tutorial notebook. Copy/paste them into your new notebook, or switch to the notebook now if you cloned it.
Note
- Serverless Spark Compute doesn't have
Python 3.10 - SDK v2installed by default. We recommend that users create a compute instance and select it before proceeding with the tutorial.
Create handle to workspace
Before you dive in the code, you need a way to reference your workspace. Create ml_client for a handle to the workspace and use the ml_client to manage resources and jobs.
In the next cell, enter your Subscription ID, Resource Group name, and Workspace name. To find these values:
- In the upper right Azure Machine Learning studio toolbar, select your workspace name.
- Copy the value for workspace, resource group, and subscription ID into the code.
- You need to copy one value, close the area and paste, then come back for the next one.
from azure.ai.ml import MLClient
from azure.identity import DefaultAzureCredential

# authenticate
credential = DefaultAzureCredential()

# Get a handle to the workspace
ml_client = MLClient(
    credential=credential,
    subscription_id="<SUBSCRIPTION_ID>",
    resource_group_name="<RESOURCE_GROUP>",
    workspace_name="<AML_WORKSPACE_NAME>",
)
Note
Creating MLClient won't connect to the workspace. The client initialization is lazy and waits for the first time it needs to make a call (this happens in the next code cell).
Register the model
If you already completed the earlier training tutorial, Train a model, you registered an MLflow model as part of the training script and can skip to the next section.
If you didn't complete the training tutorial, you need to register the model. Registering your model before deployment is a recommended best practice.
The following code specifies the path (where to upload files from) inline. If you cloned the tutorials folder, then run the following code as-is. Otherwise, download the files and metadata for the model to deploy and unzip the files. Update the path to the location of the unzipped files on your local computer.
The SDK automatically uploads the files and registers the model.
For more information on registering your model as an asset, see Register your model as an asset in Machine Learning by using the SDK.
# Import the necessary libraries
from azure.ai.ml.entities import Model
from azure.ai.ml.constants import AssetTypes

# Provide the model details, including the
# path to the model files, if you've stored them locally.
mlflow_model = Model(
    path="./deploy/credit_defaults_model/",
    type=AssetTypes.MLFLOW_MODEL,
    name="credit_defaults_model",
    description="MLflow Model created from local files.",
)

# Register the model
ml_client.models.create_or_update(mlflow_model)
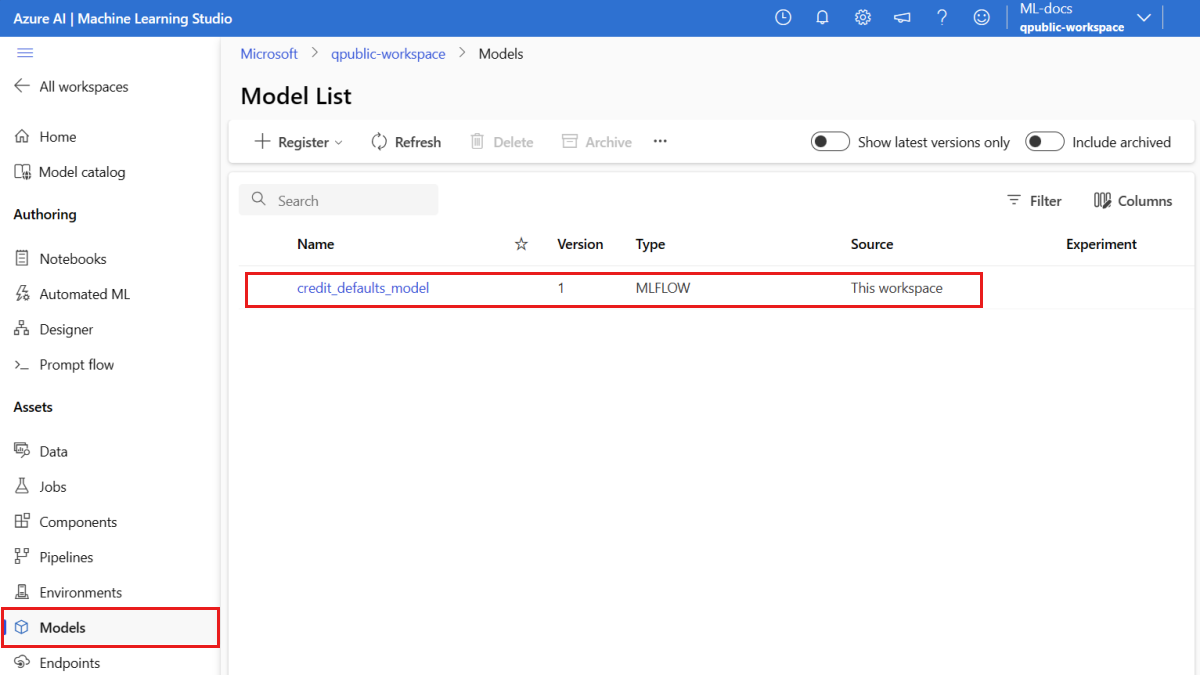
Confirm that the model is registered
You can check the Models page in Azure Machine Learning studio to identify the latest version of the registered model.
Alternatively, the following code retrieves the latest version number for you to use.
registered_model_name = "credit_defaults_model"

# Let's pick the latest version of the model
latest_model_version = max(
    [int(m.version) for m in ml_client.models.list(name=registered_model_name)]
)

print(latest_model_version)
Now that you have a registered model, you can create an endpoint and deployment. The next section briefly covers some key details about these topics.
Endpoints and deployments
After you train a machine learning model, you need to deploy it so that others can use it for inferencing. For this purpose, Azure Machine Learning allows you to create endpoints and add deployments to them.
An endpoint, in this context, is an HTTPS path that provides an interface for clients to send requests (input data) to a trained model and receive the inferencing (scoring) results from the model. An endpoint provides:
- Authentication using "key or token" based auth
- TLS(SSL) termination
- A stable scoring URI (endpoint-name.region.inference.ml.azure.com)
A deployment is a set of resources required for hosting the model that does the actual inferencing.
A single endpoint can contain multiple deployments. Endpoints and deployments are independent Azure Resource Manager resources that appear in the Azure portal.
Azure Machine Learning allows you to implement online endpoints for real-time inferencing on client data, and batch endpoints for inferencing on large volumes of data over a period of time.
In this tutorial, you go through the steps of implementing a managed online endpoint. Managed online endpoints work with powerful CPU and GPU machines in Azure in a scalable, fully managed way that frees you from the overhead of setting up and managing the underlying deployment infrastructure.
Create an online endpoint
Now that you have a registered model, it's time to create your online endpoint. The endpoint name needs to be unique in the entire Azure region. For this tutorial, you create a unique name using a universally unique identifier UUID. For more information on the endpoint naming rules, see endpoint limits.
import uuid

# Create a unique name for the endpoint
online_endpoint_name = "credit-endpoint-" + str(uuid.uuid4())[:8]
First, define the endpoint, using the ManagedOnlineEndpoint class.
Tip
auth_mode: Usekeyfor key-based authentication. Useaml_tokenfor Azure Machine Learning token-based authentication. Akeydoesn't expire, butaml_tokendoes expire. For more information on authenticating, see Authenticate clients for online endpoints.Optionally, you can add a description and tags to your endpoint.
from azure.ai.ml.entities import ManagedOnlineEndpoint

# define an online endpoint
endpoint = ManagedOnlineEndpoint(
    name=online_endpoint_name,
    description="this is an online endpoint",
    auth_mode="key",
    tags={
        "training_dataset": "credit_defaults",
    },
)
Using the MLClient created earlier, create the endpoint in the workspace. This command starts the endpoint creation and returns a confirmation response while the endpoint creation continues.
Note
Expect the endpoint creation to take approximately 2 minutes.
# create the online endpoint
# expect the endpoint to take approximately 2 minutes.

endpoint = ml_client.online_endpoints.begin_create_or_update(endpoint).result()
Once you create the endpoint, you can retrieve it as follows:
endpoint = ml_client.online_endpoints.get(name=online_endpoint_name)

print(
    f'Endpoint "{endpoint.name}" with provisioning state "{endpoint.provisioning_state}" is retrieved'
)
Understanding online deployments
The key aspects of a deployment include:
name- Name of the deployment.endpoint_name- Name of the endpoint that will contain the deployment.model- The model to use for the deployment. This value can be either a reference to an existing versioned model in the workspace or an inline model specification.environment- The environment to use for the deployment (or to run the model). This value can be either a reference to an existing versioned environment in the workspace or an inline environment specification. The environment can be a Docker image with Conda dependencies or a Dockerfile.code_configuration- the configuration for the source code and scoring script.path- Path to the source code directory for scoring the model.scoring_script- Relative path to the scoring file in the source code directory. This script executes the model on a given input request. For an example of a scoring script, see Understand the scoring script in the "Deploy an ML model with an online endpoint" article.
instance_type- The VM size to use for the deployment. For the list of supported sizes, see Managed online endpoints SKU list.instance_count- The number of instances to use for the deployment.
Deployment using an MLflow model
Azure Machine Learning supports no-code deployment of a model created and logged with MLflow. This means that you don't have to provide a scoring script or an environment during model deployment, as the scoring script and environment are automatically generated when training an MLflow model. If you were using a custom model, though, you'd have to specify the environment and scoring script during deployment.
Important
If you typically deploy models using scoring scripts and custom environments and want to achieve the same functionality using MLflow models, we recommend reading Guidelines for deploying MLflow models.
Deploy the model to the endpoint
Begin by creating a single deployment that handles 100% of the incoming traffic. Choose an arbitrary color name (blue) for the deployment. To create the deployment for the endpoint, use the ManagedOnlineDeployment class.
Note
No need to specify an environment or scoring script as the model to deploy is an MLflow model.
from azure.ai.ml.entities import ManagedOnlineDeployment

# Choose the latest version of the registered model for deployment
model = ml_client.models.get(name=registered_model_name, version=latest_model_version)

# define an online deployment
# if you run into an out of quota error, change the instance_type to a comparable VM that is available.\
# Learn more on https://azure.microsoft.com/en-us/pricing/details/machine-learning/.
blue_deployment = ManagedOnlineDeployment(
    name="blue",
    endpoint_name=online_endpoint_name,
    model=model,
    instance_type="Standard_DS3_v2",
    instance_count=1,
)
Using the MLClient created earlier, now create the deployment in the workspace. This command starts the deployment creation and returns a confirmation response while the deployment creation continues.
# create the online deployment
blue_deployment = ml_client.online_deployments.begin_create_or_update(
    blue_deployment
).result()

# blue deployment takes 100% traffic
# expect the deployment to take approximately 8 to 10 minutes.
endpoint.traffic = {"blue": 100}
ml_client.online_endpoints.begin_create_or_update(endpoint).result()
Check the status of the endpoint
You can check the status of the endpoint to see whether the model was deployed without error:
# return an object that contains metadata for the endpoint
endpoint = ml_client.online_endpoints.get(name=online_endpoint_name)

# print a selection of the endpoint's metadata
print(
    f"Name: {endpoint.name}\nStatus: {endpoint.provisioning_state}\nDescription: {endpoint.description}"
)
# existing traffic details
print(endpoint.traffic)

# Get the scoring URI
print(endpoint.scoring_uri)
Test the endpoint with sample data
Now that the model is deployed to the endpoint, you can run inference with it. Begin by creating a sample request file that follows the design expected in the run method found in the scoring script.
import os

# Create a directory to store the sample request file.
deploy_dir = "./deploy"
os.makedirs(deploy_dir, exist_ok=True)
Now, create the file in the deploy directory. The following code cell uses IPython magic to write the file into the directory you just created.
%%writefile {deploy_dir}/sample-request.json
{
  "input_data": {
    "columns": [0,1,2,3,4,5,6,7,8,9,10,11,12,13,14,15,16,17,18,19,20,21,22],
    "index": [0, 1],
    "data": [
            [20000,2,2,1,24,2,2,-1,-1,-2,-2,3913,3102,689,0,0,0,0,689,0,0,0,0],
            [10, 9, 8, 7, 6, 5, 4, 3, 2, 1, 10, 9, 8, 7, 6, 5, 4, 3, 2, 1, 10, 9, 8]
            ]
                }
}
Using the MLClient created earlier, get a handle to the endpoint. You can invoke the endpoint by using the invoke command with the following parameters:
endpoint_name- Name of the endpointrequest_file- File with request datadeployment_name- Name of the specific deployment to test in an endpoint
Test the blue deployment with the sample data.
# test the blue deployment with the sample data
ml_client.online_endpoints.invoke(
    endpoint_name=online_endpoint_name,
    deployment_name="blue",
    request_file="./deploy/sample-request.json",
)
Get logs of the deployment
Check the logs to see whether the endpoint/deployment were invoked successfully. If you face errors, see Troubleshooting online endpoints deployment.
logs = ml_client.online_deployments.get_logs(
    name="blue", endpoint_name=online_endpoint_name, lines=50
)
print(logs)
Create a second deployment
Deploy the model as a second deployment called green. In practice, you can create several deployments and compare their performance. These deployments could use a different version of the same model, a different model, or a more powerful compute instance.
In this example, you deploy the same model version, using a more powerful compute instance that could potentially improve performance.
# pick the model to deploy. Here you use the latest version of the registered model
model = ml_client.models.get(name=registered_model_name, version=latest_model_version)

# define an online deployment using a more powerful instance type
# if you run into an out of quota error, change the instance_type to a comparable VM that is available.\
# Learn more on https://azure.microsoft.com/en-us/pricing/details/machine-learning/.
green_deployment = ManagedOnlineDeployment(
    name="green",
    endpoint_name=online_endpoint_name,
    model=model,
    instance_type="Standard_F4s_v2",
    instance_count=1,
)

# create the online deployment
# expect the deployment to take approximately 8 to 10 minutes
green_deployment = ml_client.online_deployments.begin_create_or_update(
    green_deployment
).result()
Scale deployment to handle more traffic
Using the MLClient created earlier, you can get a handle to the green deployment. You can then scale it by increasing or decreasing the instance_count.
In the following code, you increase the VM instance manually. However, it's also possible to autoscale online endpoints. Autoscale automatically runs the right amount of resources to handle the load on your application. Managed online endpoints support autoscaling through integration with the Azure monitor autoscale feature. To configure autoscaling, see Autoscale online endpoints.
# update definition of the deployment
green_deployment.instance_count = 2

# update the deployment
# expect the deployment to take approximately 8 to 10 minutes
ml_client.online_deployments.begin_create_or_update(green_deployment).result()
Update traffic allocation for deployments
You can split production traffic between deployments. You might first want to test the green deployment with sample data, just like you did for the blue deployment. Once you've tested your green deployment, allocate a small percentage of traffic to it.
endpoint.traffic = {"blue": 80, "green": 20}
ml_client.online_endpoints.begin_create_or_update(endpoint).result()
Test traffic allocation by invoking the endpoint several times:
# You can invoke the endpoint several times
for i in range(30):
    ml_client.online_endpoints.invoke(
        endpoint_name=online_endpoint_name,
        request_file="./deploy/sample-request.json",
    )
Show logs from the green deployment to check that there were incoming requests and the model was scored successfully.
logs = ml_client.online_deployments.get_logs(
    name="green", endpoint_name=online_endpoint_name, lines=50
)
print(logs)
View metrics using Azure Monitor
You can view various metrics (request numbers, request latency, network bytes, CPU/GPU/Disk/Memory utilization, and more) for an online endpoint and its deployments by following links from the endpoint's Details page in the studio. Following any of these links takes you to the exact metrics page in the Azure portal for the endpoint or deployment.

If you open the metrics for the online endpoint, you can set up the page to see metrics such as the average request latency as shown in the following figure.

For more information on how to view online endpoint metrics, see Monitor online endpoints.
Send all traffic to the new deployment
Once you're fully satisfied with your green deployment, switch all traffic to it.
endpoint.traffic = {"blue": 0, "green": 100}
ml_client.begin_create_or_update(endpoint).result()
Delete the old deployment
Remove the old (blue) deployment:
ml_client.online_deployments.begin_delete(
    name="blue", endpoint_name=online_endpoint_name
).result()
Clean up resources
If you aren't going use the endpoint and deployment after completing this tutorial, you should delete them.
Note
Expect the complete deletion to take approximately 20 minutes.
ml_client.online_endpoints.begin_delete(name=online_endpoint_name).result()
Delete everything
Use these steps to delete your Azure Machine Learning workspace and all compute resources.
Important
The resources that you created can be used as prerequisites to other Azure Machine Learning tutorials and how-to articles.
If you don't plan to use any of the resources that you created, delete them so you don't incur any charges:
In the Azure portal, select Resource groups on the far left.
From the list, select the resource group that you created.
Select Delete resource group.
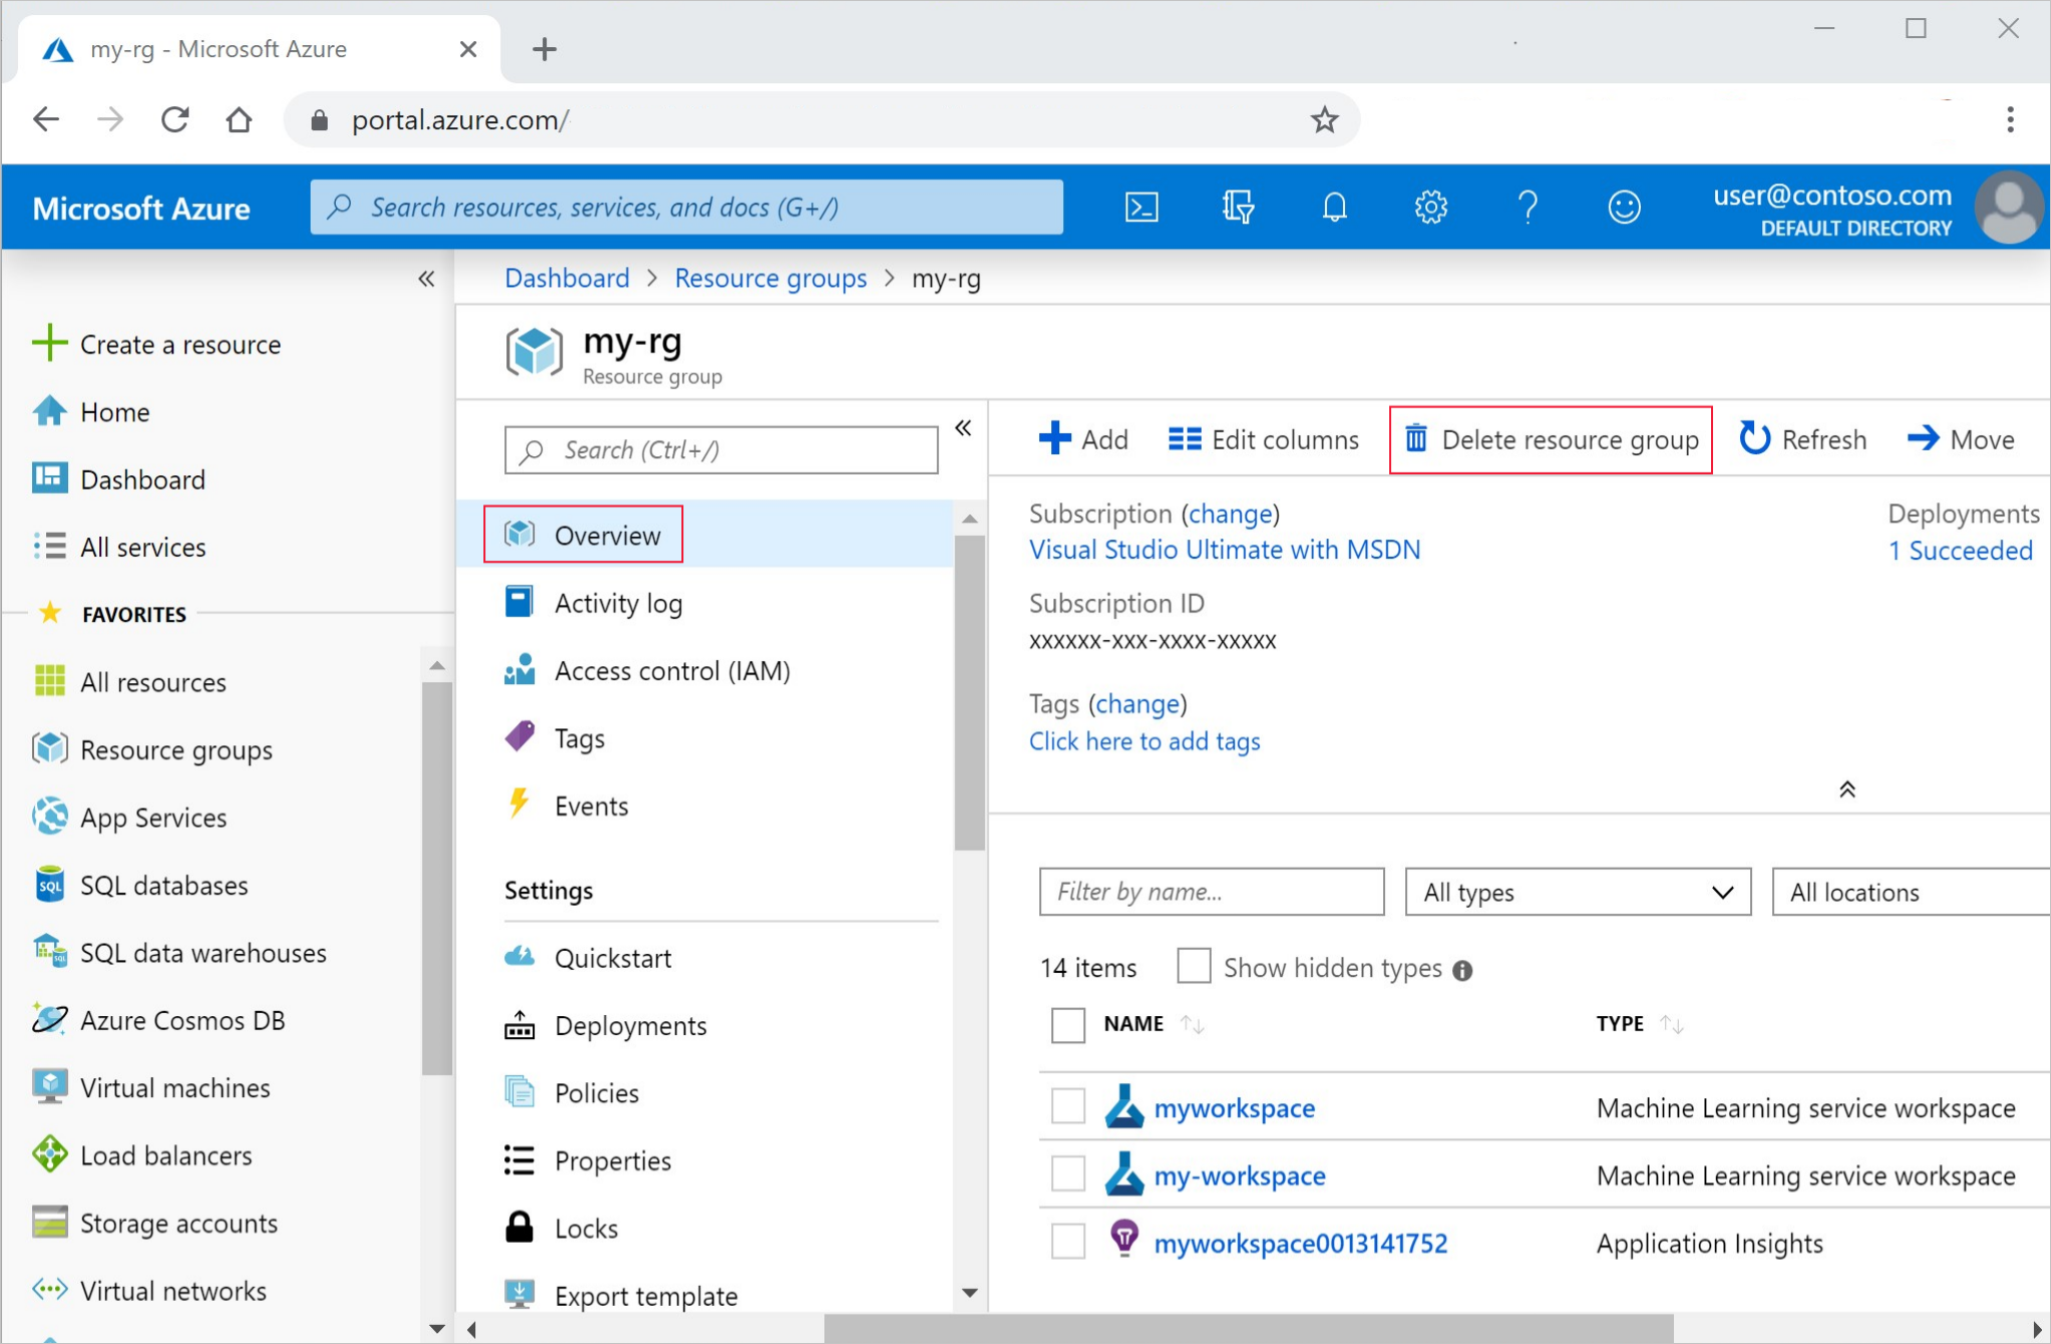
Enter the resource group name. Then select Delete.
Next step
Feedback
Coming soon: Throughout 2024 we will be phasing out GitHub Issues as the feedback mechanism for content and replacing it with a new feedback system. For more information see: https://aka.ms/ContentUserFeedback.
Submit and view feedback for