Create an Azure AI Search service in the portal
Azure AI Search is a vector and full text information retrieval solution for the enterprise, and for traditional and generative AI scenarios.
If you have an Azure subscription, including a trial subscription, you can create a search service for free. Free services have limitations, but you can complete all of the quickstarts and most tutorials, except for those featuring semantic ranking (it requires a billable service).
The easiest way to create a service is using the Azure portal, which is covered in this article. You can also use Azure PowerShell, Azure CLI, the Management REST API, an Azure Resource Manager service template, a Bicep file, or Terraform.

Before you start
The following service properties are fixed for the lifetime of the service. Consider their usage implications as you fill in each property:
- Service name becomes part of the URL endpoint (review tips for helpful service names).
- Tier (Free, Basic, Standard, and so forth) determines the underlying physical hardware and billing. Some features are tier-constrained.
- Service region can determine the availability of certain scenarios and higher storage limits. If you need availability zones or AI enrichment or more storage, create the resource in a region that provides the feature.
Subscribe (free or paid)
To try search for free, open a free Azure account and then create your search service by choosing the Free tier. You can have one free search service per Azure subscription. Free search services are intended for short-term evaluation of the product for non-production applications. If you want to move forward with a production application, create a new search service on a billable tier.
Alternatively, you can use free credits to try out paid Azure services. With this approach, you can create your search service at Basic or above to get more capacity. Your credit card is never charged unless you explicitly change your settings and ask to be charged. Another approach is to activate Azure credits in a Visual Studio subscription. A Visual Studio subscription gives you credits every month you can use for paid Azure services.
Paid (or billable) search occurs when you choose a billable tier (Basic or above) when creating the resource on a billable Azure subscription.
Find the Azure AI Search offering
Sign in to the Azure portal.
Select (Create Resource") in the top-left corner.
Use the search bar to find "Azure AI Search".

Choose a subscription
If you have more than one subscription, choose one for your search service. If you're implementing customer-managed encryption or if you use other features that depend on managed service identities for external data access, choose the same subscription as the one used for Azure Key Vault or other services for which managed identities are used.
Set a resource group
A resource group is a container that holds related resources for your Azure solution. It's useful for consolidating same-solution resources, monitoring costs, and for checking the creation date of your search service.

Over time, you can track current and projected costs all-up or you can view charges for individual resources. The following screenshot shows the kind of cost information you can expect to see when you combine multiple resources into one group.

Tip
Resource groups simplify cleanup because deleting a resource group deletes everything within it.
Name the service
In Instance Details, provide a service name in the URL field. The name is part of the endpoint against which API calls are issued: https://your-service-name.search.windows.net. For example, if you want the endpoint to be https://myservice.search.windows.net, you would enter myservice.
Service name requirements:
- Unique within the search.windows.net namespace
- Between 2 and 60 characters in length
- Consist of lowercase letters, digits, or dashes (
-) - Don't use dashes in the first 2 characters or as the last single character
- Don't use consecutive dashes anywhere
Tip
If you have multiple search services, it helps to include the region (or location) in the service name as a naming convention. A name like mysearchservice-westus can save you a trip to the properties page when deciding how to combine or attach resources.
Choose a region
Important
Due to high demand, Azure AI Search is currently unavailable for new instances in West Europe. If you don't immediately need semantic ranker or skillsets, choose Sweden Central because it has the most data center capacity. Otherwise, North Europe is another option.
Azure AI Search is available in most regions, as listed in the Products available by region page.
We strongly recommend the following regions because they provide more storage per partition, three to seven times more depending on the tier, at the same billing rate. Extra capacity applies to search services created after April 3, 2024:
| Country | Regions providing extra capacity per partition |
|---|---|
| United States | East US, East US 2, Central US, North Central US, South Central US, West US, West US 2, West US 3, West Central US |
| United Kingdom | UK South, UK West |
| United Arab Emirates | UAE North |
| Switzerland | Switzerland West |
| Sweden | Sweden Central |
| Poland | Poland Central |
| Norway | Norway East |
| Korea | Korea Central, Korea South |
| Japan | Japan East, Japan West |
| Italy | Italy North |
| India | Central India, Jio India West |
| France | France Central |
| Europe | North Europe |
| Canada | Canada Central, Canada East |
| Bazil | Brazil South |
| Asia Pacific | East Asia, Southeast Asia |
| Australia | Australia East, Australia Southeast |
If you use multiple Azure services, putting all of them in the same region minimizes or voids bandwidth charges. There are no charges for data exchanges among same-region services.
Two notable exceptions might warrant provisioning Azure services in separate regions:
Outbound connections from Azure AI Search to Azure Storage. You might want search and storage in different regions if you're enabling a firewall.
Business continuity and disaster recovery (BCDR) requirements dictate creating multiple search services in regional pairs. For example, if you're operating in North America, you might choose East US and West US, or North Central US and South Central US, for each search service.
Some features are subject to regional availability:
- Availability Zones
- Azure roles for data plane operations (Azure public cloud only)
- Semantic ranker, per the Products available by region page.
- AI enrichment requires Azure AI services to be in the same physical region as Azure AI Search. There are just a few regions that don't provide both.
The Products available by region page indicates a common regional presence by showing two stacked check marks. An unavailable combination has a missing check mark. The time piece icon indicates future availability.

Choose a tier
Azure AI Search is offered in multiple pricing tiers: Free, Basic, Standard, or Storage Optimized. Each tier has its own capacity and limits. There are also several features that are tier-dependent.
Basic and Standard are the most common choices for production workloads, but many customers start with the Free service. Among the billable tiers, key differences are partition size and speed, and limits on the number of objects you can create.

Search services created after April 3, 2024 have larger partitions and higher vector quotas.
Remember, a pricing tier can't be changed once the service is created. If you need a higher or lower tier, you should re-create the service.
Create your service
After you've provided the necessary inputs, go ahead and create the service.

Your service is deployed within minutes. You can monitor progress through Azure notifications. Consider pinning the service to your dashboard for easy access in the future.

Configure authentication
Unless you're using the portal, programmatic access to your new service requires that you provide the URL endpoint and an authenticated connection. You can use either or both of these options:
When setting up a programmatic connection, you need the search service endpoint. On the Overview page, locate and copy the URL endpoint on the right side of the page.

To set authentication options, use the Keys page. Most quickstarts and tutorials use API keys for simplicity, but if you're setting up a service for production workloads, consider using Azure roles. You can copy keys from this page.


An endpoint and key aren't needed for portal-based tasks. The portal is already linked to your Azure AI Search resource with admin rights. For a portal walkthrough, start with Quickstart: Create an Azure AI Search index in the portal.
Scale your service
After a search service is provisioned, you can scale it to meet your needs. On a billable tier, you can scale the service in two dimensions: replicas and partitions. For the free service, scale up isn't available and replica and partition configuration isn't offered.
Partitions allow your service to store and search through more documents.
Replicas allow your service to handle a higher load of search queries.
Adding resources increases your monthly bill. The pricing calculator can help you understand the billing ramifications of adding resources. Remember that you can adjust resources based on load. For example, you might increase resources to create a full initial index, and then reduce resources later to a level more appropriate for incremental indexing.
Important
A service must have 2 replicas for read-only SLA and 3 replicas for read/write SLA.
- Go to your search service page in the Azure portal.
- In the left-navigation pane, select Settings > Scale.
- Use the slidebar to add resources of either type.

When to add a second service
Most customers use just one service provisioned at a tier sufficient for expected load. One service can host multiple indexes, subject to the maximum limits of the tier you select, with each index isolated from another. In Azure AI Search, requests can only be directed to one index, minimizing the chance of accidental or intentional data retrieval from other indexes in the same service.
Although most customers use just one service, service redundancy might be necessary if operational requirements include the following:
Business continuity and disaster recovery (BCDR). Azure AI Search doesn't provide instant failover if there's an outage.
Multitenant architectures sometimes call for two or more services.
Globally deployed applications might require search services in each geography to minimize latency.
Note
In Azure AI Search, you cannot segregate indexing and querying operations; thus, you would never create multiple services for segregated workloads. An index is always queried on the service in which it was created (you cannot create an index in one service and copy it to another).
A second service isn't required for high availability. High availability for queries is achieved when you use 2 or more replicas in the same service. Replica updates are sequential, which means at least one is operational when a service update is rolled out. For more information about uptime, see Service Level Agreements.
Add more services to a subscription
Azure AI Search restricts the number of resources you can initially create in a subscription. If you exhaust your maximum limit, file a new support request to add more search services.
Sign in to the Azure portal and find your search service.
On the left-navigation pane, scroll down and select Support and Troubleshooting. This experience is fluid, and the options and prompts might vary slightly depending on your inputs.
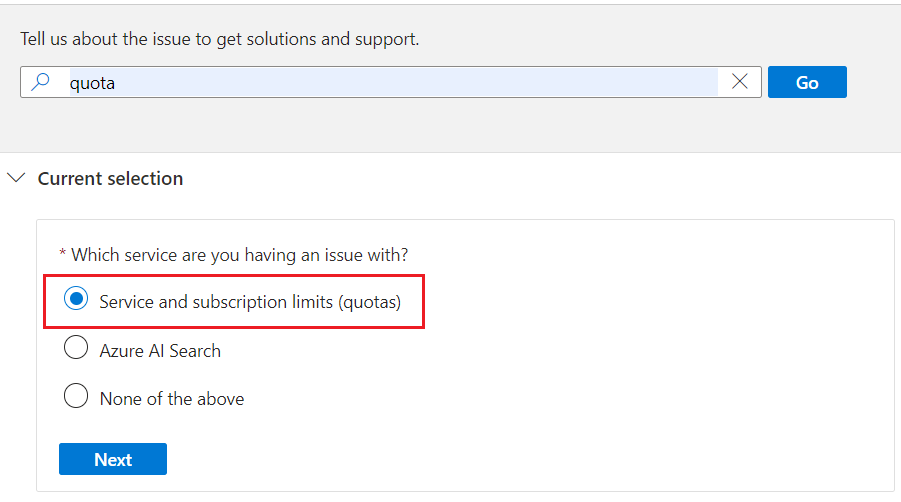
In How can we help?, type quota and then select Go.
You should see Service and subscription limits (quotas) as an option. Select it and then select Next.
Follow the prompts to select the subscription and resource for which you want to increase the limit.
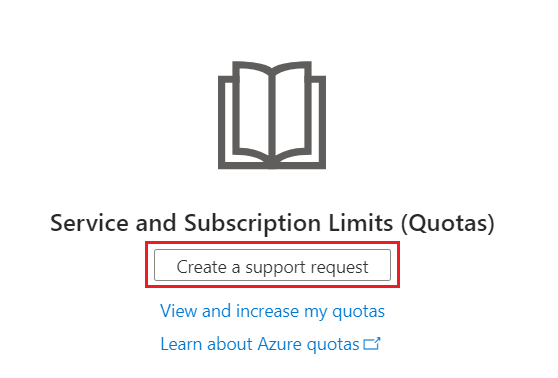
Select Create a support ticket.
Select the subscription and set quota type to Azure AI Search, and then select Next.
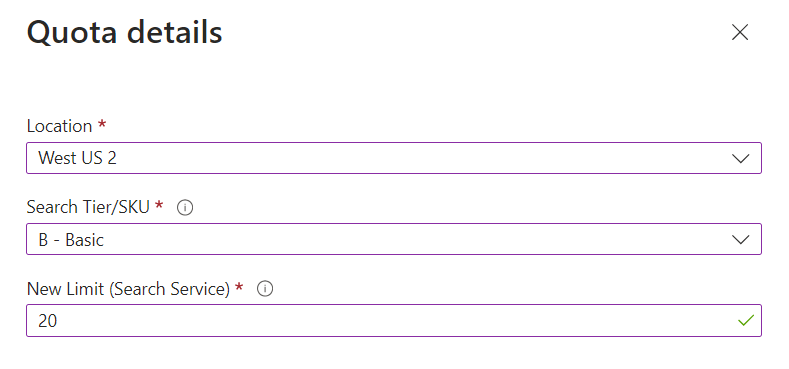
In Problem details, select Enter details.
In Quota details, specify the location, tier, and new quota. None of the values can be empty. Quota must be between 0 to 100, and it should be higher than the current quota. For example, the maximum number of Basic services is 16, so your quota request should be higher than 16.
Select Save and continue.
Provide more information, such as contact information, that's required to file the request, and then select Next.
On Review + create, select Create.
Next steps
After provisioning a service, you can continue in the portal to create your first index.
Want to optimize and save on your cloud spending?
Feedback
Kommer snart: I hele 2024 udfaser vi GitHub-problemer som feedbackmekanisme for indhold og erstatter det med et nyt feedbacksystem. Du kan få flere oplysninger under: https://aka.ms/ContentUserFeedback.
Indsend og få vist feedback om